This post may contain affiliate links. Please read my disclosure policy.
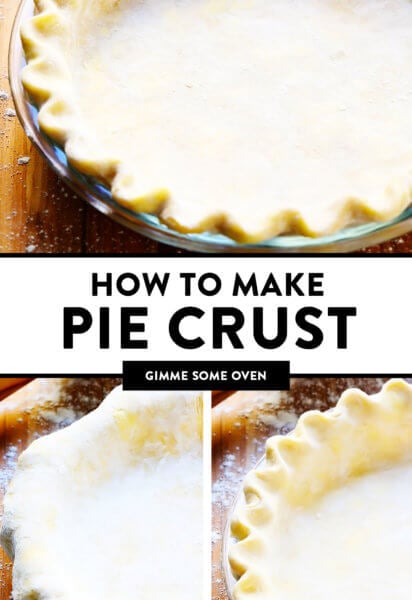
A step-by-step photo tutorial for how to make a pie crust — either 100% by hand or with the help of a food processor — featuring my favorite all-butter homemade pie crust recipe.
I hope that your holiday baking seasons are off to a delicious start! I have two new (naturally-sweetened) pie recipes coming your way later this week that I’m pretty excited about. But before we get to those, I thought it might be helpful to go back to the basics today with a quick refresher on how to make pie crust…
…featuring my go-to, all-butter, perfectly-flaky, easy-to-make, always-delicious homemade pie crust recipe. ♡
As someone who used to be 100% intimidated by the art of making pie crust from scratch, I’m here today to assure you that homemade pie crust is genuinely much simpler than you might think! All you need are 5 easy ingredients to make pie crust — flour, butter, salt, sugar (optional) and ice water — plus about 15 minutes of active prep time if you would like to make this recipe completely by hand. (Or less than 10 if you happen to own a food processor, which makes this recipe even easier.) Then after just a few simple steps, the most delicious, golden, buttery, flaky homemade pie crust will be ready to bake up in no time.
I initially shared this classic pie crust recipe here on the blog six years ago when I was first venturing into the world of pie crust baking. But now, dozens and dozens of pies later, I’m back today with a big update on this post, including some of the best tips and tricks I’ve learned in these past few years of pie baking, plus new step-by-step photos for how to make this recipe either with a food processor or completely by hand. So whether this is your very first time making pie crust or your fiftieth, my hope is that there will be a little something helpful here for everyone today, and that this recipe might make your holiday season all the more delicious and bright.
Alright, grab your rolling pins and let’s make some homemade pie crust!
How to make pie crust by hand with a pastry cutter
How to make pie crust with a food processor
Pie Crust Ingredients:
Alright, before we get to the recipe, let’s start with some ingredient notes. To make this homemade pie crust recipe, you will need these 5 simple ingredients:
All-purpose flour: We’re going classic with regular all-purpose flour here. I highly recommend using a kitchen scale to accurately measure the flour, if you have one. If not, just remember to scoop the flour with a spoon into your measuring cup and level it off with a knife, rather than scooping your measuring cup into the bag of flour itself (to prevent over-packing your measuring cup).
Sugar (optional): I like to add about a tablespoon of sugar to my pie crust recipe for a hint of sweetness. But you are welcome to leave this out if you would like an unsweetened pie crust.
Salt: To bring out the flavor of the pie dough.
Cold unsalted butter: Which we will roughly dice into 1/4-inch cubes, so that the butter can be mixed into the dry ingredients more easily and evenly. Also, you want the butter to be completely chilled when it is added to the recipe. So I recommend adding the butter to the dry ingredient mixture immediately after it has been diced.
Ice water: It’s also important that your ice water be as cold as possible when it is added to the dough. I typically keep a cup of ice water near my baking station all ready to go, then strain the cold water into a measuring cup seconds before adding it to the dough. Some people also like to use a 50/50 mixture of ice water and frozen vodka to ensure that the liquid is as chilled as possible, which you are welcome to do if you would like. (I’ve experimented with both methods over the years, but honestly can’t tell that big of a difference with the vodka trick, so I usually just stick with ice water.)
Pie Crust Equipment:
To make homemade pie crust, you will also need the following tools:
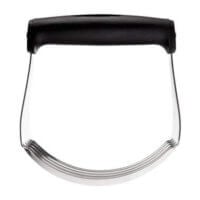
Food processor or pastry cutter or two forks: If you happen to own a food processor, it makes cutting the butter into the flour a breeze. If not, no worries, you can also easily do so by hand with either a pastry cutter or with two forks. (See instructions for all methods below.)
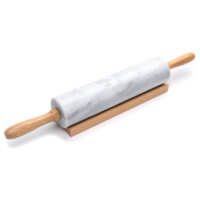
Rolling pin: Either a standard rolling pin (ideally at least 12 inches long) or a flat rolling pin. I find that this marble rolling pin works especially well with this recipe, as the cool marble has the added bonus of keeping the dough nice and chilled while rolling.
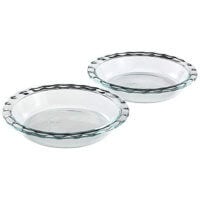
Glass pie plate: I like baking pies in glass pie plates because they conduct heat much more evenly than ceramic or metal pie plates. But that said, any pie plate that you own will do. ♡
Pastry brush (optional): Which you can use to brush the crust with an egg wash before baking, if you would like your crust to be nice and golden.
Kitchen scale (optional): Which I highly recommend to weigh your ingredients (especially the flour) for accurate measuring.
Pie crust shield (optional): Which can help to prevent the edges of your crust from burning in the oven, especially for recipes that require a longer baking time. (Alternately, you can just use a strip of aluminum foil to gently cover the edges of the crust.)
Pie weights or dried beans (for blind baking): Which you will need if your recipe requires that you blind-bake the pie crust, in order to prevent the center of the crust from rising as it bakes. I prefer using pie weights, but a bag of dried uncooked beans will also work as a substitute. You will also need to place a sheet of parchment or foil between the pie crust and the weights, in order to prevent them from sticking. (See instructions below.)
How To Make Pie Crust:
Full detailed steps for how to make pie crust by hand or in a food processor are detailed in the recipe box below. But in a nutshell, you will simply need to…
Mix the dry ingredients. Either whisked together in a mixing bowl, or pulsed together in a food processor.
Cut the butter into the dry ingredients: (This is just baking lingo for mixing cold butter into flour.) You can either do this step by hand using a pastry cutter or two forks, or you can do it in a food processor with a few brief pulses. Cut the butter into the dry ingredients until it forms roughly pea-sized clumps. (It’s ok to see some clumps!)
Add water: While the butter is still nice and cold, use a spatula to quickly mix the ice water into the dough until it is evenly combined and the dough begins to form moist clumps. (If the dough is not sticking together, you can add 1 or 2 more tablespoons of water to help it clump.) Be careful not to overmix the dough during this step of the process; you don’t want to overwork the gluten.
Form a dough ball: Using your hands, quickly pack the dough into a ball (like you’re packing a snowball) and then flatten it into an even disk.
Wrap and chill the dough: Wrap the dough disk tightly in plastic wrap and refrigerate it for at least 1 hour, or up to 3 days. Then it will be ready to use!
Important Pie Crust Tips (Please Read!):
Above all — keep everything as chilled as possible! In order to prevent your pie crust from shrinking and hardening and losing that precious flakiness, it’s super important that you try to keep all of your ingredients as chilled as possible when making pie crust. This includes making sure that you use ice water and fresh-outta-the-fridge chilled butter. And also that you try to avoid letting the ingredients/dough sit out for too long, and that you also avoid working the dough too much with your warm hands. Basically when it comes to pie crust, the chillier you can keep the dough, the better!
Measure your ingredients accurately. As I mentioned above, I super-recommend using a kitchen scale in order to measure your ingredients accurately (especially the flour). It’s easy to accidentally add too much flour if you are scooping it into a measuring cup by hand. And for anyone living outside of the United States, where butter is usually sold in larger blocks instead of sticks, it’s essential to measure your butter accurately too.
Don’t overwork the dough. It’s also important to avoid overworking (over-mixing) the dough, especially during the steps when you are adding in the water, forming the dough into a disk, and eventually, when you are rolling it out on a cutting board.
Don’t skip the resting/chilling times. These are essential parts of this recipe. The gluten in the dough needs time to rest (and/or chill) in between certain steps. Otherwise, the pie crust will shrink once it bakes in the oven.
Don’t stretch the dough. When you reach the process of rolling out and transferring the dough into a pie plate, try to avoid pulling or stretching the dough to create your desired shape. If you have a hole or need to extend the edges on one side, it is better to cut off and press some excess dough into that spot, versus trying to stretch the dough.
Favorite Pie Recipes:
Stay tuned for two new pie recipes coming to the blog later this week! In the meantime, here are a few more of my faves:
My favorite all-butter pie crust recipe — easy to make either 100% by hand or with the help of a food processor. See notes above for more helpful tips. (This recipe makes enough for one standard 9-inch pie crust. Please double the recipe if you need a double crust.)
Ingredients
Scale
1 1/4 cups (150 grams) all-purpose flour
2 teaspoons granulated sugar (optional)
1/2 teaspoon salt
1/2 cup (115 grams) cold unsalted butter*, diced into 1/4-inch cubes
1/4 cup ice water
Instructions
Mix the dry ingredients: Combine the flour, sugar (optional) and salt in a large mixing bowl or a food processor. Whisk or pulse briefly until combined.
Cut the butter into the dry ingredients: Sprinkle the diced butter evenly over the dry ingredient mixture. If working by hand, use a pastry cutter or two forks to cut the butter into the dry ingredients until the butter is evenly dispersed into pea-sized (or smaller) bits. If using a food processor, briefly pulse the butter and dry ingredients together 5 to 7 times until the butter is evenly dispersed into pea-sized (or smaller) bits, then transfer the mixture to a large mixing bowl.
Add water: Sprinkle the dough evenly with the ice water. Use a spatula to quickly mix the water into the dough until it is evenly combined, and the dough begins to form moist clumps. (If the dough is not sticking together, you can add 1 or 2 more tablespoons of water to help it clump.) Try not to overmix the dough.
Form a dough ball: Using your hands, quickly pack the dough into a ball (like you’re packing a snowball). Then flatten the ball into a 3/4-inch thick disk.
Wrap and chill the dough: Wrap the dough disk tightly in plastic wrap, then refrigerate for at least 1 hour, or up to 3 days, until ready to roll out and use.
*Chilled butter: You want the butter to be fresh-out-of-the-fridge chilled (not frozen, not room temperature) when it is added to the dry ingredients.
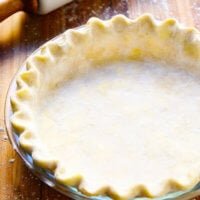
To roll out the dough: Once the dough has chilled for at least an hour, transfer the dough to a well-floured work surface and let it rest for 10-15 minutes. Unwrap and lightly dust the top of the dough and the rolling pin with flour. Then gently roll the dough into a circle that is at least 12 inches in diameter and about 1/8 inch thick (the perfect size for a 9-inch pie plate). Carefully transfer dough to the pie plate, and gently press the dough into the sides of the plate without stretching it. Use kitchen shears or a knife to trim off any excess pastry, leaving about a 1-inch border of crust around the top of the pie plate. Carefully lift and fold the outer 1/2-inch edges of the crust back under itself, pinching the crust gently to sculpt an upstanding ridge. Use your fingers to crimp the dough (see photo) to form a scalloped edge, or create whatever other decorative crust design you prefer. Chill pie crust for at least 15 minutes before continuing with your recipe.
To blind-bake the crust: If your recipe calls for a blind-baked (pre-baked) crust, use a fork to poke a few series of holes in the bottom of the chilled crust. Then use parchment paper or aluminum foil to line the inside of the crust, shaping it gently around the inner edges to form a mold of the crust. Fill the bottom of the crust with pie weights or dried beans. Then bake immediately at 400°F for 15 minutes. Remove the pan from the oven, and carefully lift out the foil/parchment and weights and set them aside. If the bottom of the crust has started to bubble up, poke it with the fork a few more times. Return the crust to the oven for 10-12 minutes for a partially baked pre-baked pie shell (it should be lightly browned), or 15-17 minutes for a fully pre-baked pie shell (it should be a deep golden brown).
For an extra golden or sugary crust: Use a pastry brush an egg wash (an egg whisked together with a splash or milk or water) on the surface of the crust before baking. Sprinkle with a little sugar, too, if desired.
Recipe update: Recipe has been updated slightly in November 2019 to include instructions for how to make a pie crust by hand. I also now recommend mixing the ice water into the dough by hand, versus doing that step in the food processor, as it is easy to accidentally over-mix the water using a food processor.
Awesome tutorial on making pie crust, Ali!!! So detailed and really great photos! I love making pies so I can’t wait to see all the pies you created this week!!!
Beautiful DIY tutorial and so very thorough, Ali! I have used iced water, chilled vodka and apple cider vinegar. It all depends on what you feel like rolling with, literally. Love this and pinning everywhere. You ROCK! xo
Thank you for this. I’ve baked pies successfully, though not a whole bunch, mostly because of sheer laziness or fear. I do enjoy using the food processor, and either using a silpat or rolling the dough between layers of plastic wrap. I’m pinning this on my pie crust board, because I can use all the help I can get. Great tutorial!
This is such a fantastic post and will be so useful for all the holiday bakers. I’ve done pie crust just about every possible way and the food processor is my method of choice as well. So quick and easy and the end result is always perfect!
I have to admit that I buy my pie crusts. :( However, my husband’s favorite is chicken pot pie, and my life goal is to make him one completely from scratch. I know, such high ambitions, right? Ha!
Thank you thank you THANK YOU! I have never ever made a pie before. They weren’t popular in our home growing up either and I just never learned. I cannot wait for the rest of your posts! I think it’s time for me to finally bake a pie.
Wow, what a thorough tutorial – I love this Ali!! Pies are one of my favorite desserts ever, I tend to make more of them in the fall/winter so I guess that’s the one and only reason I’m looking forward to summer ending :)
I happen to agree with you about every step of your preferred method! Right down to the “old-fashioned” method of mixing the ingredients by hand. I think that extra loving touch makes a difference. For being a novice, your crust looks pretty close to perfection! Apparently there is a steeper learning curve in my kitchen!
All about the vodka in the crust. It still makes my favorite standard pie crust.
Thanks for the pie crust tips. I sure can use them!! I will try your recipe & let you know if I’m successful or not. I have trouble when it comes to rolling it ou & transferring the crust into a pie plate.
If I’m not pre-baking my crust, do I still have to prick it before putting my pie filling in it? I always use a pie crust shield to keep the crust from getting too brown. I give the inside of the pie crust shield a light misting of cooking oil spray, before placing it on the crust, to keep it from sticking to the crust. I also use a pie moat with all my fruit pies in case of leaks–keeps the oven clean.
Wow! We used this pie crust at Thanksgiving and it is now my go-to pie crust. We are a dry household, but the crust was beautiful without the vodka. Absolutely stunning. Thanks!!
Thank you so much for this tutorial! As a beginner to pie crusts, I don’t have a food processor, and was trying to blend the dough by hand with a pastry cutter. My last dough was wet on the outside and dry on the inside. Using my stand mixer (and your recipe!) worked perfectly. By far my best pie crust yet.
You’re plethora of good tips for pie crust. I truly needed to read your blog. I love to bake, but terrible in proper pie crust techniques. I love the way you break it down giving various options. Today, I am trying my hand making the pie crust. Thank you….
I just tried it and it was wonderful to make. Can’t wait to taste it once the pie is baked. Always had a difficult time making pie crusts however not anymore! Thanks thanks thanks
Ali, I can’t thank you enough for your clear and detailed instructions on how to make a butter pie crust! I have lived in the US for 50 years, fell in love with Thanksgiving and pumpkin pie in my first year here and have tried to make a butter pie crust every year since, only to wind up with a shrunken cardboard-like disk each time. Followed all kinds of “easy” directions too! This year I came across gimmesomeoven and was immediately reassured by your own admittance of several failures before you got the hang of butter-pie-crust making. I read everything you wrote about shrinking crusts and how tricky (but tasty!) it is to work with butter. Then I followed your recipe and directions to the letter, including your equipment recommendations. First crust was good but not baked all the way through, which I blamed on my oven. Second crust: VICTORY!!! (I gave that one an extra 2 minutes in my oven.) Flaky, tasty, prebaked crust with an edge that stayed on the rim of the pie pan. Rave comments from my family. And from the dog, who licked up the final crumbs. Thank you, thank you, thank you!
I’m definitely afraid of making pies, but you’ve convinced me to try this year. I hope one of the new pie recipes is that vegan pumpkin pie you showed on Instagram. I love pumpkin pie, but I’m allergic to eggs, so I need to find a good vegan version so I can eat some too this year.
Just made this recipe and now I’m noshing on left over baked strips of the pie dough (sprinkled with cinnamon before baking). What a great recipe — so flaky and tasty! Thanks so much.
I need you to know that this recipe turned me into an obsessed pie baker! I was awful at pie crust until something about the way you wrote this recipe made it click for me. Now it comes out pretty much perfectly every time, and I’m never scared during the process. Thank you thank you thank you!
took way more time than my old pie crust recipe, but worth it. you just have to keep this in mind when you are planning on baking. that should be mentioned.


Great post! I loved seeing all of your Instagram photos of pie! They all looked amazing! Wish I could have baked and watched FNL with you:)
Such a great post! THNAK YOU! I always, always have a hard time with pie crust and I cannot wait to use this come thanksgiving!
Awesome tutorial on making pie crust, Ali!!! So detailed and really great photos! I love making pies so I can’t wait to see all the pies you created this week!!!
Beautiful DIY tutorial and so very thorough, Ali! I have used iced water, chilled vodka and apple cider vinegar. It all depends on what you feel like rolling with, literally. Love this and pinning everywhere. You ROCK! xo
Great post! This one is getting bookmarked! I am not the best baker and the helpful tips are wonderful to know!! And loads of pictures!! Thank you!!
Thank you for this. I’ve baked pies successfully, though not a whole bunch, mostly because of sheer laziness or fear. I do enjoy using the food processor, and either using a silpat or rolling the dough between layers of plastic wrap. I’m pinning this on my pie crust board, because I can use all the help I can get. Great tutorial!
Wow! What a thorough tutorial. You anticipated every question that might come up. Pinned it.
HELPFUL :)
This is such a fantastic post and will be so useful for all the holiday bakers. I’ve done pie crust just about every possible way and the food processor is my method of choice as well. So quick and easy and the end result is always perfect!
I know how much work went into this post and I tip my hat to you. But this post is going to help so many people out there!
Such an awesome post! Thank you for putting so much into it. I’ll definitely use it next time I bake up a pie :)
I have to admit that I buy my pie crusts. :( However, my husband’s favorite is chicken pot pie, and my life goal is to make him one completely from scratch. I know, such high ambitions, right? Ha!
Awesome post! And I’m so old school, but I love using the pastry cutter just like my grandma did!
I’m an all-butter pie crust gal. GREAT tutorial!
Love this post Ali! I can never get those ridges perfect but I’m hoping I will now!
Great tutorial, I love an all-butter crust too! Can’t wait to see your beautiful pies, I was drooling when I saw them in my IG feed!
Look at that perfect pie crust! Great tips, Ali. This thing is just begging to be filled with cream and berries, or a luscious lemon curd. Love it!
Vodka in pie crust?!? Nice!!
Thank you thank you THANK YOU! I have never ever made a pie before. They weren’t popular in our home growing up either and I just never learned. I cannot wait for the rest of your posts! I think it’s time for me to finally bake a pie.
This is a great tutorial. I feel the need to make a pie now!! YUM!
Wow, what a thorough tutorial – I love this Ali!! Pies are one of my favorite desserts ever, I tend to make more of them in the fall/winter so I guess that’s the one and only reason I’m looking forward to summer ending :)
Great tips!! You do make a beautiful pie crust!!
That is one beautiful Pie crust! I am 100% intimated of making pie crusts and lattice crusts! I need to work on that! Thanks for the directions!
Love this picture tutorial!! :)
I happen to agree with you about every step of your preferred method! Right down to the “old-fashioned” method of mixing the ingredients by hand. I think that extra loving touch makes a difference. For being a novice, your crust looks pretty close to perfection! Apparently there is a steeper learning curve in my kitchen!
All about the vodka in the crust. It still makes my favorite standard pie crust.
Great post! Pie crusts can be tricky!
This is a wonderful tutorial! Making a pie crust can be daunting at first.
Wow. All your hours of flour and butter surely paid off! Excellent post. I’ll be trying your method, for sure!! ;)
I always use ice cold apple cider vinegar. Makes the flakiest crusts.
great tutorial..u made it so much easy to make… :* thanx
Thanks for the pie crust tips. I sure can use them!! I will try your recipe & let you know if I’m successful or not. I have trouble when it comes to rolling it ou & transferring the crust into a pie plate.
If I’m not pre-baking my crust, do I still have to prick it before putting my pie filling in it? I always use a pie crust shield to keep the crust from getting too brown. I give the inside of the pie crust shield a light misting of cooking oil spray, before placing it on the crust, to keep it from sticking to the crust. I also use a pie moat with all my fruit pies in case of leaks–keeps the oven clean.
This is the best and easiest pie crust I’ve ever made. Thank you!!
Have had success with a few other pic crust recipes, but this one came out the best. TY
Wow! We used this pie crust at Thanksgiving and it is now my go-to pie crust. We are a dry household, but the crust was beautiful without the vodka. Absolutely stunning. Thanks!!
Thank you for including step by step pictures with this recipe. I’m going to give pie crust making a try!
Thank you so much for this tutorial! As a beginner to pie crusts, I don’t have a food processor, and was trying to blend the dough by hand with a pastry cutter. My last dough was wet on the outside and dry on the inside. Using my stand mixer (and your recipe!) worked perfectly. By far my best pie crust yet.
You’re plethora of good tips for pie crust. I truly needed to read your blog. I love to bake, but terrible in proper pie crust techniques. I love the way you break it down giving various options. Today, I am trying my hand making the pie crust. Thank you….
Thanks for all the tips for making a great pie crust. I will be trying some that was mention,because I always use a processor.
I just tried it and it was wonderful to make. Can’t wait to taste it once the pie is baked. Always had a difficult time making pie crusts however not anymore! Thanks thanks thanks
thank u so much but i want to asking you what can use flour instead unbleached flour?
We just used unbleached all purpose flour (you don’t have to get the unbleached kind if you don’t want/can’t find it). We hope you enjoy!
Ali, I can’t thank you enough for your clear and detailed instructions on how to make a butter pie crust! I have lived in the US for 50 years, fell in love with Thanksgiving and pumpkin pie in my first year here and have tried to make a butter pie crust every year since, only to wind up with a shrunken cardboard-like disk each time. Followed all kinds of “easy” directions too! This year I came across gimmesomeoven and was immediately reassured by your own admittance of several failures before you got the hang of butter-pie-crust making. I read everything you wrote about shrinking crusts and how tricky (but tasty!) it is to work with butter. Then I followed your recipe and directions to the letter, including your equipment recommendations. First crust was good but not baked all the way through, which I blamed on my oven. Second crust: VICTORY!!! (I gave that one an extra 2 minutes in my oven.) Flaky, tasty, prebaked crust with an edge that stayed on the rim of the pie pan. Rave comments from my family. And from the dog, who licked up the final crumbs. Thank you, thank you, thank you!
I’m definitely afraid of making pies, but you’ve convinced me to try this year. I hope one of the new pie recipes is that vegan pumpkin pie you showed on Instagram. I love pumpkin pie, but I’m allergic to eggs, so I need to find a good vegan version so I can eat some too this year.
Better yet is to use finely rendered lard, none can compare
Just made this recipe and now I’m noshing on left over baked strips of the pie dough (sprinkled with cinnamon before baking). What a great recipe — so flaky and tasty! Thanks so much.
What makes the pie ingredients get under the crust during baking?
This is my go to pie crust recipe, always delicious. Thanks
I need you to know that this recipe turned me into an obsessed pie baker! I was awful at pie crust until something about the way you wrote this recipe made it click for me. Now it comes out pretty much perfectly every time, and I’m never scared during the process. Thank you thank you thank you!
I’ve never been disappointed with your recipes and I always look for you when searching for a recipe!
took way more time than my old pie crust recipe, but worth it. you just have to keep this in mind when you are planning on baking. that should be mentioned.