How to Carve a Turkey Like a Pro

If you’ve ever found yourself getting ready to cut into a beautifully roasted turkey thinking “mmm… now what?” trust me, you’re not alone. 😅
The good news is that it’s actually pretty simple to carve a turkey once you understand the basic cuts. Just follow the natural joints, work from the outside in, slice against the grain, and your turkey will be carved and ready to enjoy in no time.
I’ve included a step-by-step video and photos below, along with some of the best tips I’ve picked up over my years of turkey carving. So sharpen your knife (a small but important step!) and let’s do this!

How To Carve A Turkey
Detailed instructions are included in the recipe below, but here are the basic steps:
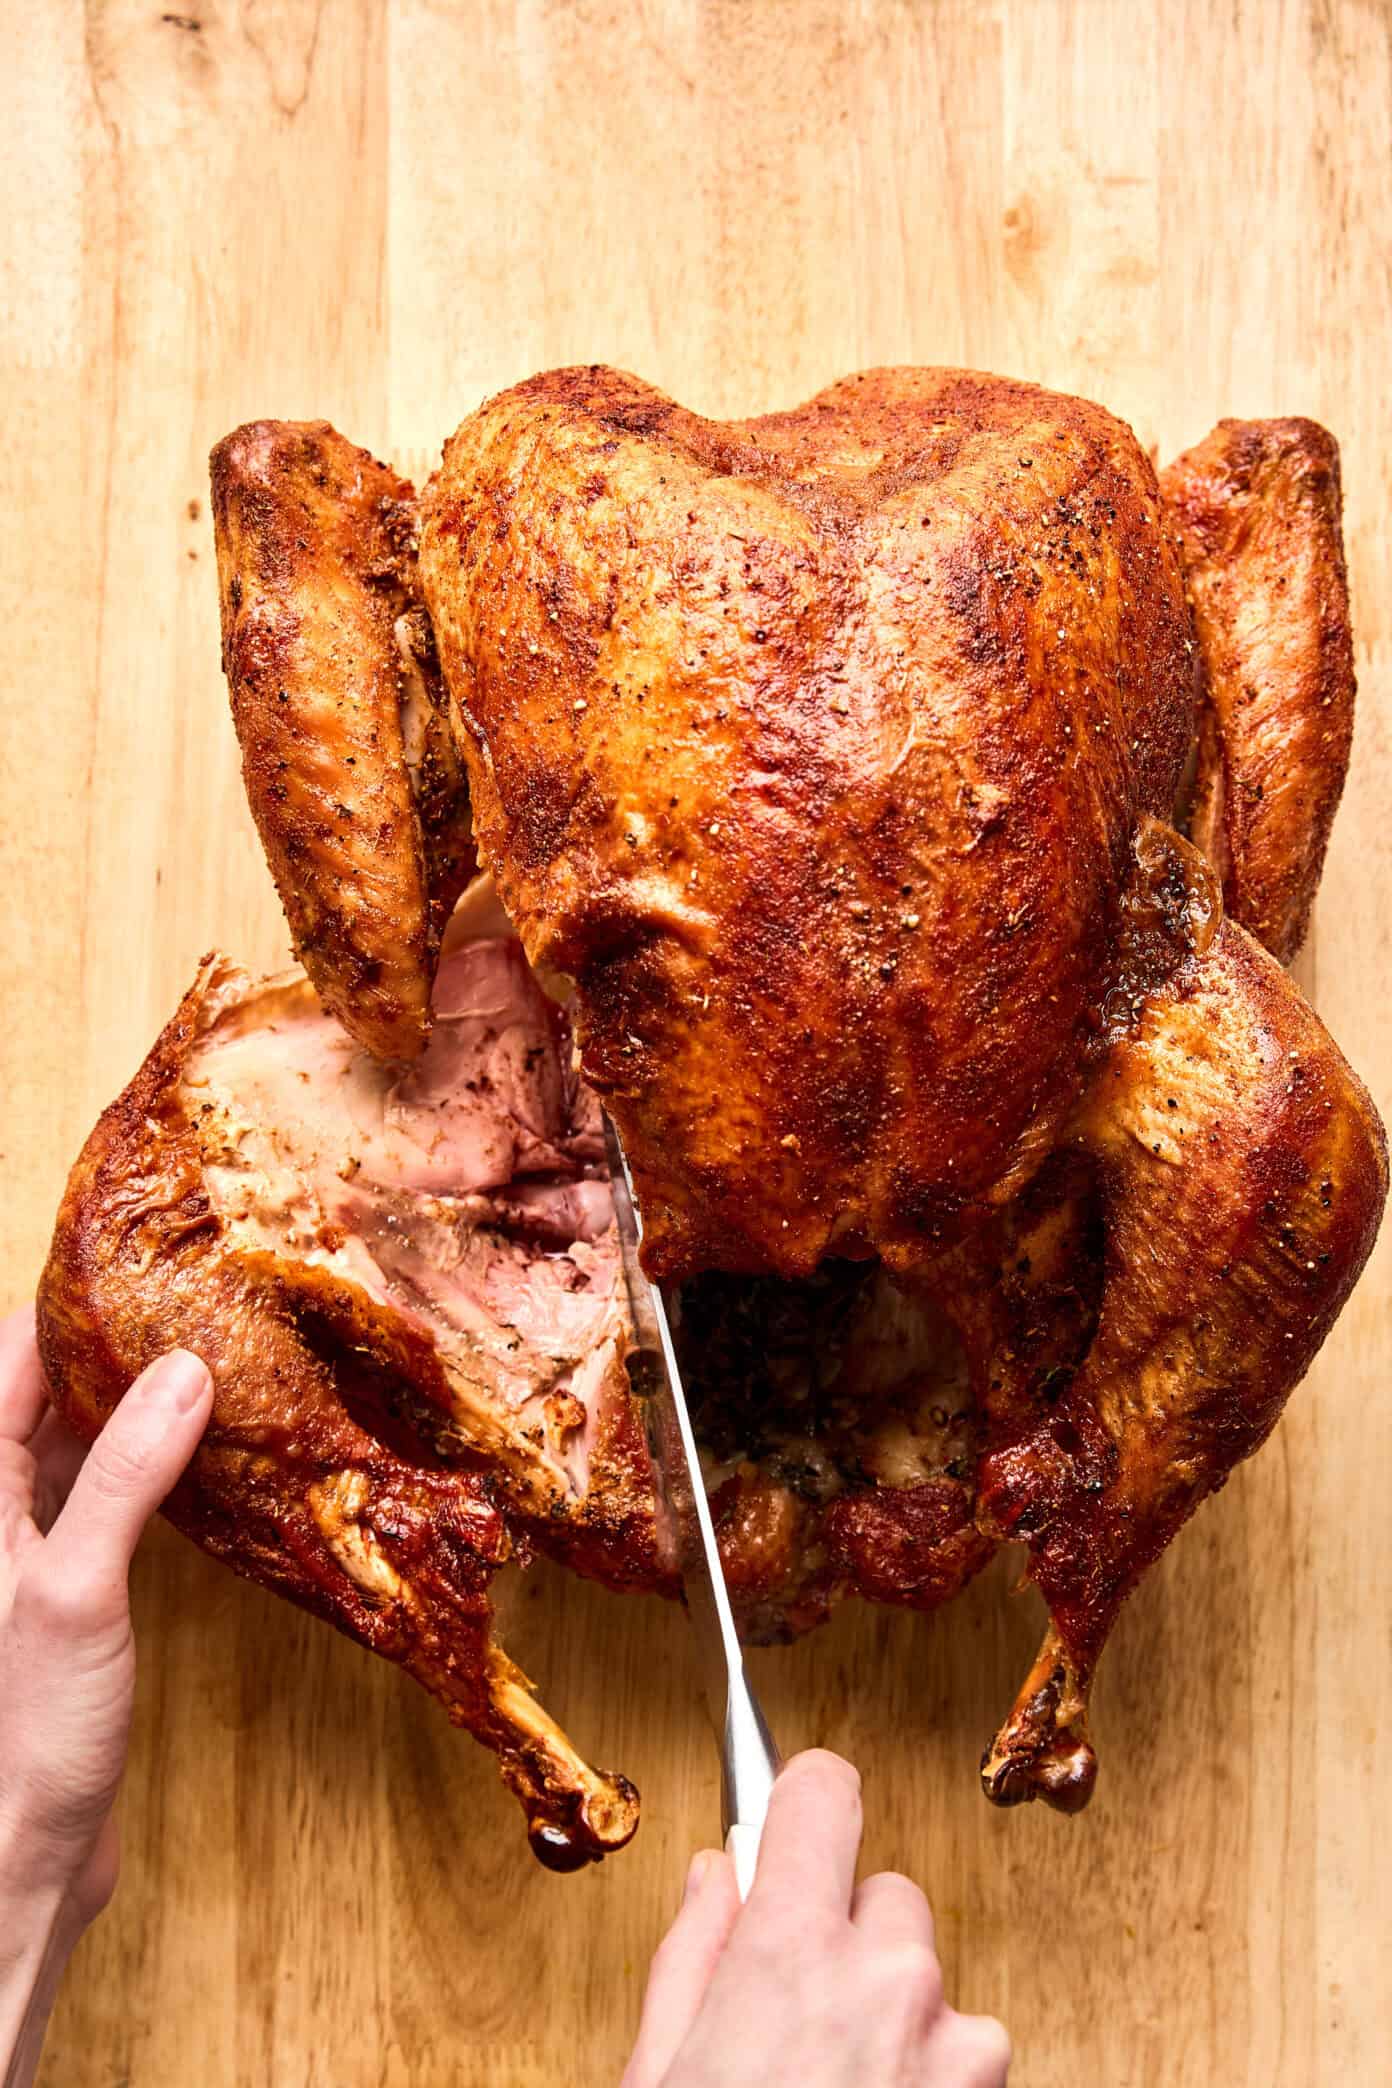
- Remove the legs and thighs: Cut along the natural seam where the leg meets the body, pull the leg outward to expose the joint, and slice through it to remove the leg-and-thigh piece. Repeat on the other side.
- Remove the wings: Pull each wing outward to reveal the joint, then cut through it to detach the wing cleanly. Trim the wing tips if you prefer a neater look.
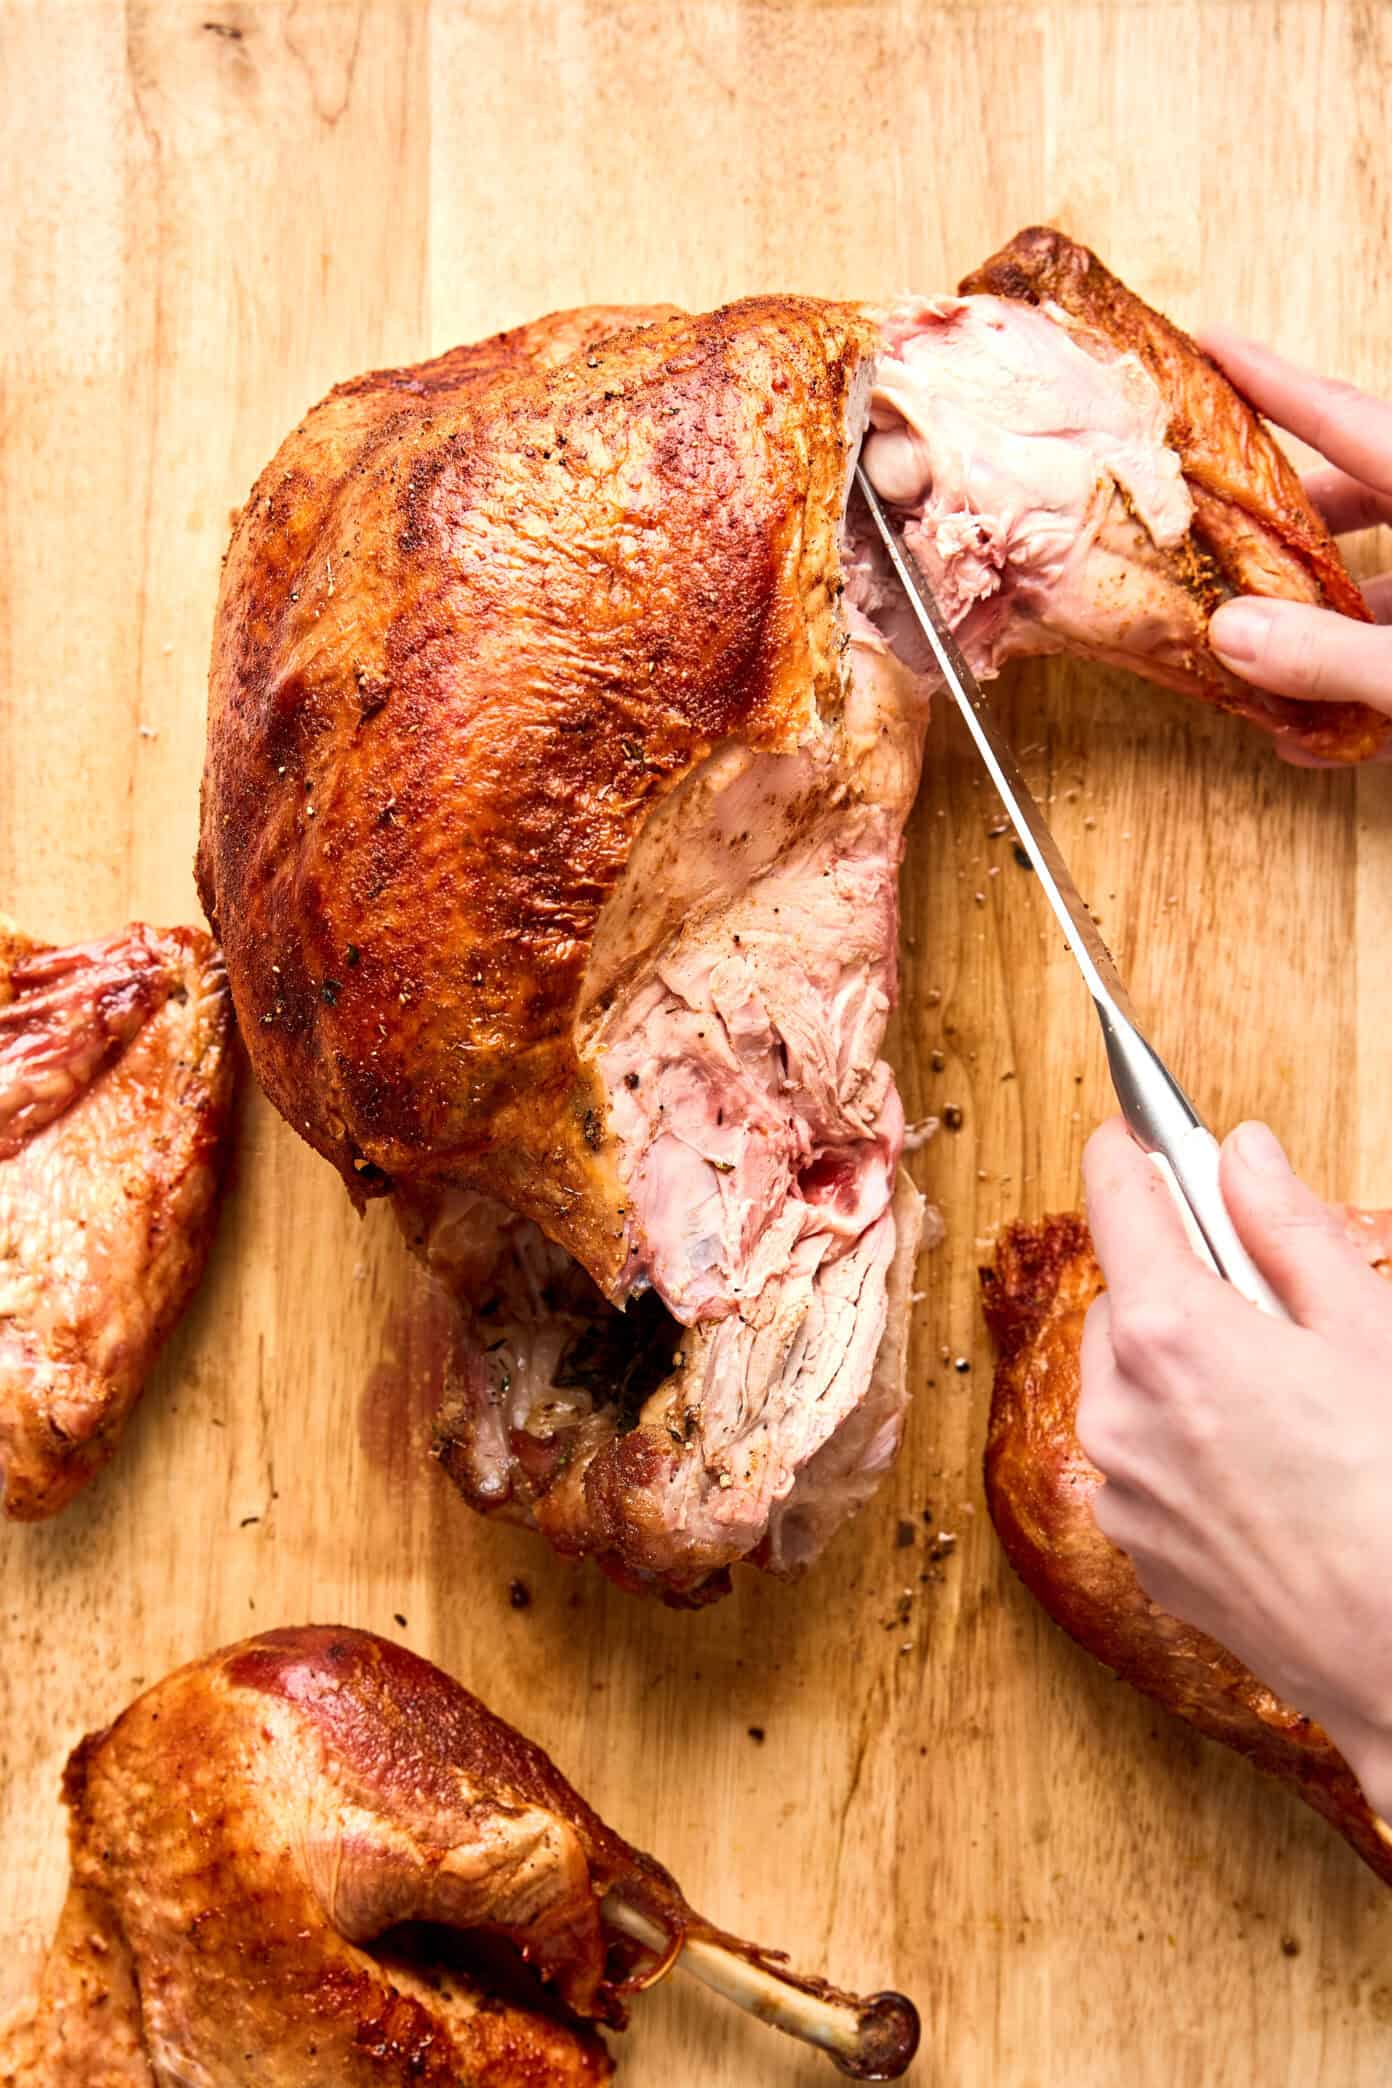
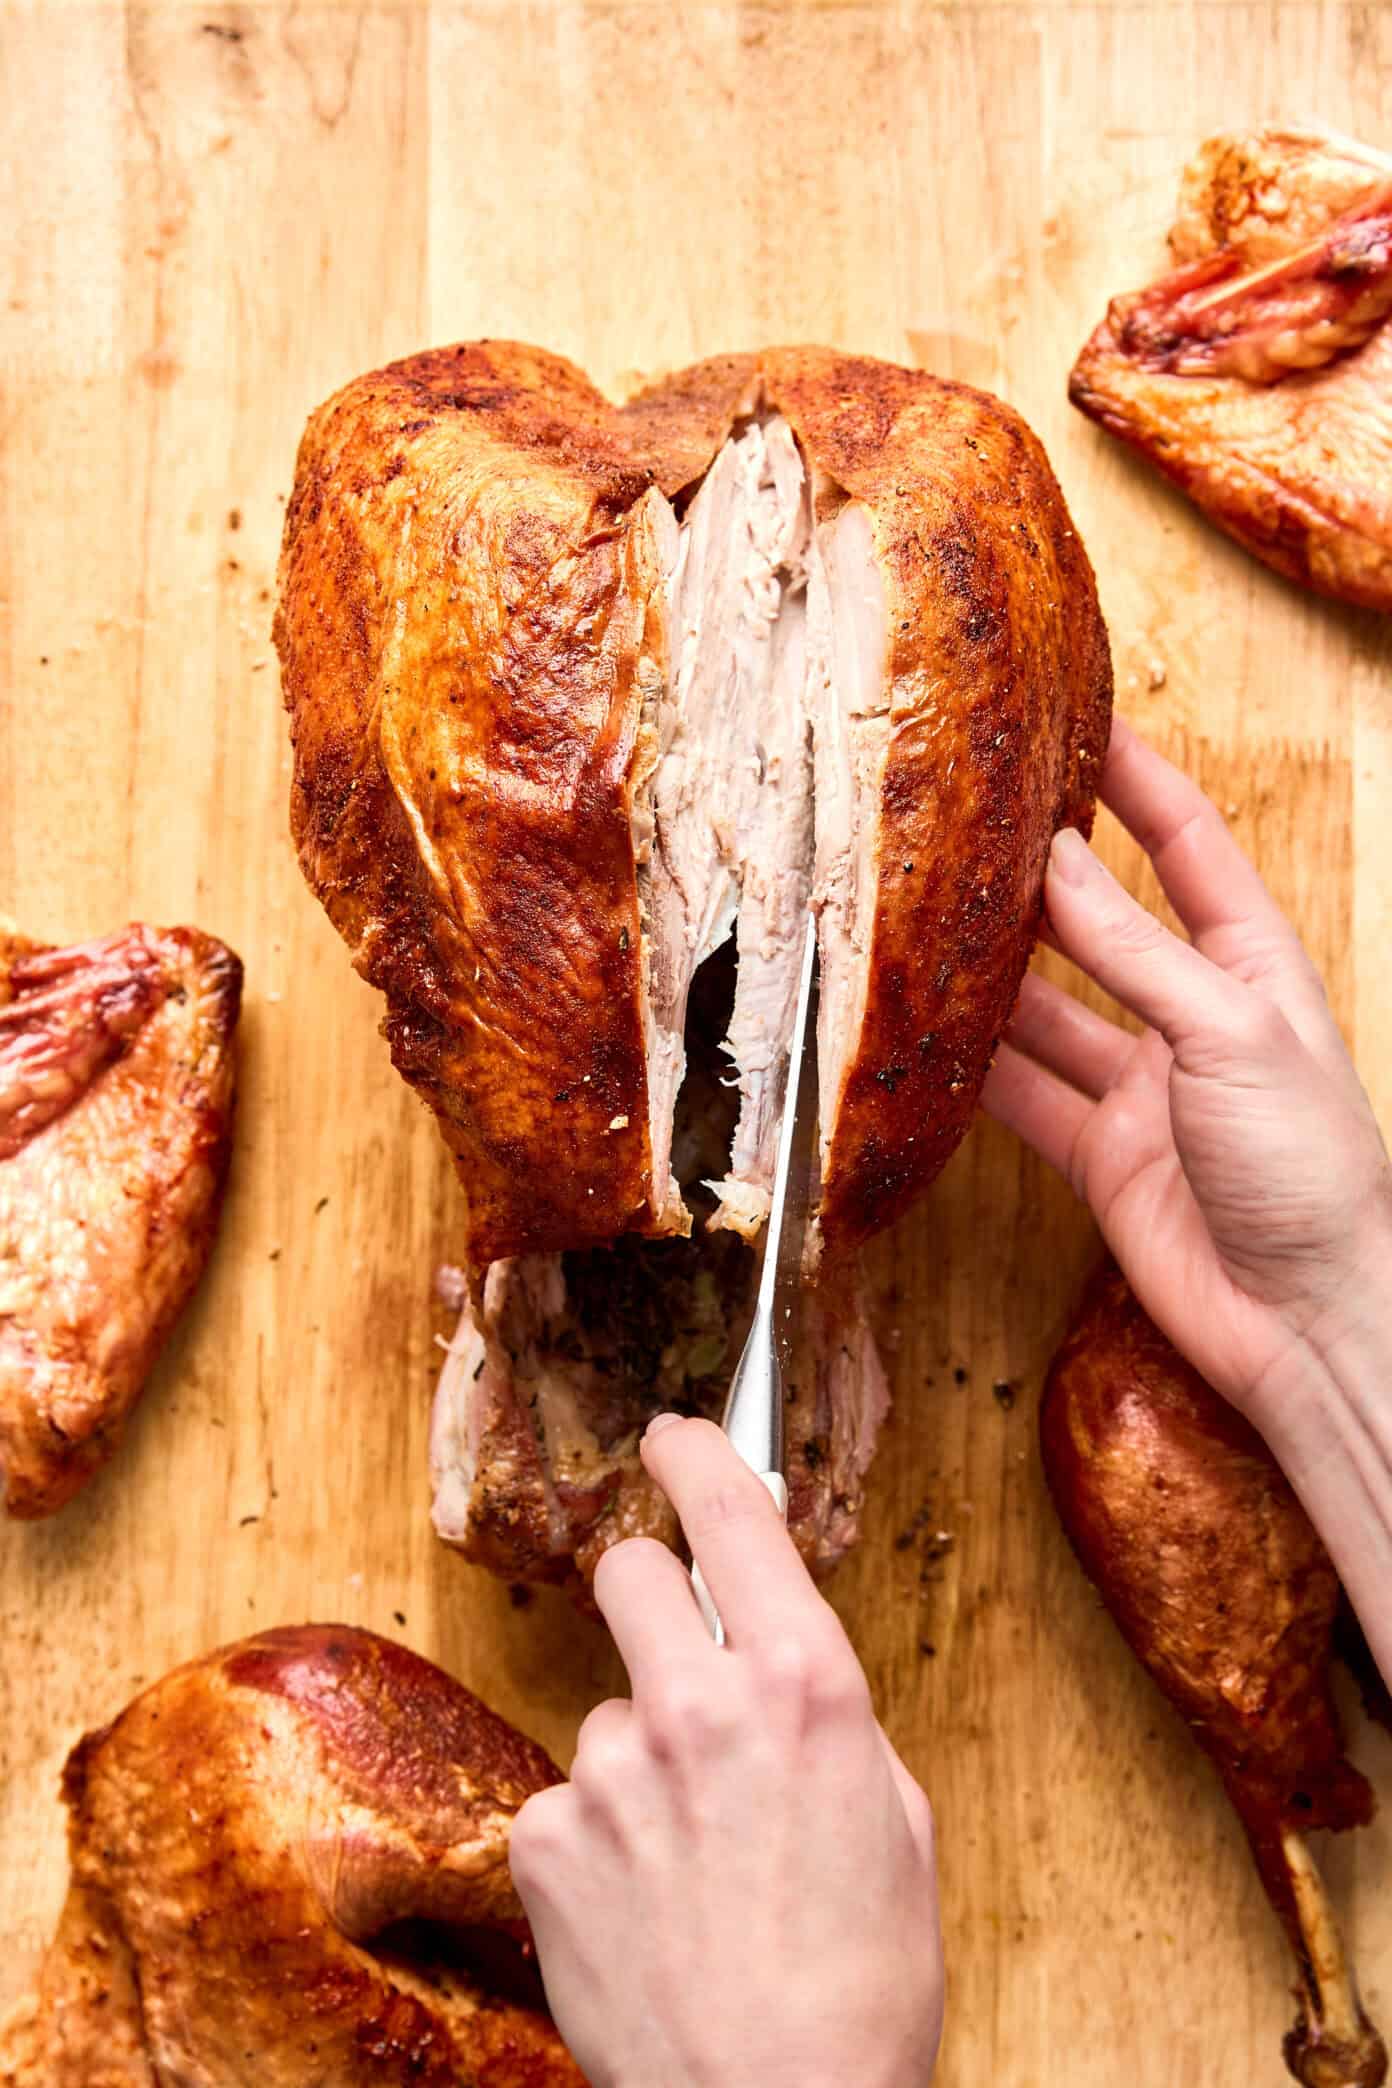
- Remove the breast meat: Slice down one side of the breastbone and follow the rib cage to remove the breast in one large piece. Lay it flat and cut crosswise into even slices; repeat on the other side.
- Separate the thigh from the drumstick: Find the joint connecting the thigh and drumstick and cut through it to separate. Slice the thigh meat parallel to the bone, and serve the drumstick whole or carved.
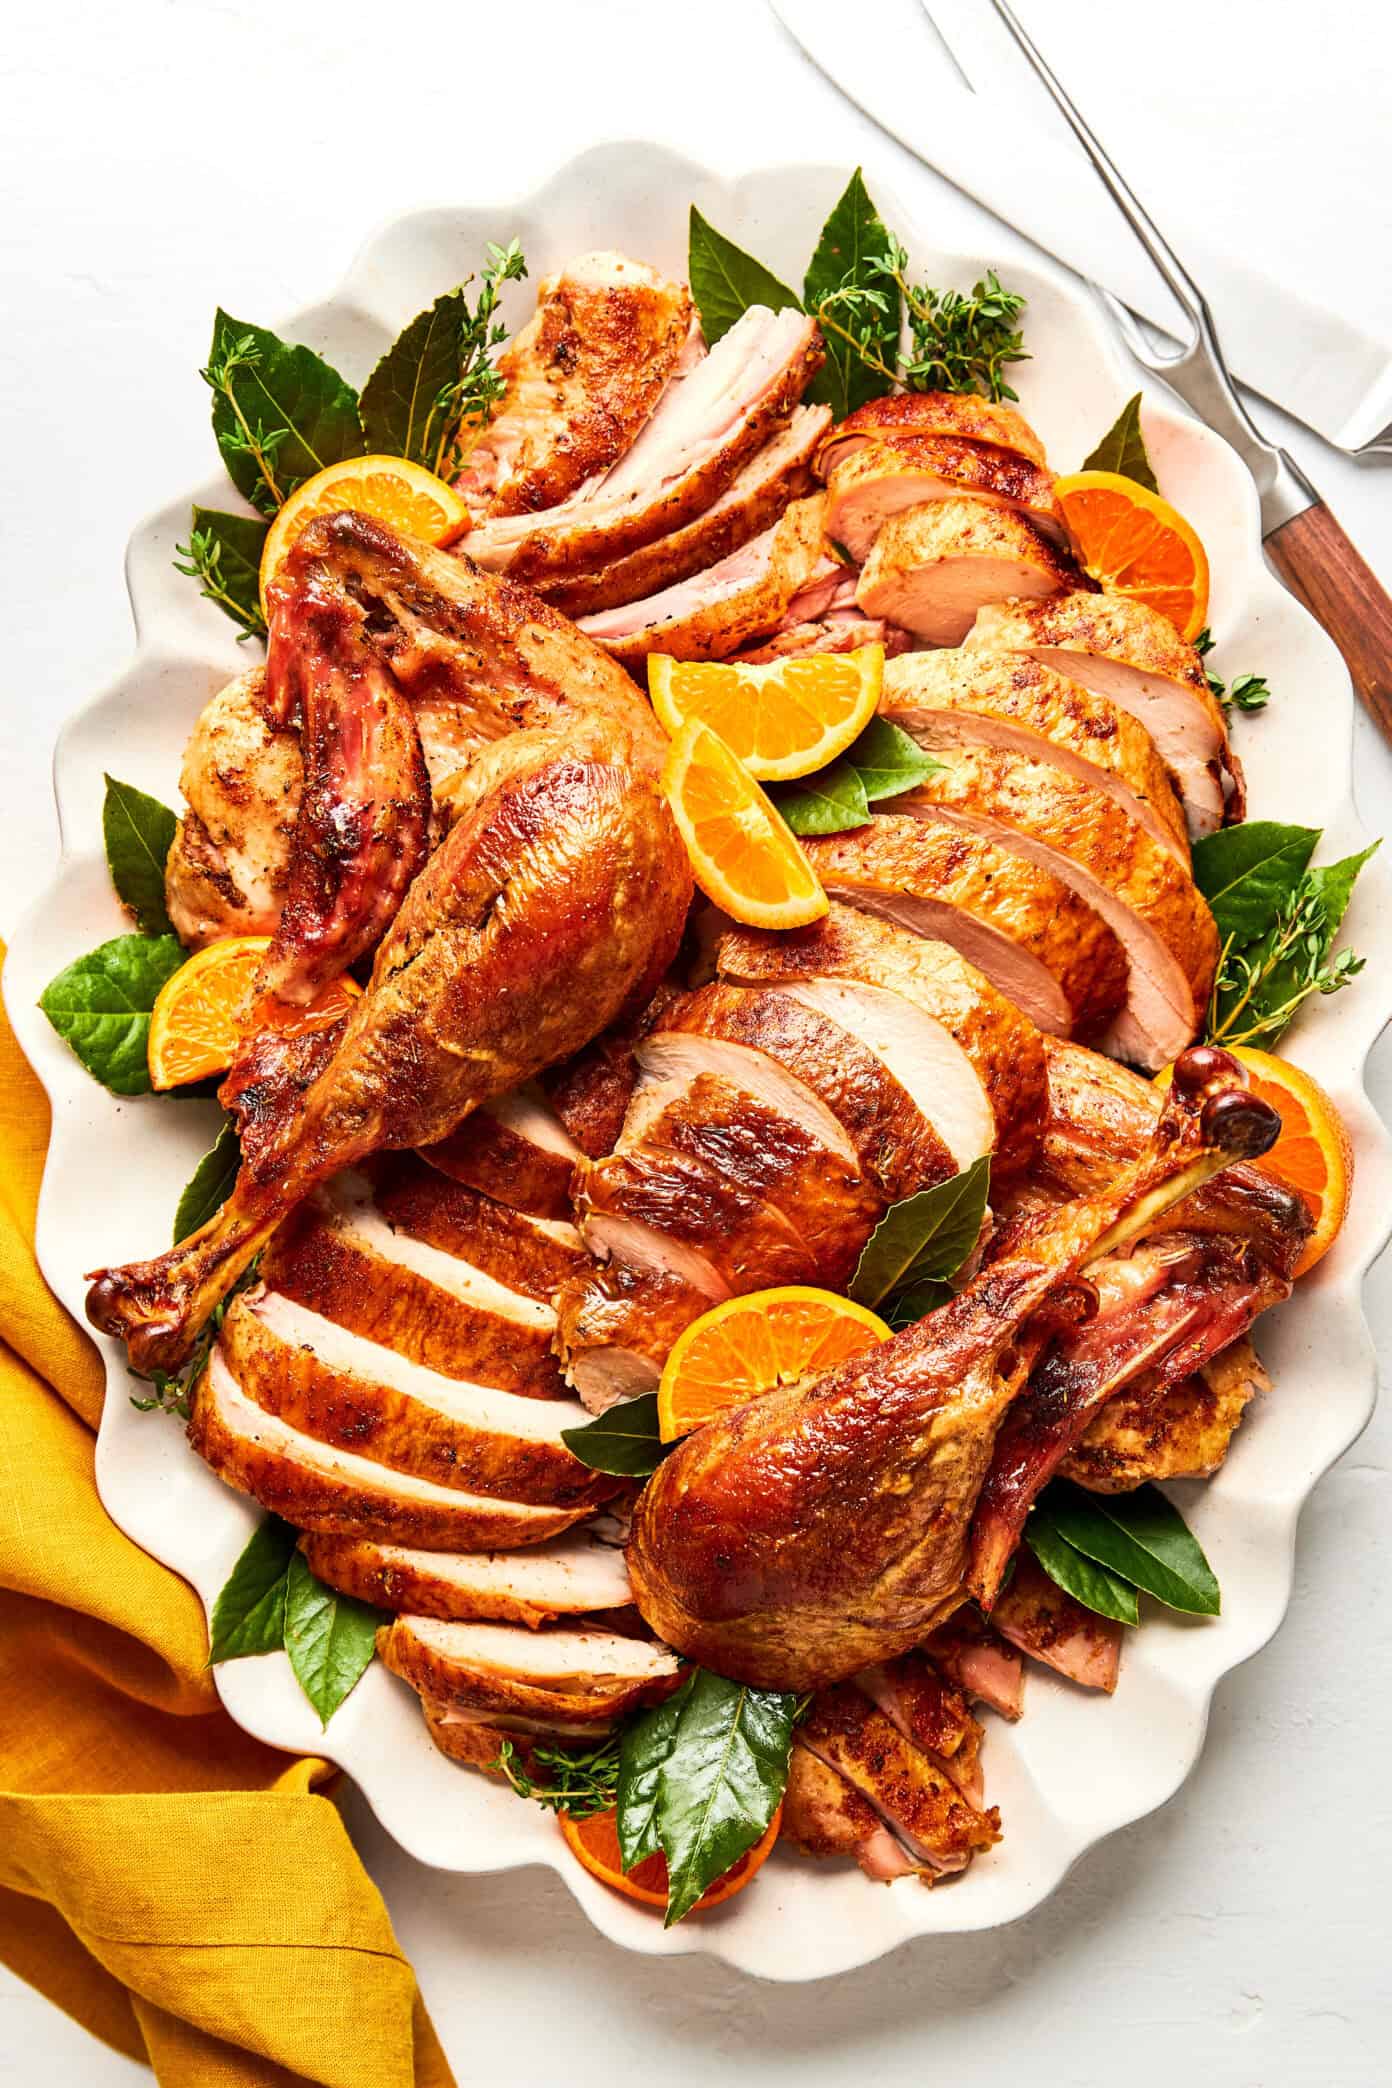
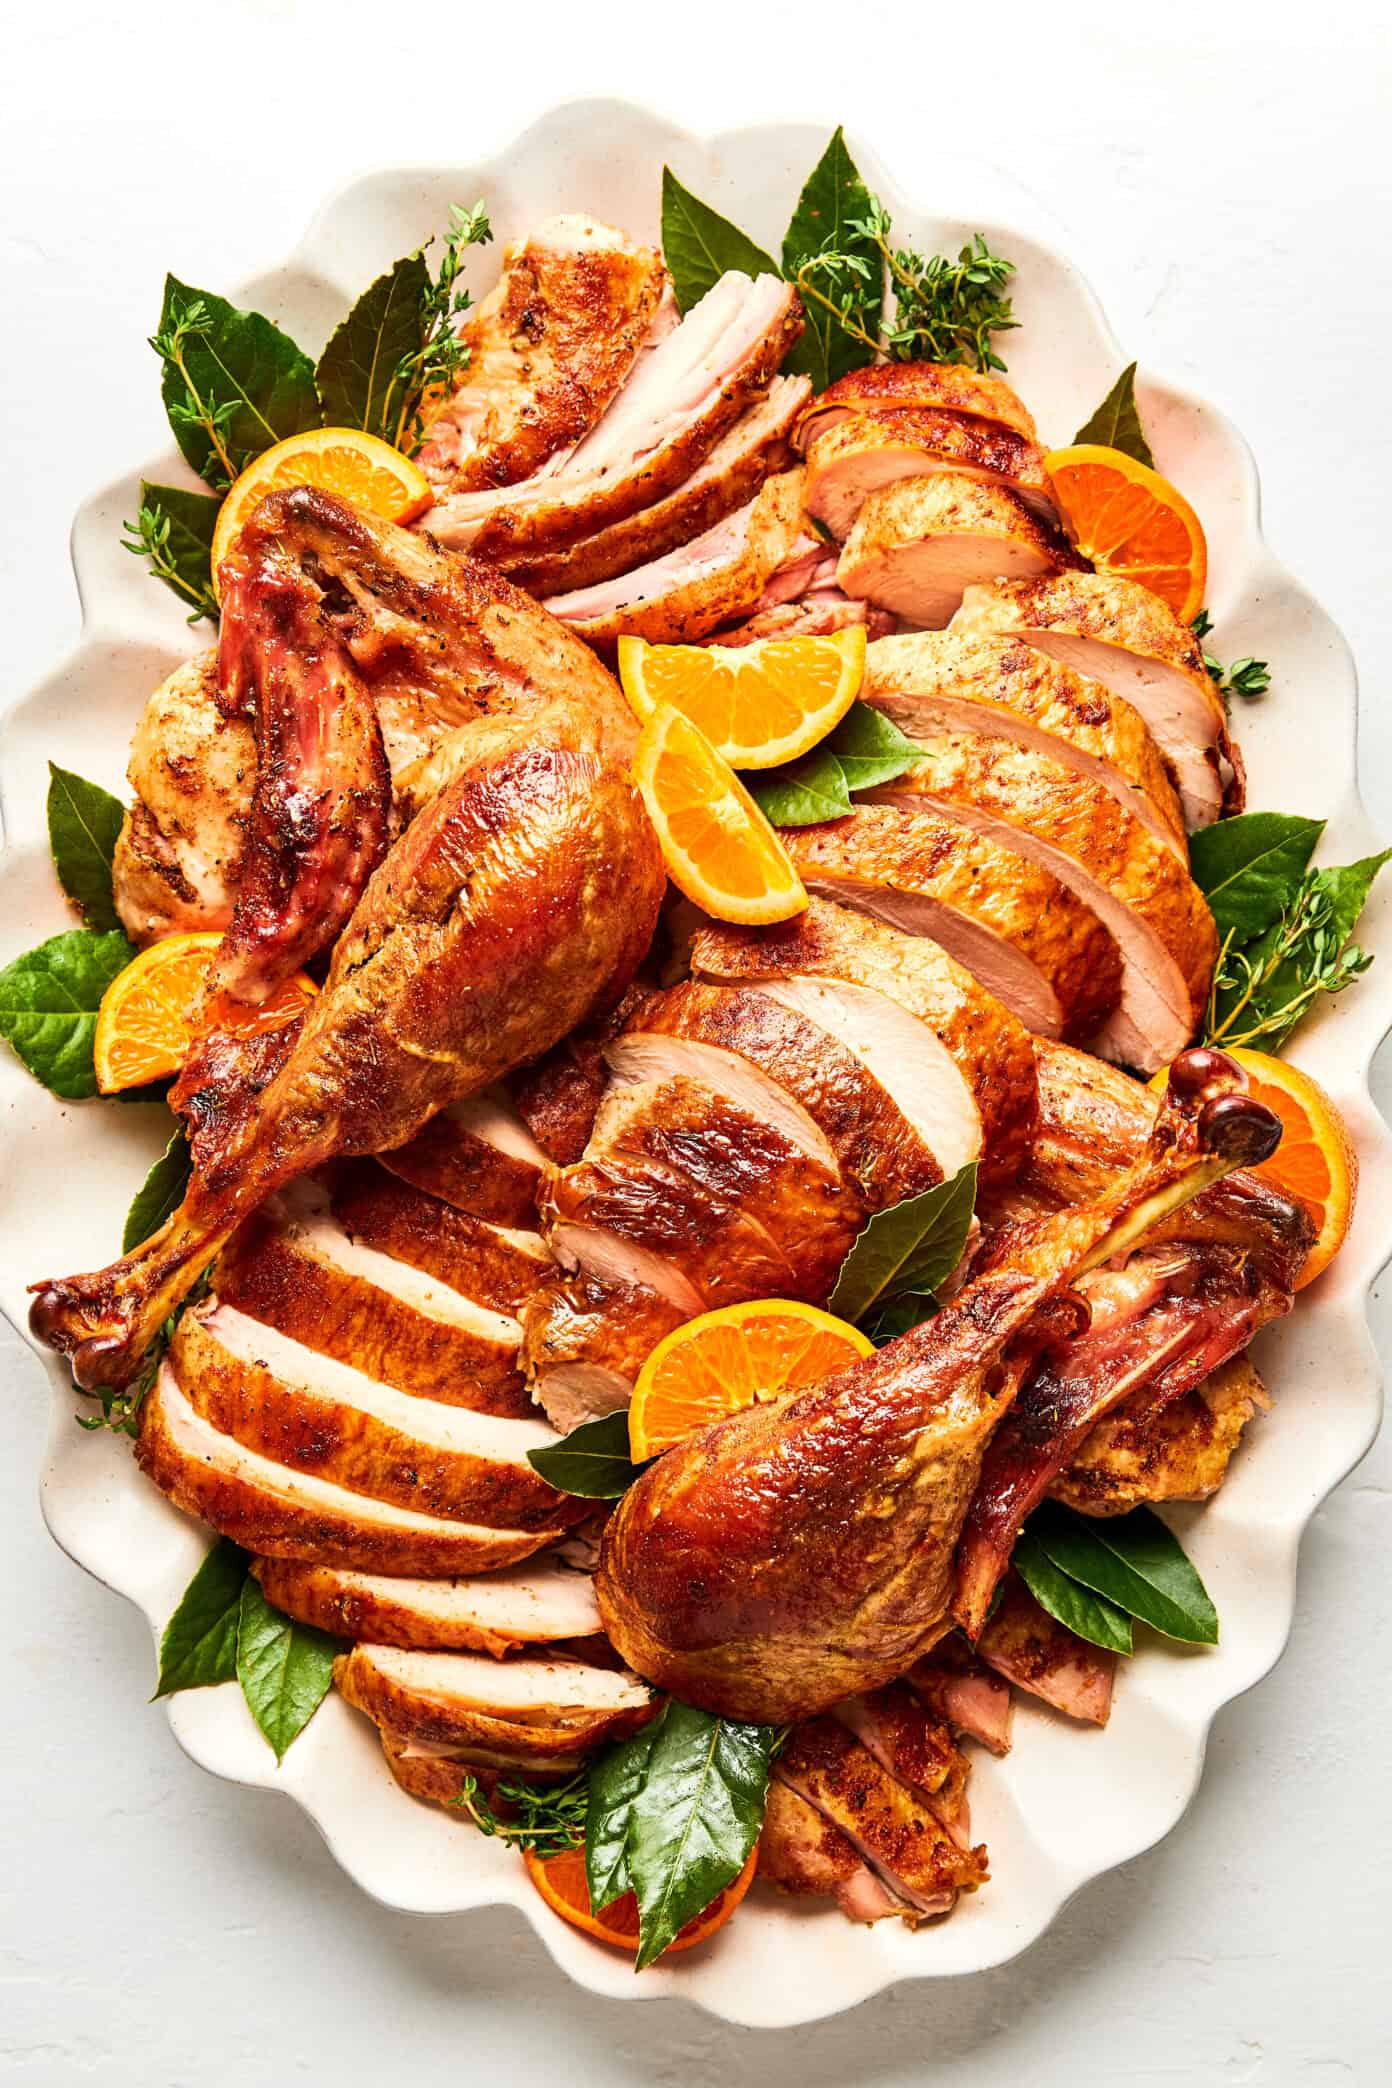
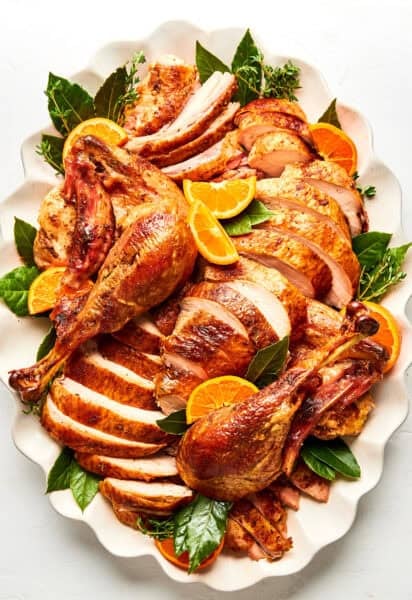
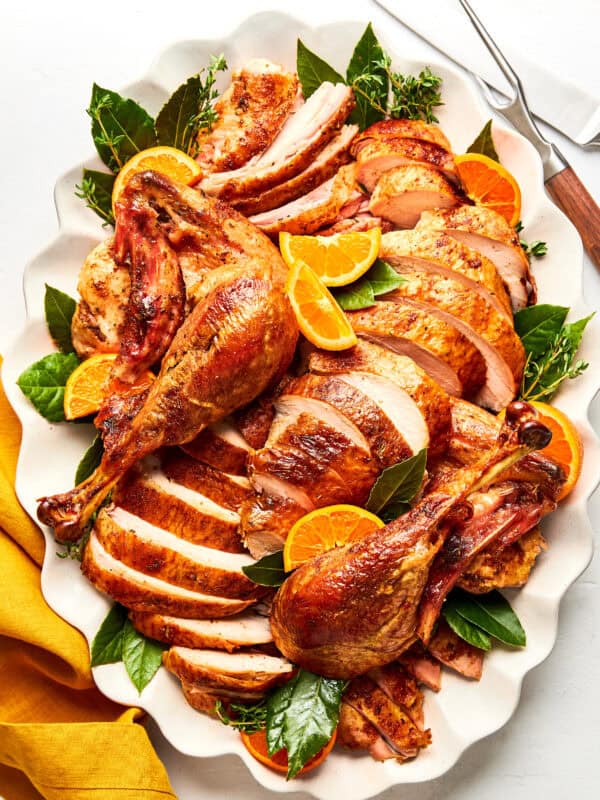
- Arrange on the platter: Layer the sliced breast meat neatly and arrange the thighs, drumsticks, and wings around it. Drizzle with pan juices or gravy and add garnishes if you like.
Tips and Tricks
Here are a few helpful tips to make your turkey-carving experience extra smooth:
- Let the turkey rest. Give it at least 20–30 minutes after roasting so the juices can settle and the meat stays tender when sliced.
- Use a sharp knife. A long carving knife or chef’s knife makes a big difference. Dull blades cause tearing.
- Find the joints — don’t fight the bones. If you feel resistance, adjust slightly. Each major piece separates cleanly at a joint.
- Remove the wishbone first (optional but helpful). It frees up space and makes removing the breast in one piece easier.
- Carve on a sturdy cutting board. Bonus points if it has a groove to catch juices.
- Slice the breast across the grain. This ensures tender slices instead of stringy pieces.
- Arrange strategically on the platter. Place the breast slices in the center, then add thighs, drumsticks, and wings around the edges for a beautiful presentation.
FAQ
Yes, you can carve up to an hour ahead. Just arrange it on a platter, cover with foil, and keep warm with a bit of broth or pan juices.
Make sure the turkey has rested and use long, smooth slicing motions instead of sawing back and forth. Sharp knife = crisp, clean skin.
Save it!! Simmer the bones with veggie scraps to make amazing turkey stock for soups, ramen, or next-day gravy.
Totally! The anatomy is the same, just on a smaller scale.
How To Carve A Turkey
- Prep Time: 15 mins
- Cook Time: 0 mins
- Total Time: 15 mins
- Yield: 1 turkey 1x
Description
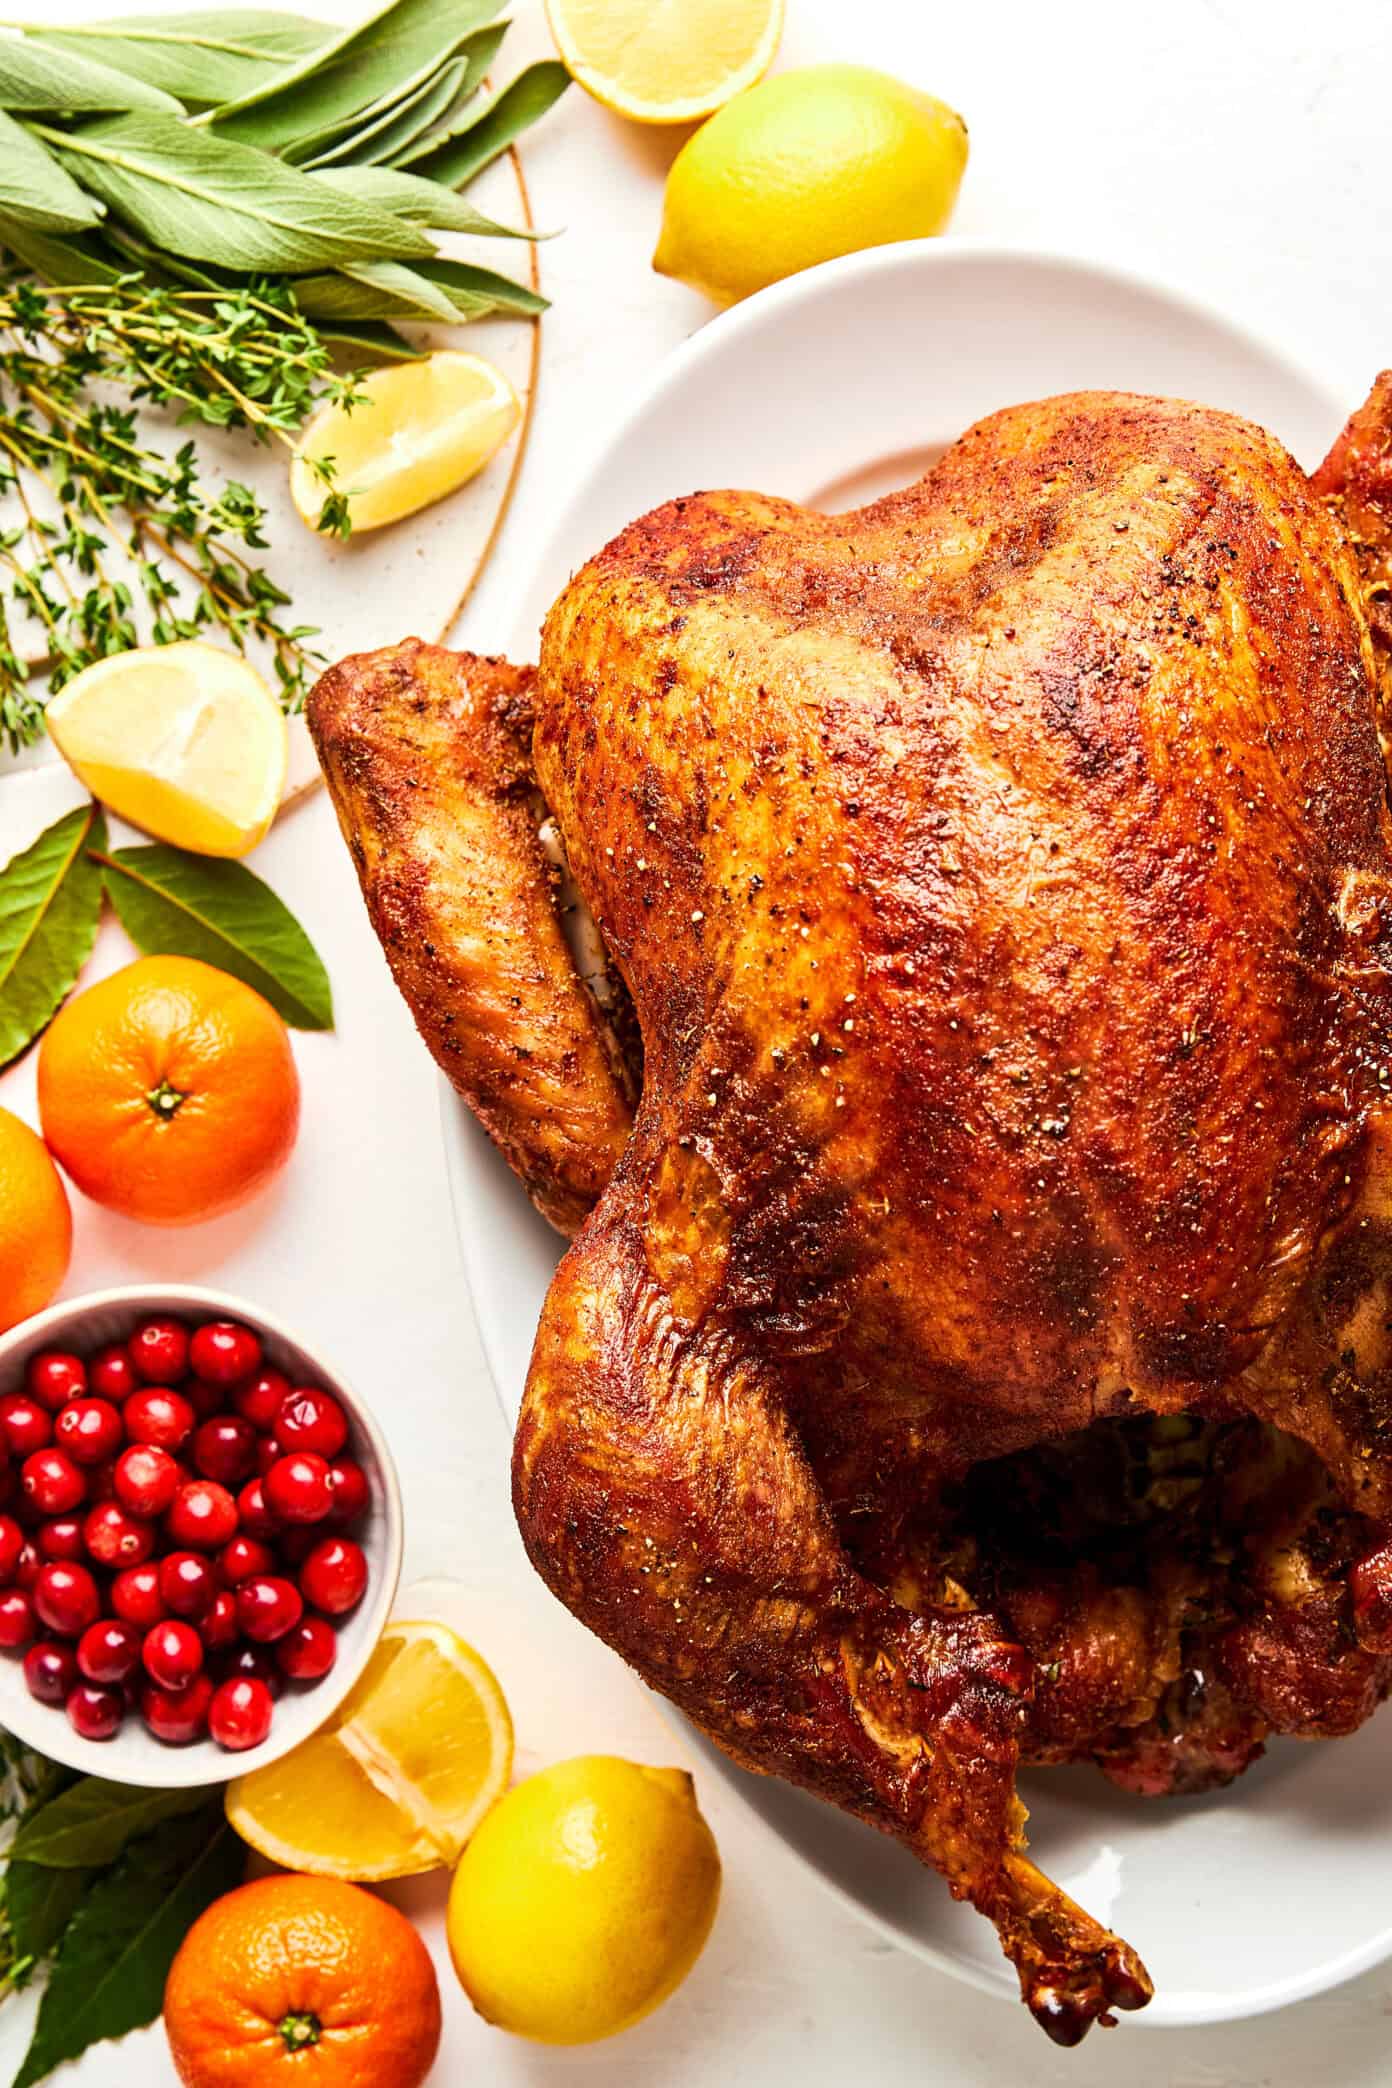
Learn how to carve a turkey step-by-step with this simple guide and video, including the basic cuts, how to slice against the grain, and tips for creating a beautiful serving platter.
Ingredients
- 1 cooked whole turkey
- optional garnishes: fresh herbs (sage, rosemary, thyme, parsley and/or bay leaves), citrus wedges (lemon or oranges), fresh cranberries
Instructions
-
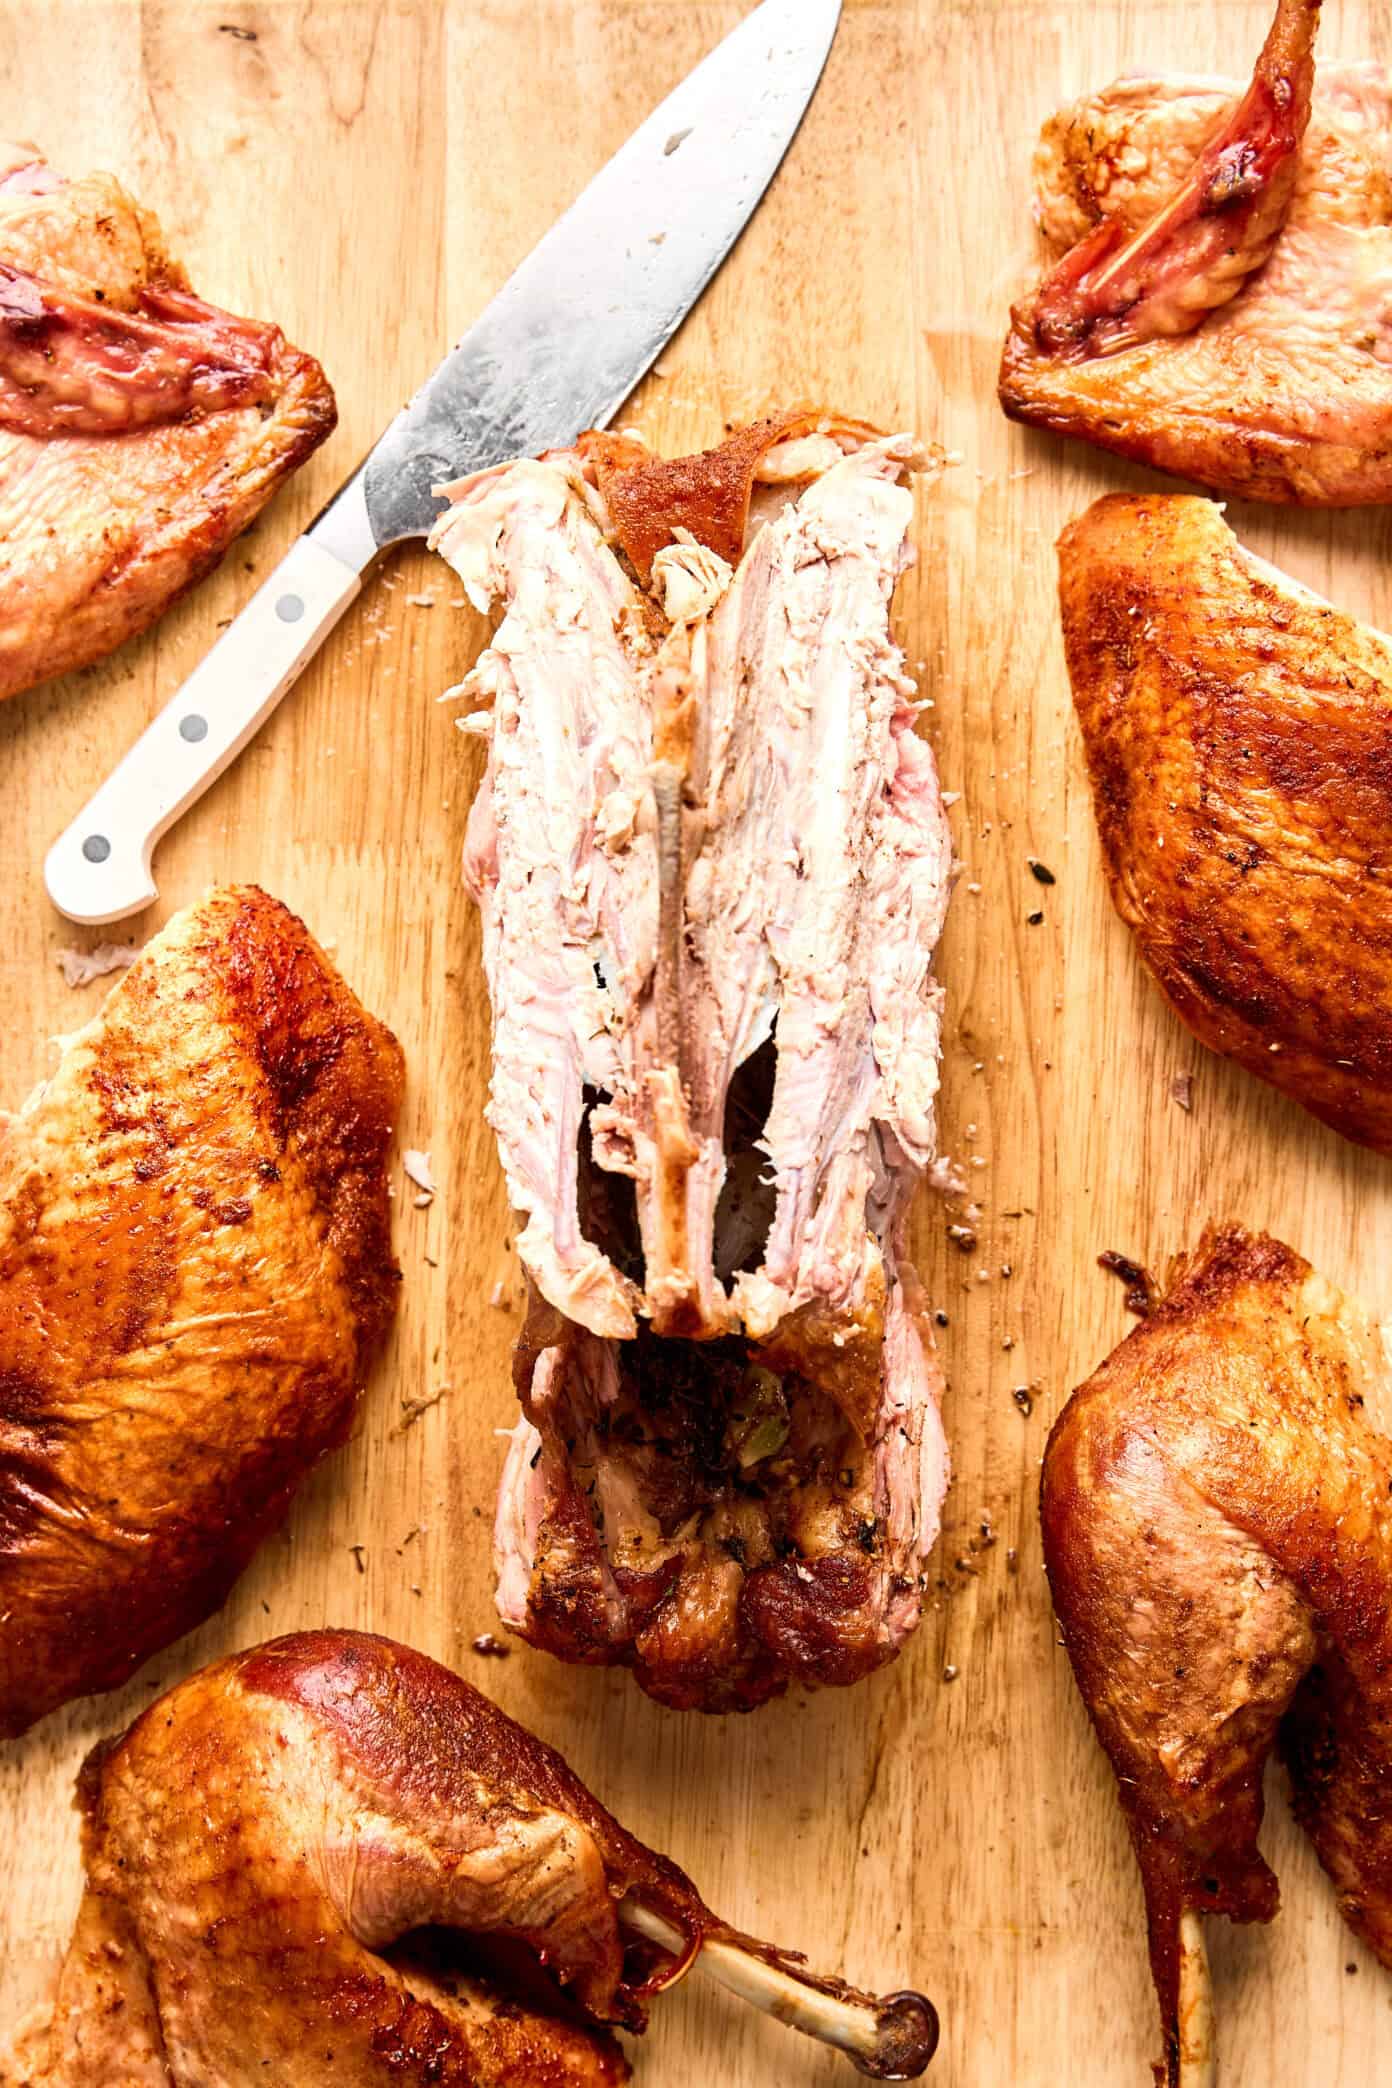
Remove the legs and thighs. Place the turkey breast-side up on the cutting board. Using your knife, cut along the natural line where the leg/thigh meets the body. Pull the leg outward to expose the joint, then cut through the joint to separate the leg and thigh from the body. Repeat on the other side. (Tip: Always look for the joints — you should never need to cut through bone.)
-
Remove the wings. Cut along the natural line where the wing meets the body while gently pulling the wing outward to reveal the joint. Use your knife (or kitchen shears) to cut through the joint where the wing meets the body. If desired, trim off the end of each wing for a cleaner presentation. Set wings aside for serving.
-
Carve the breast meat. Find the breastbone in the center and make a long vertical cut down one side of it, slicing along the rib cage to free one breast half from the carcass, ideally in one big piece. Place that breast piece skin-side up on the board. Slice across the grain (horizontal slices) at about ¼-inch thickness or as desired. Repeat on the other breast: cut along the breastbone to remove it, then lay flat and slice. Arrange the slices on the serving platter.
-
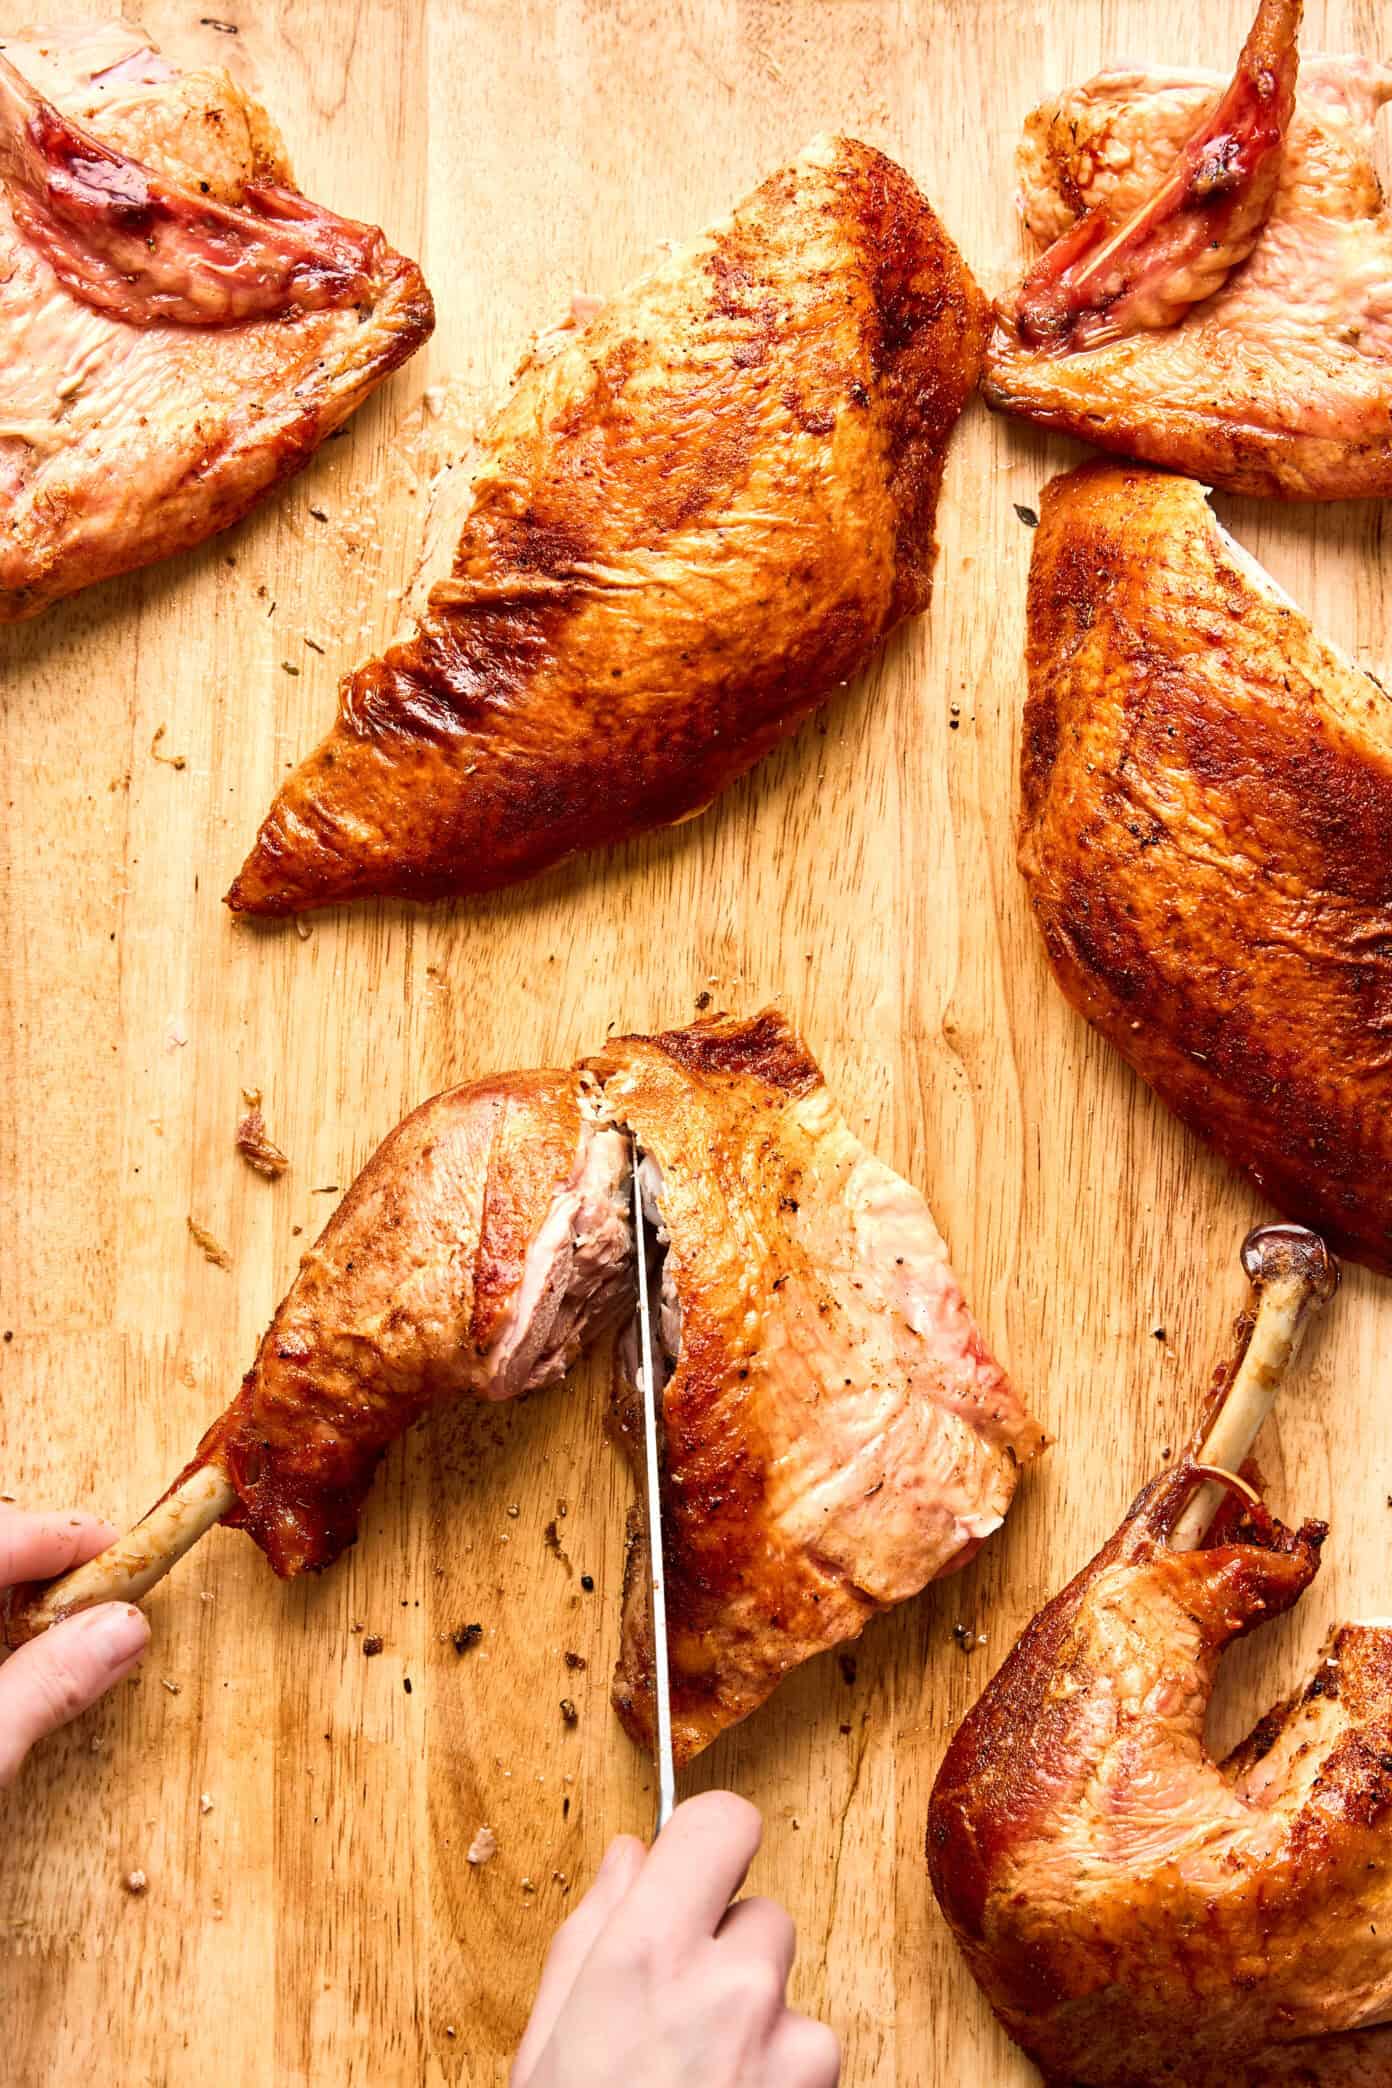
Separate the thigh from the drumstick. Lay each leg-and-thigh piece skin-side down (or whichever way is comfortable). Feel for the joint between the thigh and the drumstick. Slice through the joint to separate them. For the thigh, slice the meat parallel to the bone for neat pieces. The drumstick can be served whole or you can carve the meat off the bone.
-
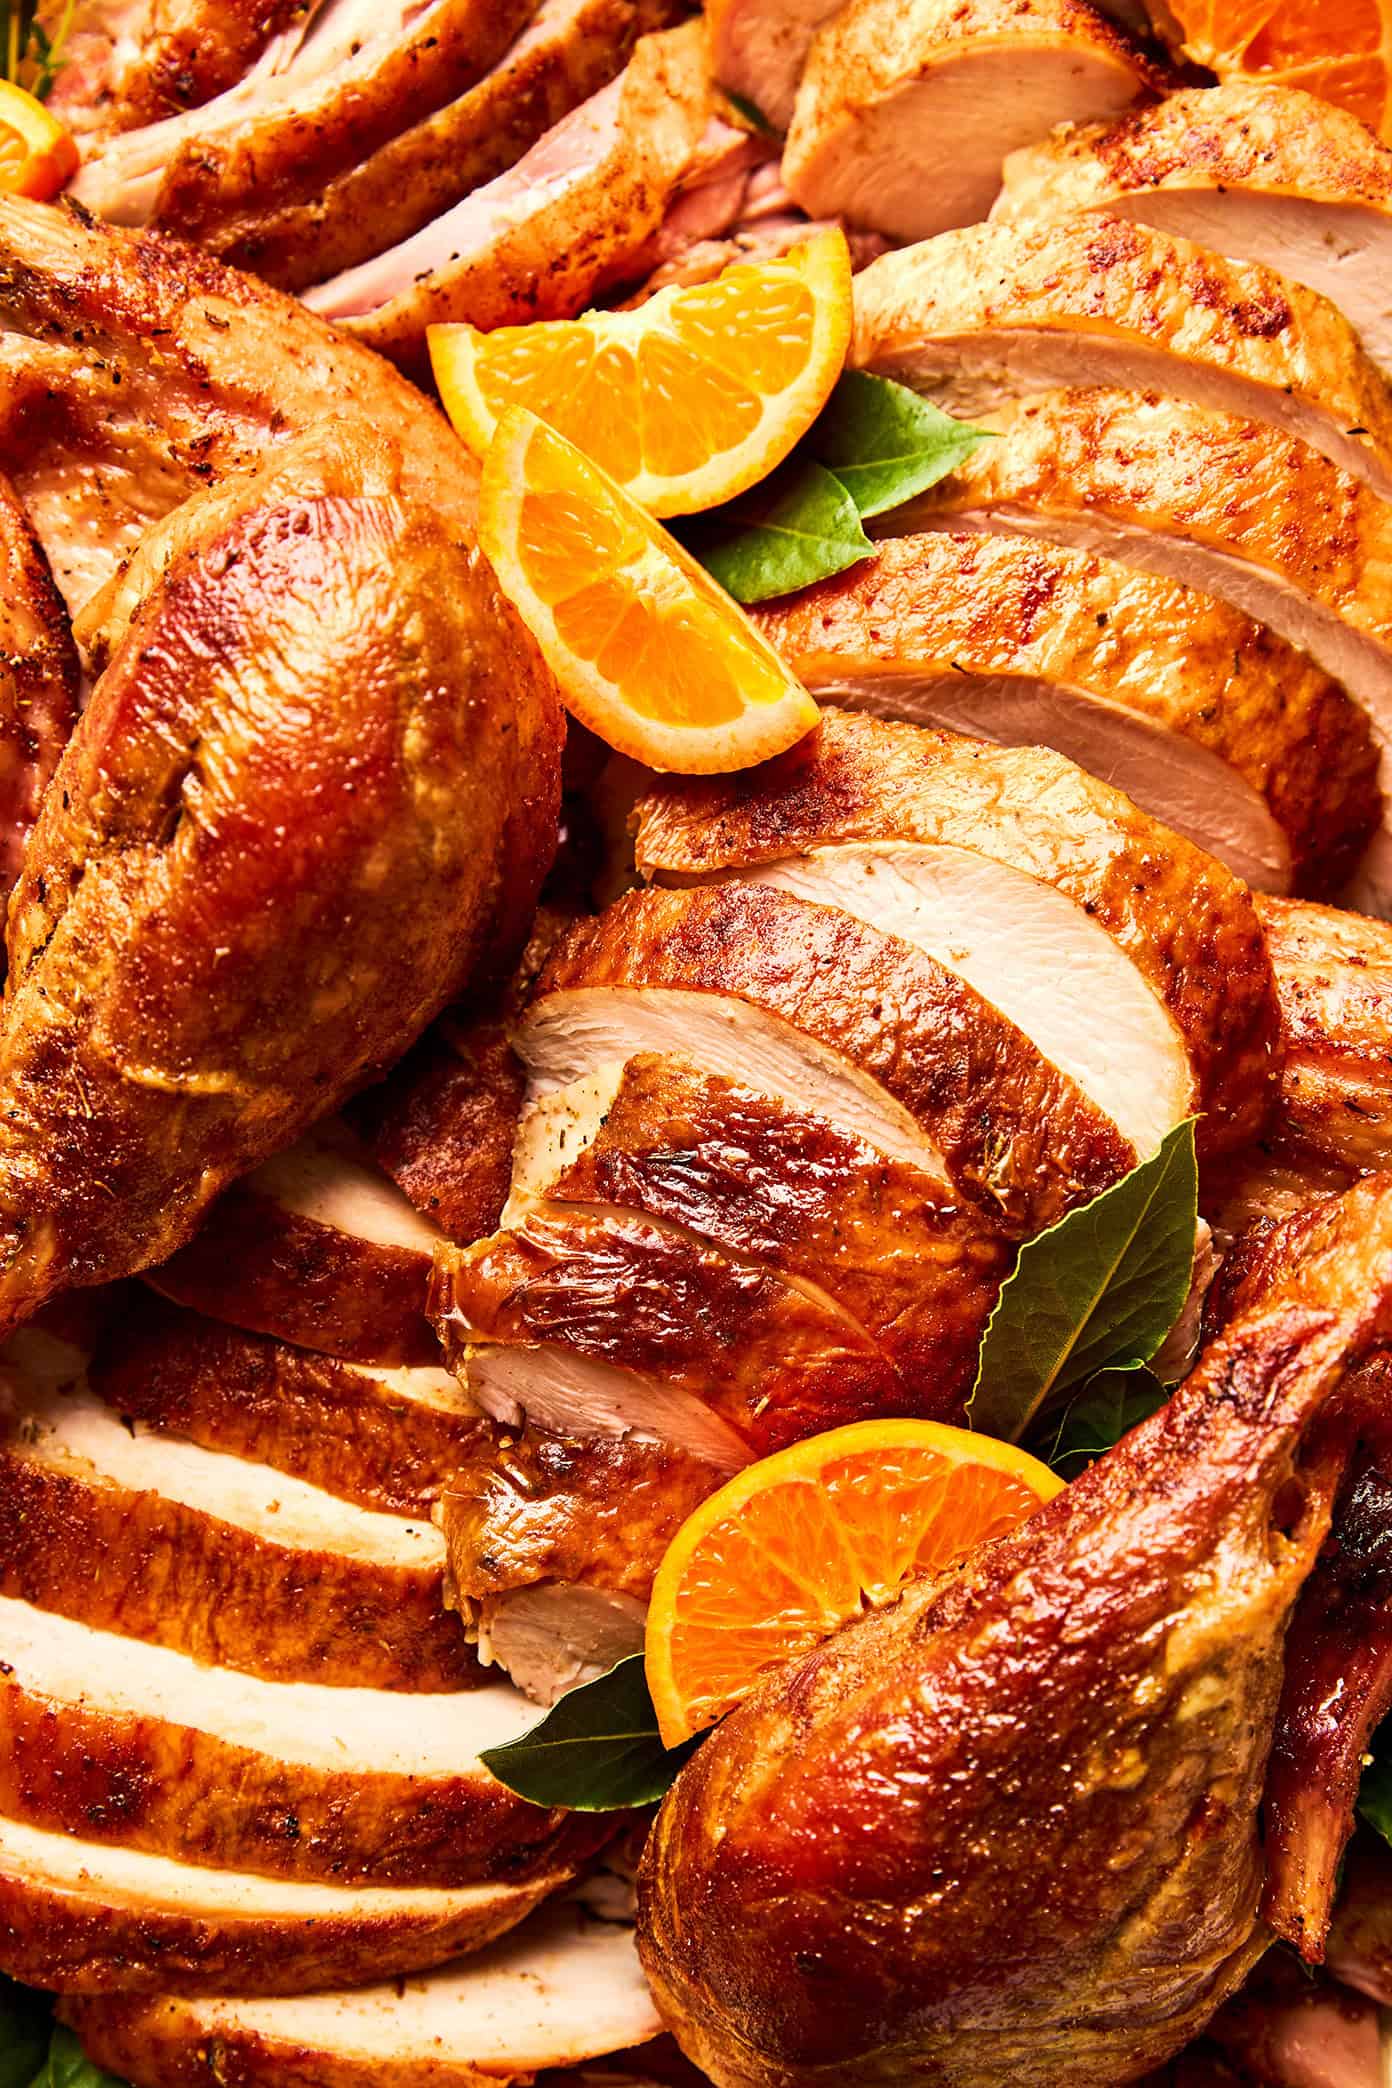
Arrange on the platter. Lay slices of breast meat neatly, overlapping slightly. Place thighs, drumsticks, and wings around or beside the breast slices. Drizzle with pan juices or gravy, if desired. Add any garnishes you like, then serve and enjoy!

0 Comments