This homemade apple cider recipe is easy to make in the Crock-Pot, Instant Pot or on the stovetop, and always tastes so fresh and delicious.

A Mug of Pure Fall Comfort

If you’ve never made apple cider from scratch before, get ready — it’s so much easier (and more delicious) than you might think. ♡
This simple recipe transforms a batch of fresh apples into a the most delicious hot cider that tastes like pure fall in a mug. It’s easy to make in your Instant Pot, Crock-Pot, or on the stovetop — whatever you prefer. No matter which method you choose, it all comes together with the same cozy blend of apples, oranges, cinnamon, and cloves, and makes your home smell absolutely heavenly while it cooks.
Serve it warm for a classic fall treat, chill it for a refreshing twist, or spike it with a splash of bourbon or rum for an extra festive version. However you make it, this homemade apple cider is one of those simple traditions that never fails to makes apple season feel a little more special.
Apple Cider Tips
Here are a few tips to ensure that your apple cider turns out perfectly each time:
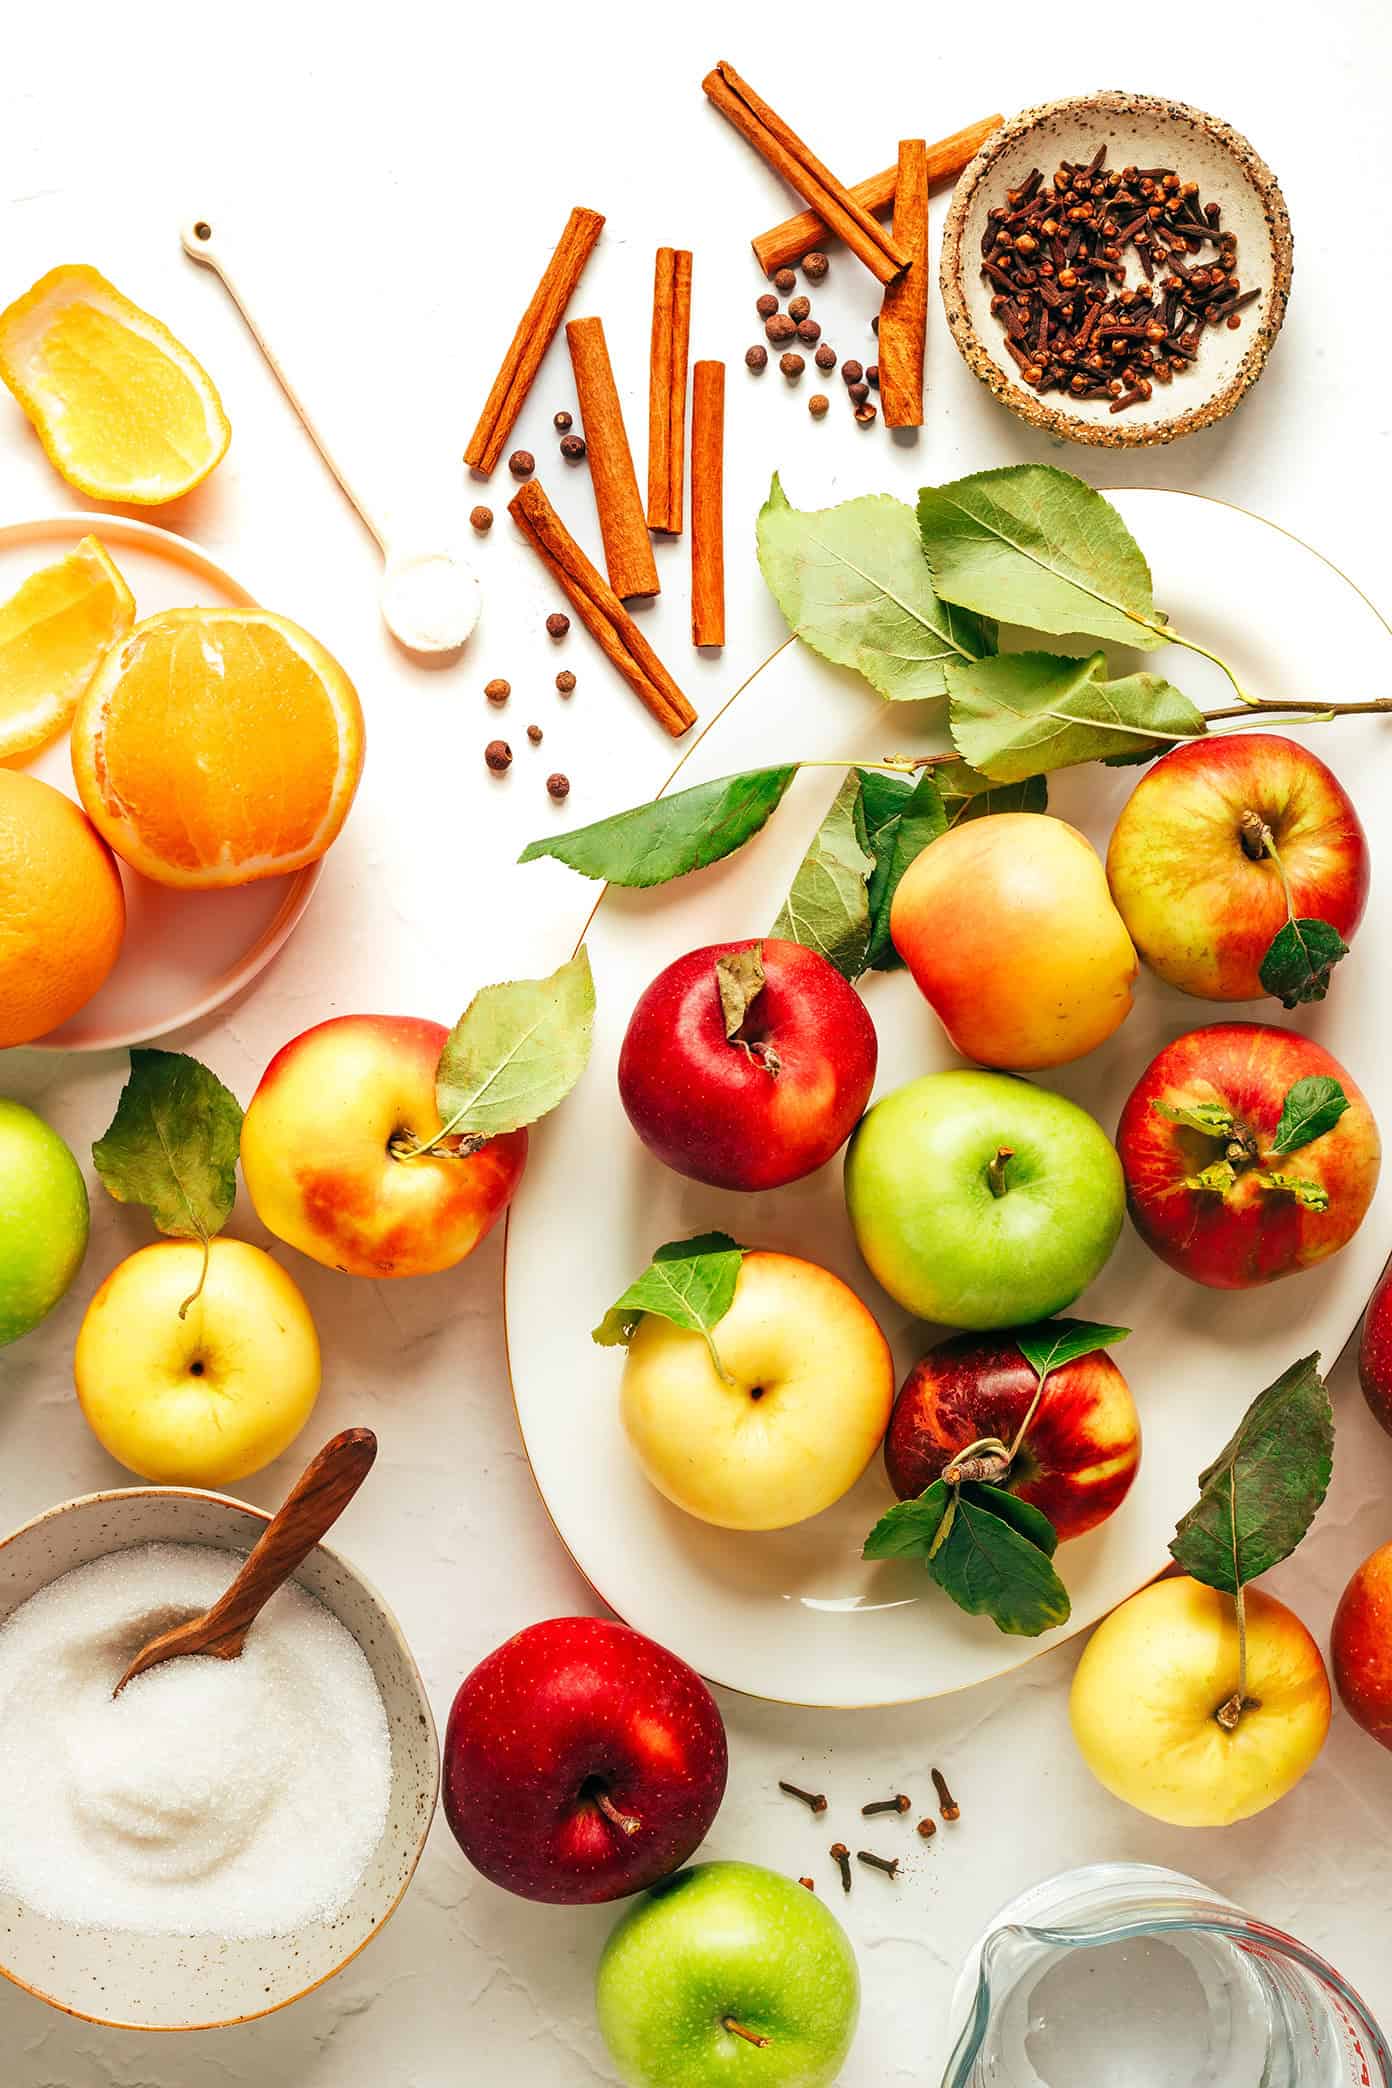
- Use a mix of apples: Combining sweet and tart varieties (such as Honeycrisp, Fuji, and Granny Smith) gives the cider a more complex flavor than using just one type.
- Don’t overfill your pot: Leave a few inches of space at the top — fruit expands slightly as it cooks, especially in the Instant Pot.
- Adjust sweetness gradually: Start with ½ cup of sweetener, then taste after straining and add more if needed. (Store-bought ciders are typically quite sweet!) White sugar gives a clean, classic flavor; brown sugar adds warmth; maple syrup adds lovely depth and subtle smokiness.
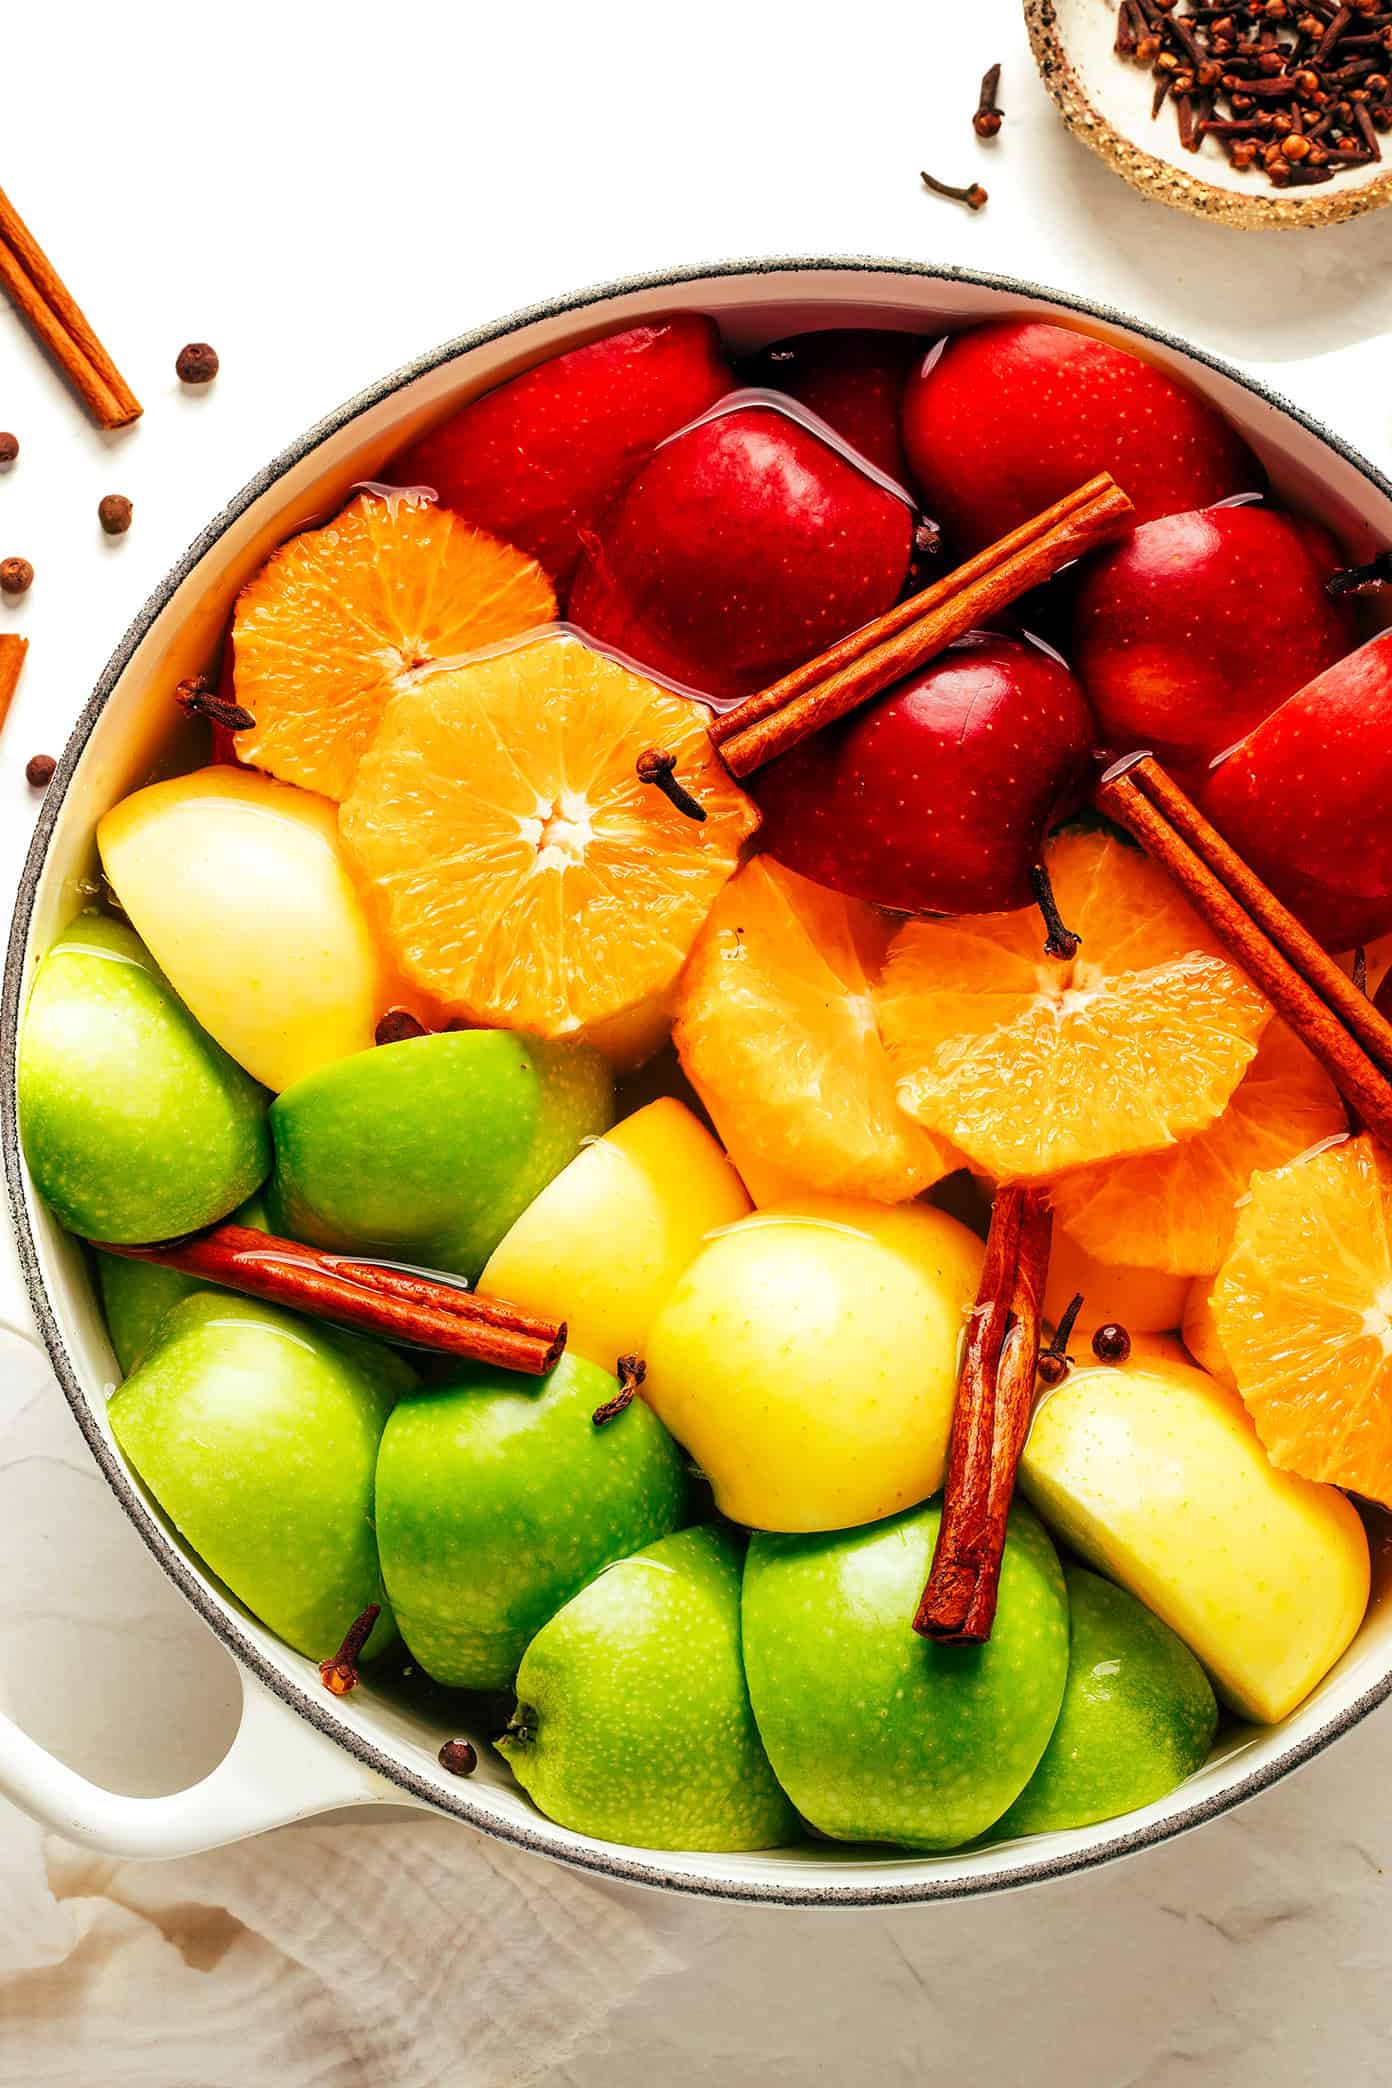
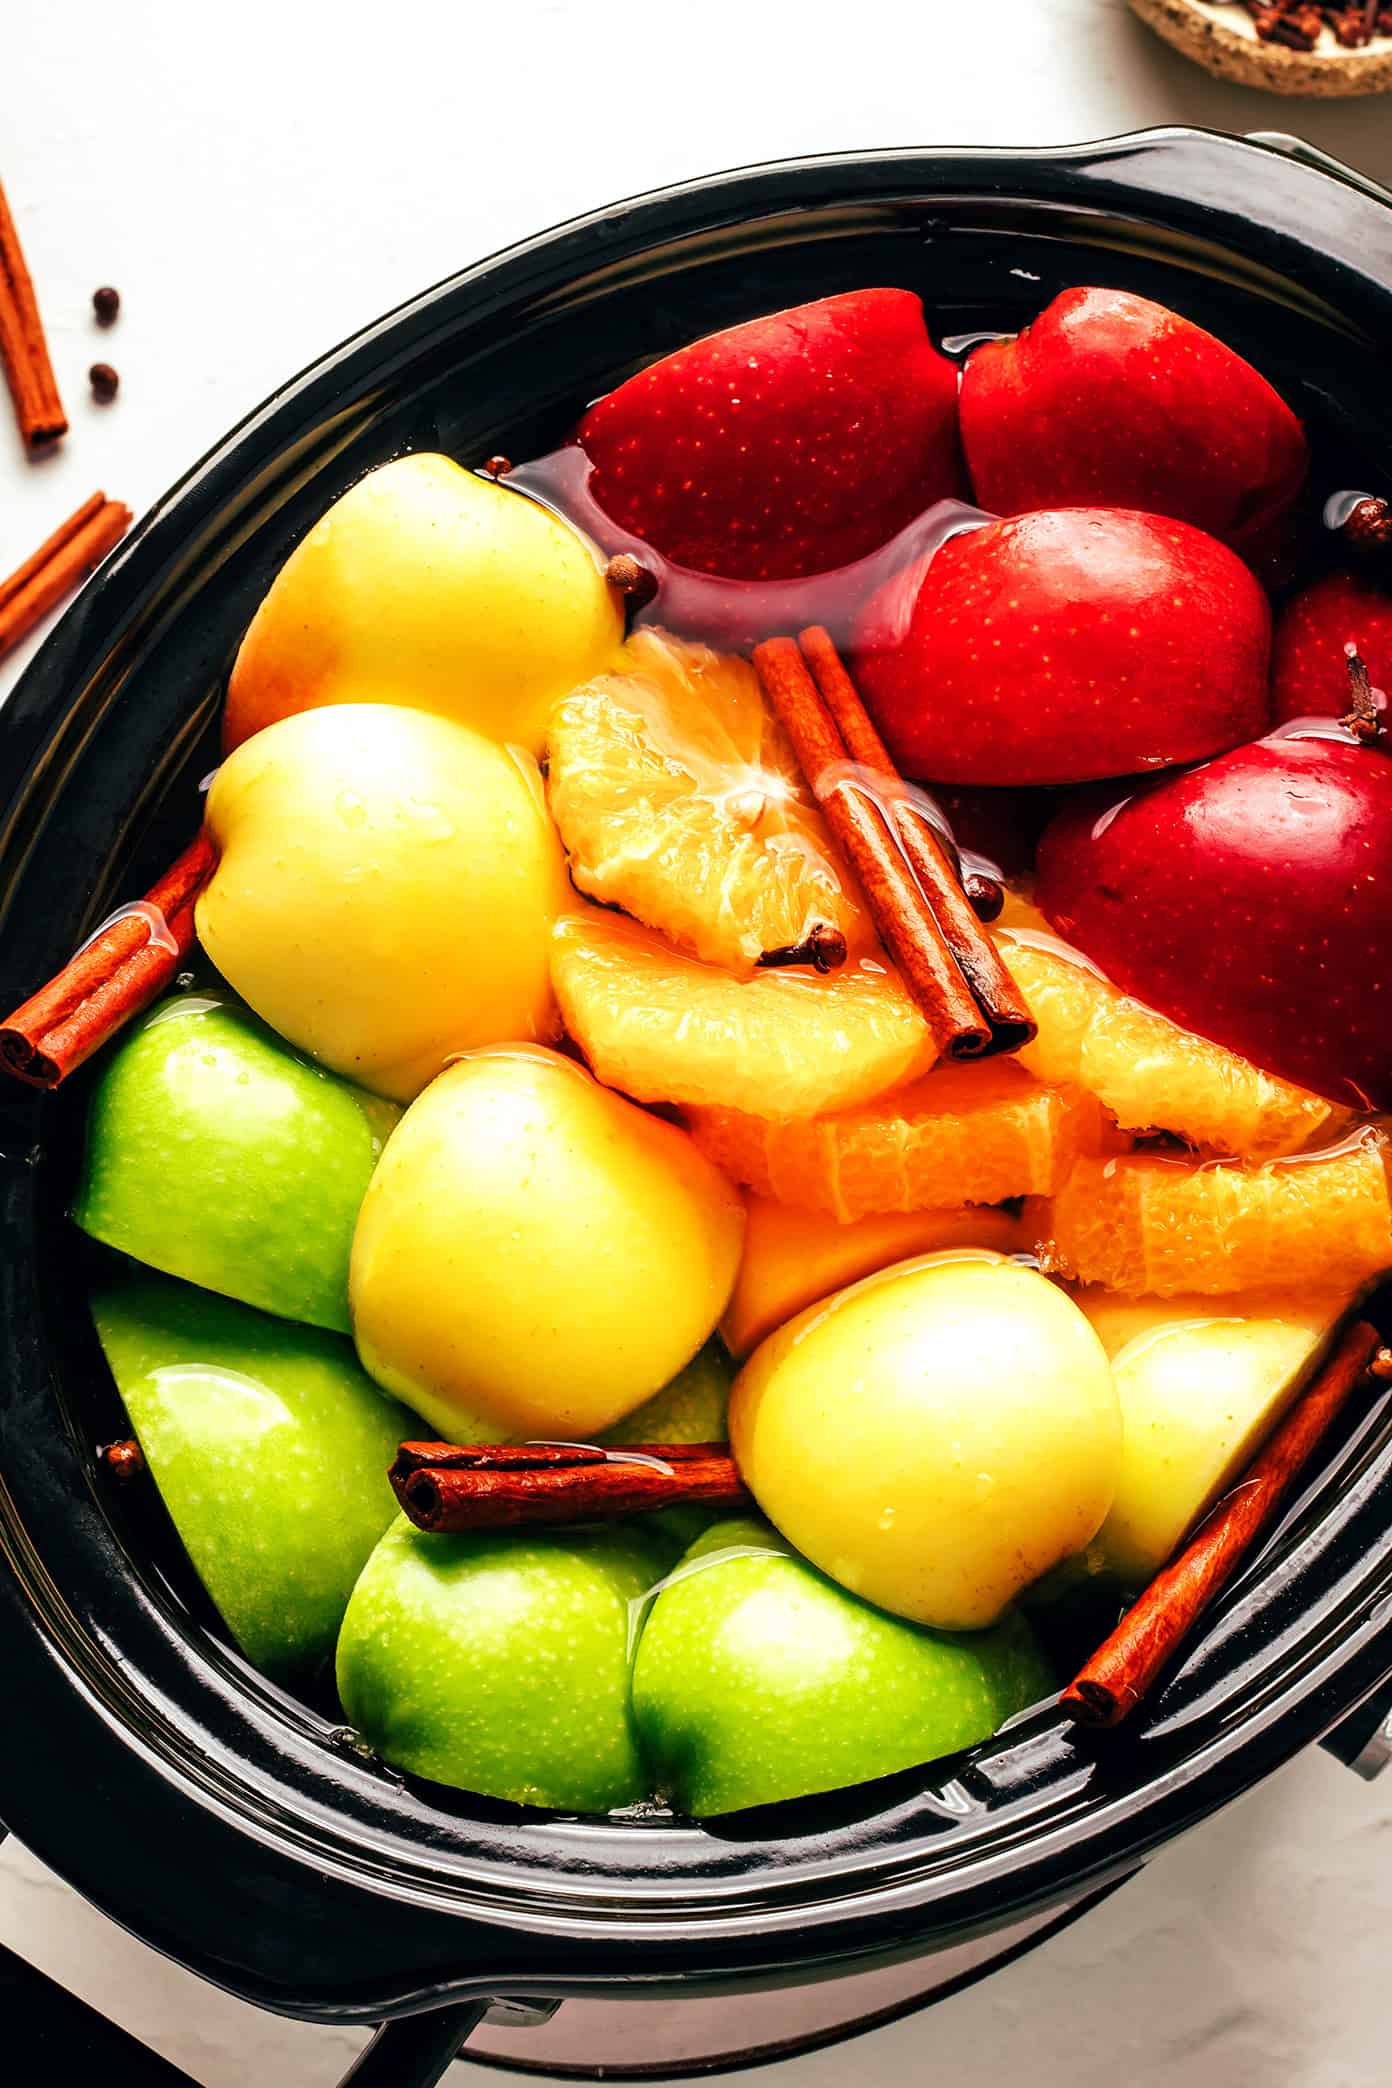
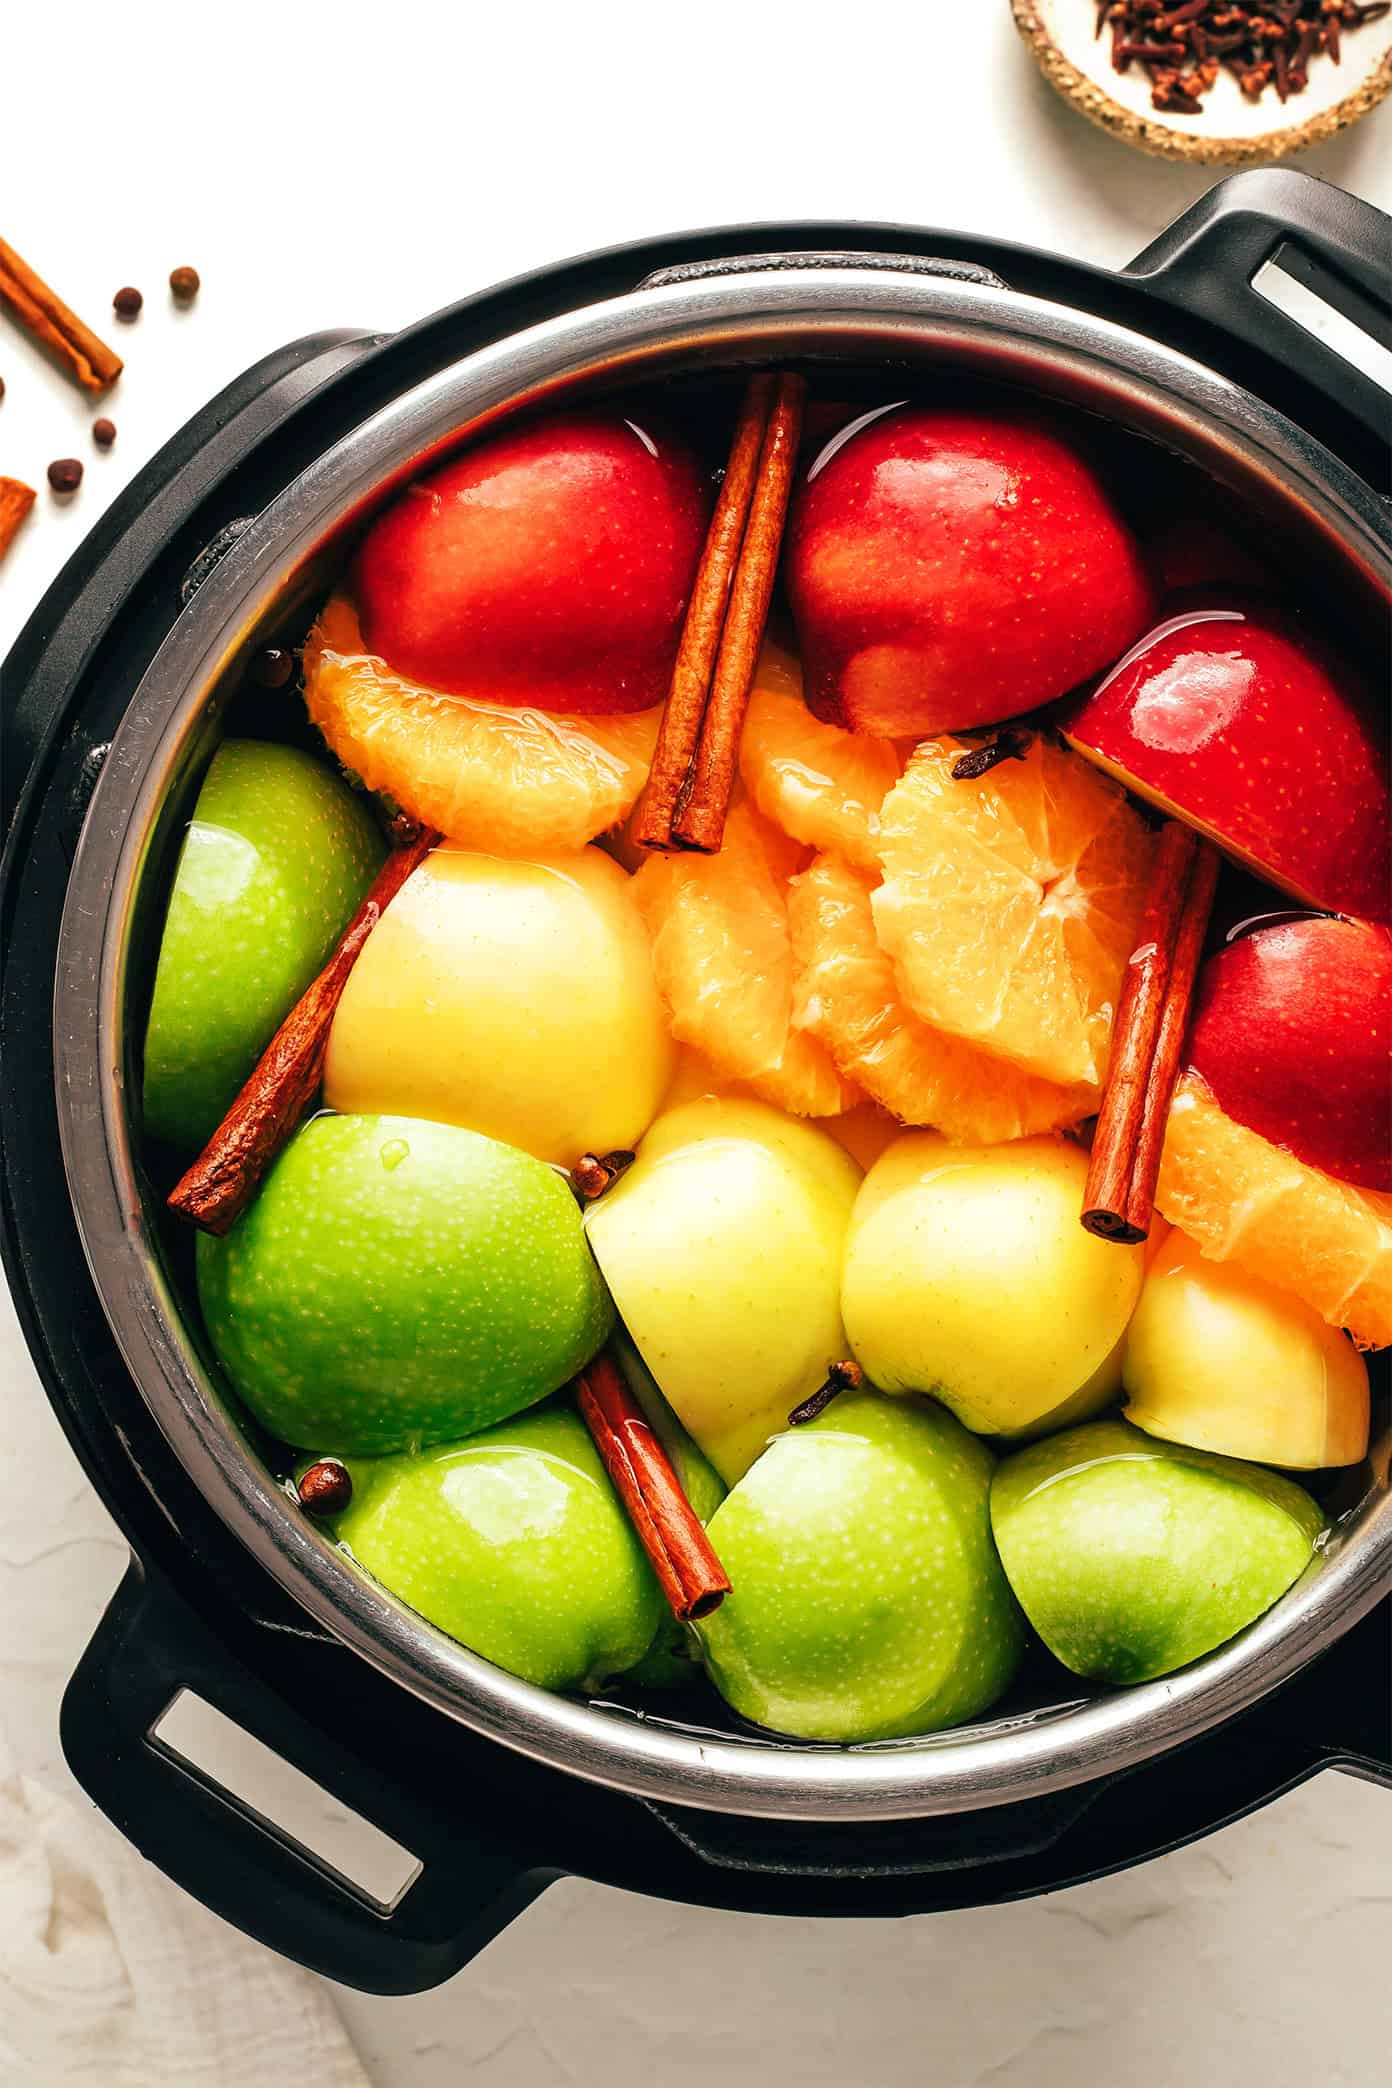
- Watch the bitterness: Orange peels add brightness but can turn slightly bitter if cooked too long, so I recommend peeling them first for a smoother flavor.
- Mash thoroughly: The more you mash the fruit after simmering, the stronger the flavor your cider will have.
- Strain well: Use a fine-mesh sieve or cheesecloth and press firmly to extract every last drop of flavor. For even clearer cider, you can strain it twice — once through a mesh sieve, then again through cheesecloth for a crystal-clear finish.
- For a festive touch: Add star anise, whole cranberries, or fresh rosemary sprigs for a pretty presentation when serving to guests.
Apple Cider Variations
There are all sorts of ways that you can mix things up with this apple cider recipe. For example, feel free to:
- Add vanilla: Stir in 1 teaspoon pure vanilla extract after straining for a smooth, mellow finish.
- Add ginger: Include a few slices of fresh ginger (or ½ teaspoon ground) for a zesty, warming kick.
- Add cranberries: Toss in 1 cup of fresh or frozen cranberries before cooking for a tart, jewel-toned twist.
- Add lemon: Add a squeeze of fresh lemon juice just before serving for a pop of brightness.
- Add more spices: Experiment with a pinch of cardamom, nutmeg, or allspice for extra warmth and complexity. Or you can also steep a chai tea bag (regular or decaf) in the mix for some chai warming spices.
- Add sparkle: Mix chilled cider with sparkling water, club soda, or prosecco for a fizzy variation.
- Add alcohol: Spike your cider with a splash of bourbon, rum, brandy, or whiskey just before serving.

FAQ
Absolutely! Homemade apple cider actually tastes even better the next day once the flavors have had a chance to meld. Just store it in an airtight container in the refrigerator for up to 5 days.
Yes! Let the cider cool completely, then transfer to freezer-safe containers or bags (leave a bit of room for expansion). Freeze for up to 3 months, then thaw in the fridge and reheat when ready to serve.
I recommend peeling them! The peel can add a touch of bitterness as it simmers, so removing it helps keep the cider’s flavor smooth and naturally sweet. You’ll still get plenty of bright citrus notes from the fruit itself.
You can use it to make apple cider syrup, simmer it down for a glaze on pork or ham, or use it in baked goods like cakes or muffins for extra flavor.
Sure! Here are both variations:
Instant Pot: Add the apples, oranges, cinnamon sticks, cloves, and any optional spices to the Instant Pot, then pour in enough water to cover the fruit by about an inch and add a pinch of salt. Cook on High Pressure for 15 minutes, let the pressure naturally release for 15 minutes, then vent any remaining steam. Mash the softened fruit well, let it sit on Warm for 20–30 minutes to deepen the flavor. Then strain and proceed with the recipe below as directed.
Crock-Pot: Add apples, oranges, cinnamon sticks, cloves, and any optional spices to a large slow cooker, then cover with water by 1–2 inches and add a pinch of salt. Cook on Low for 6–8 hours or High for 3–4 hours until the fruit is very soft, then mash well and cook for 1 more hour to build flavor. Then strain and proceed with the recipe below as directed.

Homemade Apple Cider
- Prep Time: 10 minutes
- Cook Time: 1 hour 30 mins
- Total Time: 1 hour 30 mins
- Yield: 12 servings 1x
Description
This delicious homemade apple cider recipe is easy to customize with your preferred type and amount of sweetener. See notes above for Instant Pot (pressure cooker) and Crock-Pot (slow cooker) instructions.
Ingredients
- 10–12 medium apples, a mix of sweet and tart (e.g., Honeycrisp, Fuji, Granny Smith), quartered
- 2 oranges, quartered and peeled*
- 4 cinnamon sticks
- 1 tablespoon whole cloves
- optional flavor boosters: 1 teaspoon whole allspice, grated fresh nutmeg, and/or 1–2 inches fresh ginger (sliced)
- 14–16 cups water (just enough to cover fruit by about an inch)
- 1/2 to 3/4 cup sweetener (white sugar for clean flavor, brown sugar or maple syrup for warmth and depth)
- pinch of salt
Instructions
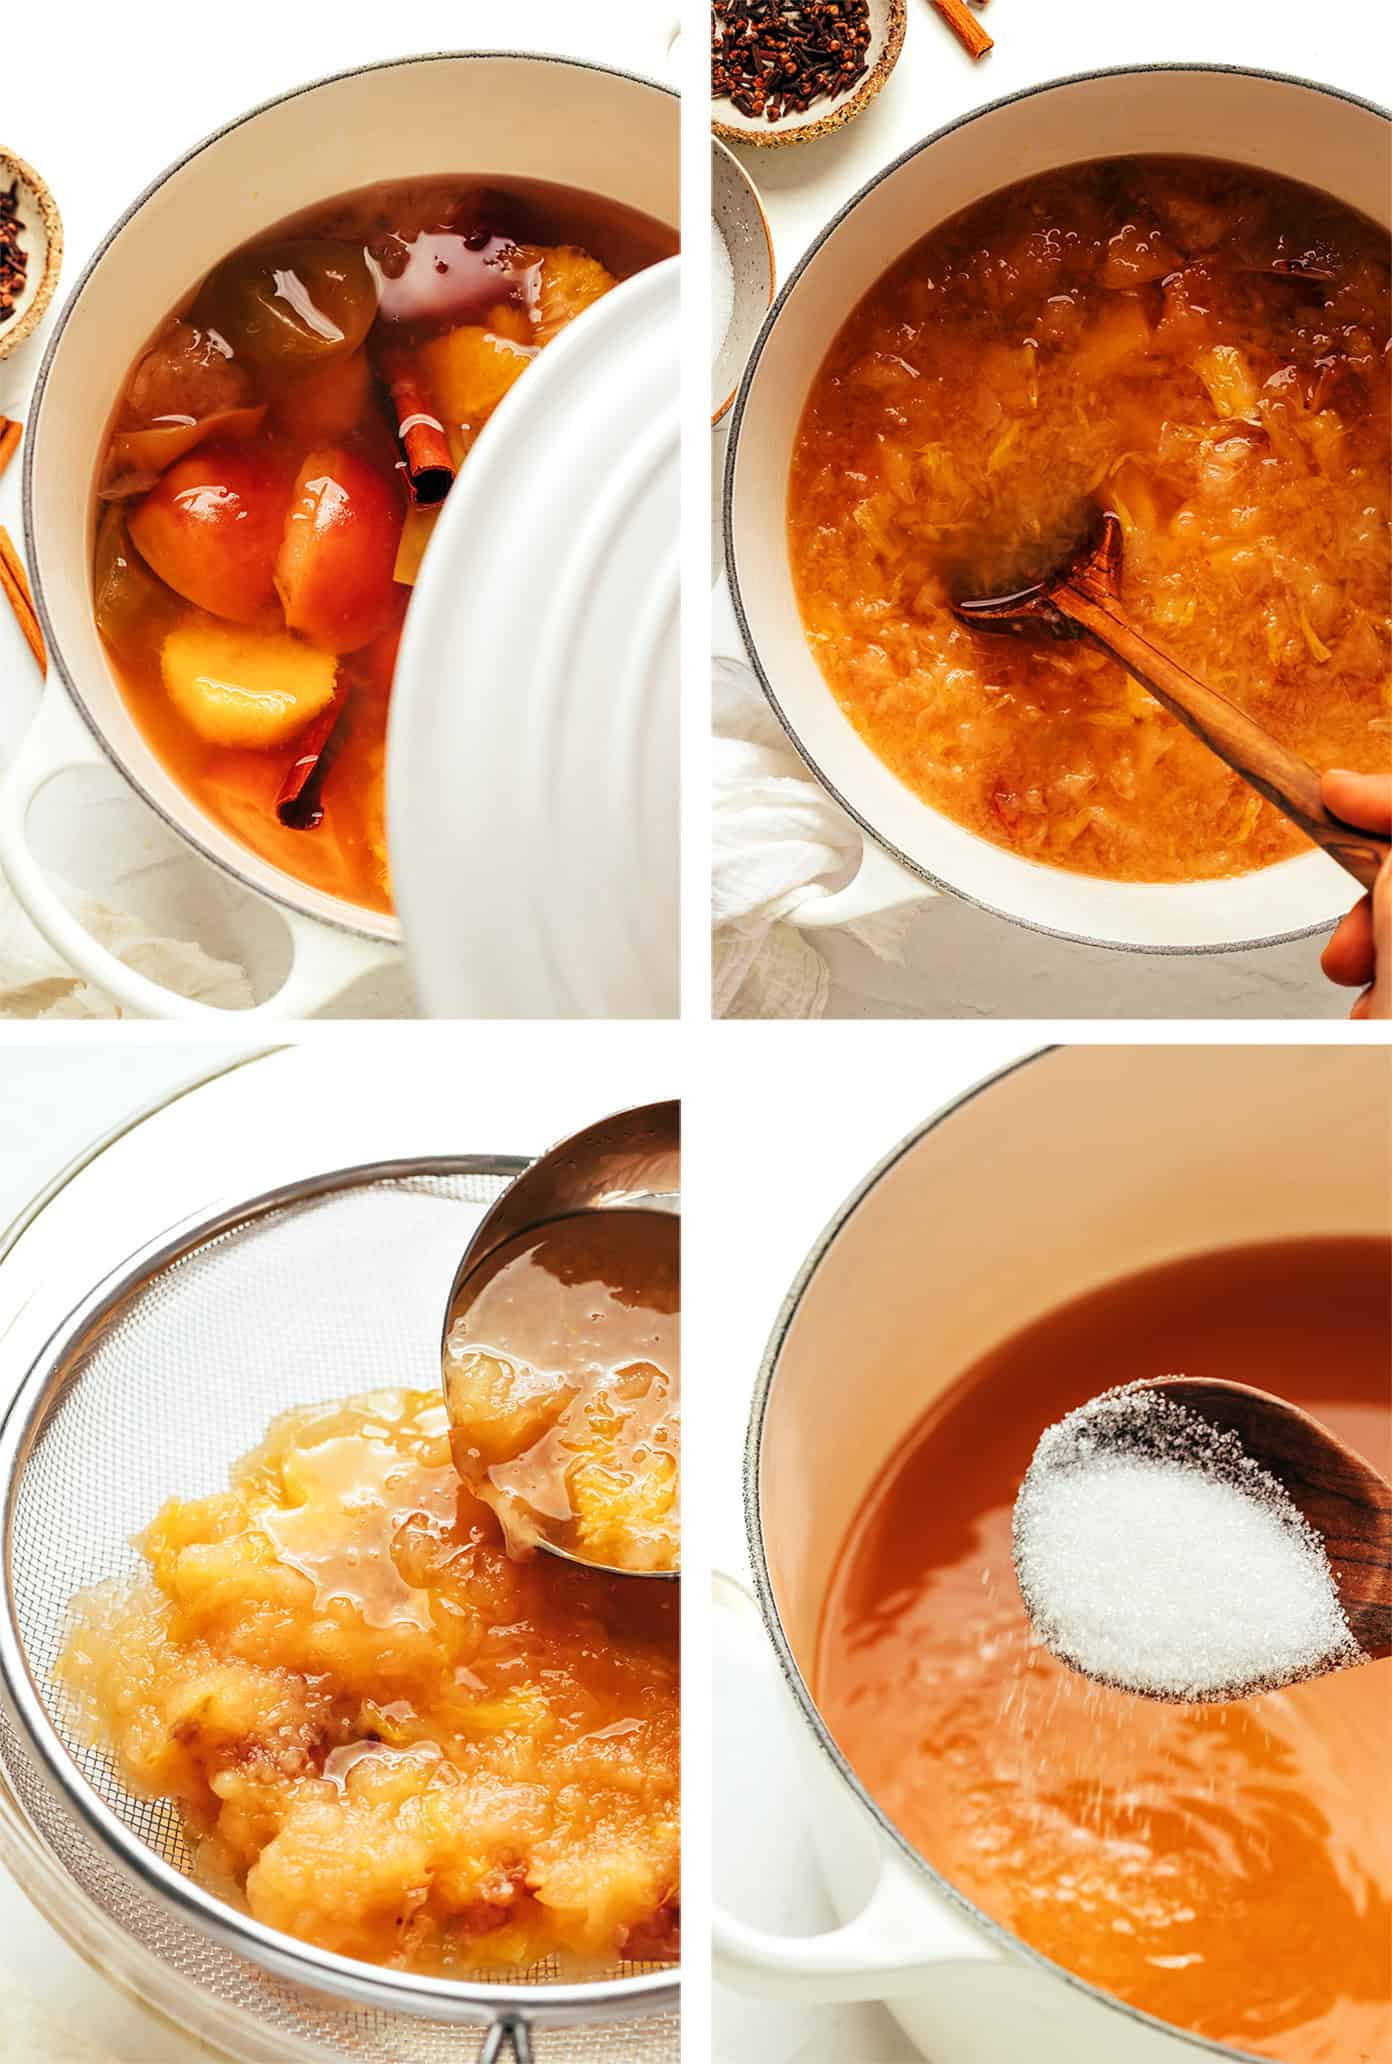
- Combine ingredients. Add apples, oranges, cinnamon, cloves, and any optional spices to a large stockpot. Pour in enough water to just cover the fruit by 1–2 inches. Add a pinch of salt.
- Simmer gently. Bring to a boil over high heat, then reduce to a gentle simmer. Cover and cook for about 2 hours, until the apples are very soft and fragrant.
- Mash for flavor. Use a potato masher or sturdy spoon to crush the softened apples and oranges against the pot’s sides. This releases extra juice and aromatic oils. Cover and simmer for 30–60 minutes more for a deeper, richer flavor.
- Strain well. Carefully ladle the mixture through a fine-mesh strainer into a clean pot or large heatproof bowl. Press firmly on the mixture to extract all of the liquid, then discard pulp and spices afterward.
- Sweeten and balance. Stir in sweetener of choice while the cider is still warm, starting with ½ cup and adding more to taste. (I recommend 3/4 cup if you’d like cider sweetened to a store-bought level.) A tiny splash of lemon juice or apple cider vinegar can also brighten the flavor if needed.
- Serve or store. Enjoy hot with fresh orange slices and cinnamon sticks for garnish, or let cool and refrigerate up to 5 days. Freeze up to 3 months.
Notes
Orange peels: I recommend peeling the oranges if you would like to make the cider less bitter.


I got too excited and added the sugar to the cooking process. Do you think that will ruin it somehow?
No worries, it should be just fine! :)