This post may contain affiliate links. Please read my disclosure policy.
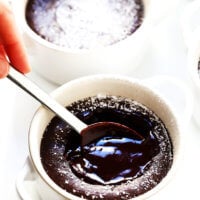
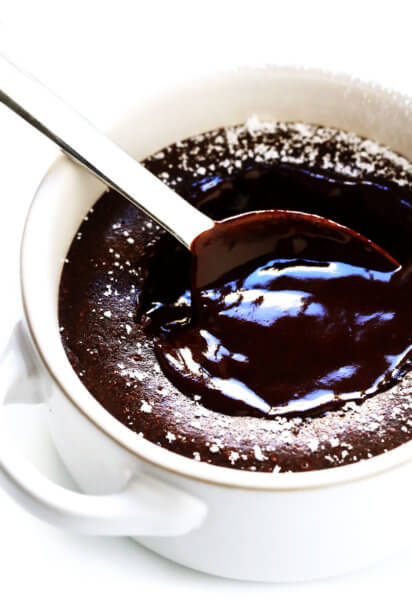
This Dreamy Chocolate Lava Cakes recipe is perfectly rich and decadent, filled with a perfectly gooey “molten” chocolate center, and super-easy to make in just 20 minutes.
Meet…the chocolate molten lava cakes of your dreams. ♡♡♡
These retro little individual lava cakes have been one of my back-pocket entertaining desserts for years. I’m telling you, that rich chocolate cake with its legendary ooey, gooey, molten chocolate filling never fails to dazzle a dinner table full of friends or family. Yet the good news behind the scenes is that these little lava cakes are ridiculously quick and easy to make. And, bonus, you can even prep up them up to a day in advance if you’d like!
All you need are 7 easy ingredients, a set of ramekins or a muffin pan, and about 20-25 minutes total. Then these dreamy individual chocolate lava cakes will be ready to go and steal the show in no time. Perfect for Valentine’s Day, your next dinner party, or any regular night when life calls for a serious chocolate fix.
Let’s make some!
Chocolate Lava Cake Ingredients:
To make these chocolate lava cakes, you will need:
Dark chocolate: I used a few dark chocolate bars, but semisweet chocolate chips would also work.
Butter and eggs: Our two refrigerated ingredients.
Sugar: I went retro and just used regular white granulated sugar here, but brown sugar or coconut sugar would also do.
Vanilla extract: Just a teaspoon.
Sea salt: To bring out the best chocolatey flavors.
Flour: All-purpose, white whole wheat, or a gluten-free all-purpose blend will do.
Cooking spray: Super-important in this recipe, especially if you plan to invert the lava cakes onto a plate.
And then, of course, toppings. Feel free to top your lava cakes with any of the following:
Powdered sugar or cocoa powder: Sprinkled on top with a fine-mesh sieve.
Flaky sea salt: One of my faves with any chocolate dessert.
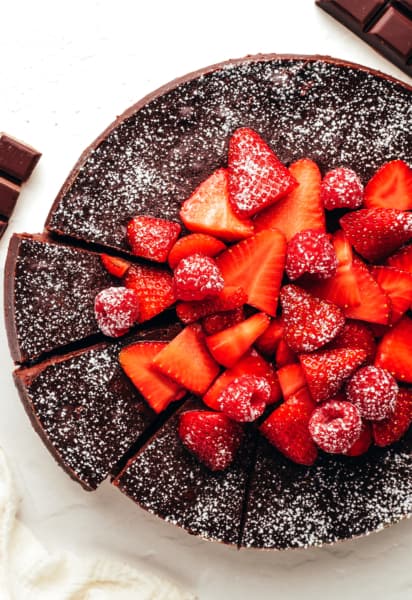
Ice cream or whipped cream: Can’t go wrong here.
Berries: Strawberries, raspberries, blackberries, or whatever sounds good.
Finally, supplies. You can bake these lava cakes in either:
Ramekins: I photographed this recipe in four large ramekins (either 7- or 8-ounce will do). Or you can use eight small (4-ounce) ramekins instead.
Muffin pan: Alternately, you can bake your lava cakes in a standard nonstick muffin pan (whose baking cups are typically 4 ounces).
How To Make A Molten Lava Cake:
Guys, it’s so easy to make this chocolate lava cake recipe! Simply…
Melt the butter and chocolate. Either in the microwave or on a double-boiler on the stove, heat the butter and chocolate together on low heat until both are melted. Whisk until they are completely smooth. Meanwhile…
Whisk together the eggs, sugar, vanilla and salt. In a separate bowl, whisk these ingredients together vigorously for 1 minute.
Combine the two mixtures. Use one hand to whisk the chocolate mixture round and round in circles, while slowly drizzling the egg mixture into the chocolate. (This process will help to not accidentally cook/scramble the eggs when they are added.)
Add in the flour. Finally, whisk in the flour until it is completely combined.
Portion into greased ramekins. Be sure that your ramekins have been greased well with cooking spray or butter. Then portion the chocolate batter equally into four large (7- to 8-ounce) ramekins, or eight small (4-ounce) ramekins.
*Bake. Pop them in the oven. (I like to set my ramekins on a baking sheet for easy transfer.) Then bake until the edges of the cakes are set but most of the inside is still gooey and molten, about 12-13 minutes for large ramekins or 9-10 minutes for small ramekins. Timing is critical here! The centers of the cakes should be mostly risen, but not too puffy and definitely not cracked. Feel free to use a toothpick to test the centers of the cakes to ensure that they are not over-baked.
*Or, if you would like to make these cakes in advance, just portion the batter into the ramekins. Then cover and refrigerate them for up to 24 hours. Remove from the fridge and let them rest on the counter for 20 minutes. Then bake as directed.
How To Serve Chocolate Lava Cakes:
However you serve your lava cakes, the key is to do so quickly so that the molten chocolate stays nice and hot and melty! You can either do so:
In the ramekins: Just sprinkle on your desired toppings, and serve them right in the ramekins themselves with a spoon.
Inverted onto a plate or bowl: Let the lava cakes rest for 1 minute after they emerge from the oven. Then carefully place a plate upside-down on top of the ramekin, and flip both over 180° so that the chocolate cake falls out onto the plate or bowl. Sprinkle with your desired toppings and serve immediately.
Possible Variations:
If you would like to change things up with this chocolate lava cakes recipe, feel free to:
Make them sweeter: I don’t like these cakes overly sweet (especially if you’re adding ice cream on top), so I wrote the recipe using just 1/4 cup of sugar. But if you would like sweeter cakes, feel free to increase that amount to either 1/3 or 1/2 cup sugar.
Add peanut butter: For all of you chocolate and peanut butter lovers, feel free to stir 3 tablespoons natural peanut butter in with the melted chocolate and butter mixture after they have been melted.
Add ground cinnamon and chili powder: For a Mexican chocolate twist, feel free to add in 1 teaspoon ground cinnamon and 1 teaspoon chili powder to the egg mixture.
Add espresso powder: For more of a mocha twist, feel free to add in 1.5 teaspoons espresso powder to the egg mixture.
Make these gluten-free: Feel free to use an all-purpose gluten free flour blend to make these gluten-free.
Heat oven to 400°F. Grease four large (7- to 8-ounce) or eight small (4-ounce) ramekins really well with cooking spray or butter; set aside.
In a small saucepan*, heat the butter and chocolate together over medium-low heat until both are melted, stirring constantly so that the chocolate does not burn. Whisk until smooth, then remove from the heat and set aside.
Meanwhile, in a separate bowl, vigorously whisk together the eggs, sugar, vanilla, and salt for 1 minute.
Once the chocolate mixture is also ready to go, use one hand to whisk the chocolate mixture round and round in circles, while slowly pouring the egg mixture into the chocolate with your other hand. (This process will help to not accidentally cook/scramble the eggs when they are added.) Whisk in the flour until it is completely combined.
Portion the chocolate batter equally into the prepared ramekins.
Bake until the edges of the cakes are set but most of the inside is still gooey and molten, about 12-13 minutes for large ramekins or 9-10 minutes for small ramekins. (The centers of the cakes should be mostly risen, but not too puffy or cracked. Feel free to use a toothpick to test the centers of the cakes to ensure that they are not over-baked.)
Remove from the oven and let the cakes rest for 1 minute. Carefully invert onto a serving plate or bowl, or serve the lava cake directly in the ramekin itself, topped with your desired toppings. Serve immediately and enjoy the cakes while they are nice and hot. :)
Notes
*Alternately, you can melt the butter and chocolate together in the microwave.
Very excited to make these on Valentine’s Day! I am hoping to prep a day in advance as you mentioned, but would you suggest varying cook time at all since they will be cold? Thanks!!
OMG! These look and sound so good! I want to try to make them. Thank you so much for sharing this.
One little suggestion: For those like me, who choose to go the NON-GMO or organic route, you will definitely want to buy organic, or N0N-GMO, for everything, except the sea salt and vanilla extract. I use only organic butter, eggs, sugar, and flour.
This looks like a really good recipe! Thank you so much for sharing. Do you think you could use milk chocolate instead of dark or semisweet chocolate? If so would it be necessary to adjust the amount of sugar in the recipe? Thanks again for sharing.
Could you recommend a dairy free alternative to the butter in this recipe? I was thinking of using ghee, but I wasn’t sure if it would mess with the rise.
Hi, wondering about the butter measurement. 2/3 cup comes to 10 2/3 Tbs measuring by what is on the wrapper and a measuring chart. You say 12 Tbs. Which is correct? Thanks.
I had totally forgotten about these little treasures. When my hubby and I went on a cruise we ate one every night after dinner. It was heaven! Thank you for sharing!
I made this for Valentines Day and my husband and young girls loved it! We ate it with vanilla ice cream and raspberries and it was fantastic! We will make it again soon. We did bake it an extra 2-3 min and i think it was too long because it was not very runny but it was still very moist. Next time we will bake it for 9 min for our small ramekins. Thanks for this delicious recipe! It did taste like the carnival recipe! My young hikes helped me make it and thought it was very fun!
This recipe was so good!! I made them for dessert last night and everyone raved about how good it was – thank you so much!! It was easy to prep ahead of time and pop in the oven when we finished dinner. Will definitely make these again!!
I made these in 4 oz. ramekins. 10 minutes was just too runny, 13 was much better. I think I will like 15 minutes. Also, next time will up the sugar a little. I wonder if anyone has tried making the batter beforehand, then pouring and baking when ready. Should it be refrigerated, or not?


Thank you for sharing this recipe! Looks so good! And you’ve made it so easy for us to follow. (Just in time for Valentine’s Day!)
Those look so delicious!! I’m adding the recipe to my “To Make list” Can’t wait to try them!
These look so amazing! I’ve never tried making lava cakes at home but it would definitely be a fun thing to do!
This recipe looks easy AND delicious! I can’t wait to try it, maybe for Valentine’s Day?
If I wanted to make/prep it ahead, what would I need to do?
oh I am so making this – looks easy and so worthwhile……but first I gotta get those ramekins! with the handles and lids! ?
Very excited to make these on Valentine’s Day! I am hoping to prep a day in advance as you mentioned, but would you suggest varying cook time at all since they will be cold? Thanks!!
OMG! These look and sound so good! I want to try to make them. Thank you so much for sharing this.
One little suggestion: For those like me, who choose to go the NON-GMO or organic route, you will definitely want to buy organic, or N0N-GMO, for everything, except the sea salt and vanilla extract. I use only organic butter, eggs, sugar, and flour.
I really want to try this! Sounds so good!
I cannot WAIT to make these!!
Yummy !!
Looking forward to trying these on V Day!
This looks like a really good recipe! Thank you so much for sharing. Do you think you could use milk chocolate instead of dark or semisweet chocolate? If so would it be necessary to adjust the amount of sugar in the recipe? Thanks again for sharing.
Could you recommend a dairy free alternative to the butter in this recipe? I was thinking of using ghee, but I wasn’t sure if it would mess with the rise.
How do you get them out of a muffin tin? Use muffin liners?
Hi, wondering about the butter measurement. 2/3 cup comes to 10 2/3 Tbs measuring by what is on the wrapper and a measuring chart. You say 12 Tbs. Which is correct? Thanks.
I had totally forgotten about these little treasures. When my hubby and I went on a cruise we ate one every night after dinner. It was heaven! Thank you for sharing!
I made this for Valentines Day and my husband and young girls loved it! We ate it with vanilla ice cream and raspberries and it was fantastic! We will make it again soon. We did bake it an extra 2-3 min and i think it was too long because it was not very runny but it was still very moist. Next time we will bake it for 9 min for our small ramekins. Thanks for this delicious recipe! It did taste like the carnival recipe! My young hikes helped me make it and thought it was very fun!
This recipe was so good!! I made them for dessert last night and everyone raved about how good it was – thank you so much!! It was easy to prep ahead of time and pop in the oven when we finished dinner. Will definitely make these again!!
So simple to make and tasted amazing!! I made it straight forward with semi-sweet chocolate chips. Can’t wait to mix up some flavors in future!
I’ve made this for an afternoon tea and it was YUMMMMMMM!!!! Love it !
I made these in 4 oz. ramekins. 10 minutes was just too runny, 13 was much better. I think I will like 15 minutes. Also, next time will up the sugar a little. I wonder if anyone has tried making the batter beforehand, then pouring and baking when ready. Should it be refrigerated, or not?
Love it ! I still can’t believe I was able to make it and works ! Family loved!
I’ve made these several times! One of my favorite desserts ever. Super easy and delicious.
Thanks for sharing! It looks really yummy and easy to do!
For this recipe, can I use Semisweet chocolate baking bars instead of semisweet chocolate chips?