This post may contain affiliate links. Please read my disclosure policy.
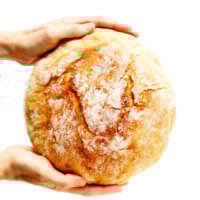
My favorite no knead bread recipe is incredibly easy to make, perfectly crusty and golden on the outside, and soft and flavorful on the inside. Two versions included — one with a traditional (overnight) rise, and one with a faster (1.5-hour) rise.
Interested in trying to make no knead bread? ♡
Well today, I thought I would share my two favorite no knead bread recipes with you — the traditional recipe that I like best (which requires the dough to rest 12-18 hours) or a faster method (which requires just a short 1.5-hour rise).
Both of these no knead bread recipes are incredibly forgiving and easy to make, with just 15 or so minutes of active hands-on prep time. They both bake up magically in the oven to yield artisan-style loaves with the most gorgeous golden crusts and soft, flavorful interiors. They call for just 4 basic ingredients, plus an extra teaspoon of honey or sugar for the faster version. They are guaranteed to make your entire home smell like the yummiest, coziest French bakery as they cook. And best of all, they both taste downright heavenly served warm and fresh outta of the oven. (And — my breakfast-loving husband would add — fabulous toasted up the next morning too!)
So whether you are brand new to bread-baking, or just looking for some tried-and-tested recipes to add to your repertoire, I highly recommend bookmarking these recipes if you would like to give no knead artisan bread a try! If you are planning ahead and have the time for an overnight rise, I would recommend going with the traditional version (my favorite) which gives the dough time to develop more of that yeasty, sourdough-like flavor and yields a more airy, porous crumb on the inside. But if you’re pressed for time and just want a hot loaf of crusty homemade bread in a hurry, this faster version is a great option to try too. Both versions can be made with any extra seasonings that you would like to add in, and baked up with however light or deeply golden of a crust you prefer.
Alright friends, let’s make some no knead bread together!
no-knead bread recipe | 1-minute video
Traditional overnight no knead bread (left) and faster 2-hour no knead bread (right).
No Knead Bread Ingredients:
The ingredients four base ingredients for these no knead bread recipes are the same — water, yeast, flour, salt — but be sure to note in the recipe below that the amounts differ slightly for each. The faster version will also include a hint of sugar.
To make traditional (overnight) no knead bread, you will need the following ingredients:
Warm water: I recommend using a cooking thermometer to measure the temperature of the water, if you have one. It should be between 105-110°F — which will feel quite warm but not hot to the touch.
Active dry yeast: You will need less than a packet (1/2 teaspoon) for the overnight version, and one full packet (2 1/4 teaspoons) for the faster version. If you only have instant yeast on hand, see notes below for how to modify.
All-purpose flour: I highly recommend using a kitchen scale to weigh your flour, if possible, so that the amount is accurate. But if you do not have a scale, just be sure to spoon the flour into your measuring cups (instead of scooping the cups into the flour) to make the measurements more accurate.
Fine sea salt: To bring out all of those delicious flavors.
To make faster (2.5-hour) no knead bread, you will need the following ingredients:
All of the ingredients listed above: Warm water, active dry yeast, AP flour, fine sea salt, plus…
Sugar or honey: We add extra sugar to this version to help the yeast do its work a bit more quickly.
How To Make No Knead Bread:
Here are the basic steps for how to make overnight no knead bread (full instructions in the recipe below):
Mix the dough. Whisk together the dry ingredients, add the warm water, then stir everything together until no flour streaks remain. The dough will look quite loose and shaggy and won’t hold its shape well — which is ok.
Let the dough rise. Cover the bowl with plastic wrap or beeswrap, and let it rest at room temperature for about 12 to 18 hours. The longer it rests, the more flavor and better texture it will have.
Shape the dough. Transfer the dough to a well-floured surface. Form the dough into a round ball by folding the dough on top of itself. (Just gently pull the outer edges up and press them into the center of the dough a few times until the dough feels a bit tighter and holds its shape.) If the dough is sticky or feels too loose at any point, just keep sprinkling on extra flour as needed. Lightly flour the top of the dough ball, and then carefully flip it upside-down onto a piece of parchment paper, so that the smooth side is on top. Use your hands to shape the ball into an even circle. Lightly flour the top of the dough ball, then loosely cover it with plastic wrap or beeswrap to rest while the oven heats.
Heat the oven and Dutch oven. Place the Dutch oven inside of your oven, then set oven to 450°F. Wait for 20-30 minutes for the oven to heat, while the dough continues to rest. (If the dough rises and spreads out more than you would like during this time, just use your hands to shape it into a tighter ball once more just before baking.)
Bake. Very carefully, use oven mitts to remove the Dutch oven from the oven. (It will be extremely hot – be careful!) Lift the edges of the parchment to carefully transfer the dough ball (along with the parchment) to the Dutch oven. Cover with the Dutch oven lid and bake for 30 minutes. Then carefully remove the lid and bake for 10-20 more minutes, until the crust of the bread reaches your desired level of doneness (as light or as deeply golden brown and crispy as you prefer).
Serve. Remove from the oven, uncover, and then carefully lift up the edges of the parchment to transfer the bread to a wire cooling rack. Cool for at least 30 minutes, then slice, serve and enjoy!
Here are the basic steps for how to make no knead bread faster (the 2-hour version):
Mix the dough. Whisk together the dry ingredients, add the warm water, then stir everything together until no flour streaks remain.
Let the dough rise. Cover the bowl with plastic wrap or beeswrap, and let the dough rest at room temperature for 1 hour (not 12-18 hours).
Continue on with steps 3-6. As directed above.
Possible Variations:
Want to customize your no knead bread recipe? Feel free to…
Add in garlic: Mince 1-2 cloves of fresh garlic and stir them into the dough during Step 1.
Add in herbs: Chopped fresh herbs (such as rosemary, tarragon or sage) or dried herbs (or herb blends such as Italian seasoning or Herbs de Provence) would be lovely additions to this bread too. Just stir them into the dough during Step 1.
Add everything bagel seasoning: One of my personal faves — stir 1 tablespoon everything bagel seasoning into the dough during Step 1.
Add freshly-cracked black pepper: Sounds simple, but tastes so good. Just stir into the dough during Step 1.
Add in Parmesan: Stir 1/4 to 1/2 cup freshly-grated Parmesan cheese into the dough during Step 1.
Use less salt: If you are sensitive to salt, I recommend reducing the amount of fine sea salt in this recipe by half. And as always, just a reminder that fine sea salt is very different than table salt! (And to make things even more complicated, different brands of fine sea salt can taste more/less salty too.) I like my bread quite salty, but feel free to experiment and use less salt if you prefer.
Top with flaky sea salt: We also love to sprinkle a few pinches of flaky sea salt on top of the bread just before baking. (If you choose to do this, though, I recommend slightly lowering the amount of salt in the dough itself.)
No Knead Bread FAQ:
What if I only have instant yeast at home? No prob, just reduce the amount of yeast by half to use instant yeast. So for the traditional recipe, you would need 1/4 teaspoon instant yeast. Or for the fast recipe, you would need about 1 1/4 teaspoons instant yeast.
Do I need to proof the yeast for this recipe? Nope, just mix the yeast right in with the flour, salt and warm water.
Can I make this recipe with ______ flour? I’ve only tested this recipe with standard all-purpose flour, so I can’t speak to any other variations. But if you give the recipe a try with alternate flours, please report back in the comments!
Help, my dough feels too loose/wet/sticky! No prob, just add in a bit of extra flour. That said, when you very first mix the ingredients together in Step 1, know that the dough is supposed to look like a loose blob. :) But once you begin to shape it in Step 3, it should tighten up a bit and be able to hold a round shape. If not, just sprinkle on some extra flour until it does.
How do I create pretty patterns on top? If you would like to carve patterns into the top of your loaf, just use a knife to lightly score the top of the bread dough just before baking.
What if I don’t like a really crusty bread? No prob, you have 100% control over the doneness and color of your crust. Bake it for 5-10 minutes after removing the lid…or leave it in there for up to 20-25 minutes if you would like a super-crispy dark golden crust.
What if a piece of the crust pokes up really high and starts to burn? This can sometimes happen with crusty bread! If you notice that a piece of the crust is raised higher than the rest of the loaf, just carefully place balance a small piece of foil on top to cover that part of the crust, which will help it not to cook as quickly.
Is it safe to use parchment paper at such high heat? Most parchment brands have a heat limit of 425-450°F, so use parchment in this recipe at your own risk. But I have never had a problem using parchment in high-heat baking, and as Cooks Illustrated verified with leading parchment brands, “using parchment at higher-than-recommended temperatures does not release noxious chemicals, and the paper will not burn.”
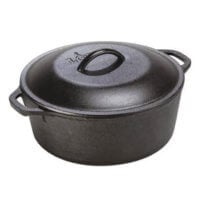
Why do you need a Dutch oven for this recipe? Basically, the Dutch oven allows us to create an enclosed environment for the bread dough so that it will steam while baking.
Any recommendations for a cheaper Dutch oven? Definitely! If you don’t want to splurge on a Le Creuset or Staub Dutch oven, there are many cheaper options available on Amazon that work just as well. Since high heat baking can be hard on enameled cast iron, I would recommend this non-enameled Dutch oven from Lodge. But if you’re in the market for an enameled Dutch oven, I love this one by AmazonBasics (which is available in a variety of colors) or this one from Lodge. Just be sure to double-check that the knob on the lid can safely be heated up to 450°F.
Important tip for those with enameled Dutch ovens: If you own an enameled Dutch oven (as I do, pictured here), I highly recommend giving it a very good clean before baking. Any grease or residue that was on the pot can tend to stain when baked at this high of a temperature. If that happens, these are the tips that I follow for removing stains.
More Favorite Bread Recipes:
Looking for more easy bread recipes to try? Here are a few of my faves!
My favorite no knead bread recipe is incredibly easy to make, perfectly crusty and golden on the outside, and soft and flavorful on the inside. See notes below for an alternate faster (2-hour) version too.
Mix the dough. Stir together the flour, salt and yeast in a large mixing bowl until combined. Add in the warm water and stir with a wooden spoon or spatula until the dough is evenly mixed and no large flour streaks remain. (The dough will look quite loose and shaggy, which is ok.)
Let the dough rise. Cover the bowl with plastic wrap or beeswrap, and let the dough rest at room temperature for 12 to 18 hours.
Shape the dough. Transfer the dough to a well-floured surface. Fold the dough on top of itself — pulling the outer edges up and into the center a few times until the dough feels a bit tighter and holds its shape — to form a round dough ball. (If the dough is sticky or feels too loose at any point, just keep sprinkling on extra flour as needed.) Lightly flour the top of the dough ball, and then carefully flip it upside-down onto a piece of parchment paper, so that the smooth side is on top. Use your hands to shape the ball into an even circle. Lightly flour the top of the dough ball, then loosely cover it with plastic wrap or beeswrap to rest while the oven heats.
Heat the oven and Dutch oven. Place the Dutch oven inside of your oven*, then set oven to 450°F. Wait for 20-30 minutes for the oven to heat, while the dough continues to rest. (If the dough rises and spreads out more than you would like during this time, just use your hands to shape it into a tighter ball once more just before baking.)
Bake. Very carefully, use oven mitts to remove the Dutch oven from the oven. (It will be extremely hot!) Lift the edges of the parchment to carefully transfer the dough ball (along with the parchment) to the Dutch oven. Cover with the Dutch oven lid and bake for 30 minutes. Then carefully remove the lid and bake for 10-20 more minutes, until the crust of the bread reaches your desired level of doneness (as light or as deeply golden brown and crispy as you prefer).
Serve. Remove from the oven, uncover, and then carefully lift up the edges of the parchment to transfer the bread to a wire cooling rack. Cool for at least 30 minutes, then slice, serve and enjoy!
Faster (2-Hour) No Knead Bread Ingredients: 3 1/4 cups (430 grams) all-purpose flour
2 teaspoons fine sea salt
1 teaspoon honey or granulated sugar
1 (7-gram) packet active dry yeast (2 1/4 teaspoons) 1 1/3 cups warm water (about 110°F)
Faster (2-Hour) No Knead Bread Instructions: 1. Stir together the flour, salt, sugar and yeast in a large mixing bowl until combined. Add in the warm water and stir with a wooden spoon or spatula until the dough is evenly mixed and no large flour streaks remain. (The dough will look quite loose and shaggy, which is ok.) 2. Cover the bowl with plastic wrap or beeswrap, and let the dough rest at room temperature for 1 hour. (It should double in size during this time.) 3. Continue with steps 3-6 as directed above.
Dutch oven safety tips: If you own an enameled (vs non-enameled) Dutch oven, I recommend giving it a very thorough scrub-down before making this recipe, as any grease that happens to be on the pot can stain when baked at high heat. Also, in order to avoid cracking the enamel in your Dutch oven, it is essential that it preheats along with the oven. So add the Dutch oven to your oven before turning the oven on and let them heat up together.
Source: Big thanks to Jim Lahey who developed the famous no knead bread method that went viral years ago! These recipes are slight adaptions of his original recipe.
Hello. I am new to bread making and thought this looked like an easy recipe to start with. I left my dough for a little over 24 hours (just the time I could get back to it) and it’s so wet I can’t even fold it over on itself it just sort of splodges out. Any insight as to what I did wrong?
Stefanie —
Just sprinkle a little flour on your hands and on the bread itself. I don’t think you did anything wrong.
Brianna —
If you have to leave it more than 12ish hours I’d suggest letting it proof in the fridge – after 24 hours you might have overproofed dough which can smell a little like alcohol and won’t rise as well. It rises great in the fridge over 24 hours!
Hi Ali, thank you for this great recipe! My bread was delicious! The only problem I had was slicing it. The bottom was very hard and my knife would not go through it! My knife was very sharp too! Did I do something wrong that the bottom came out so hard? Thank you!
Piet Vorster —
Possibly your Dutch oven was to close to the bottom element in your oven, I had the same problem with my first attempts because it’s one of those table top ovens and the Dutch oven was to close to the bottom.
If you can’t adjust the rack in the oven I suggest a lower baking tempreture, worked for me at about 180-200C(356-392F)
Extremely wet dough. What i made vs what i saw in the picture was totally different. I was unable to shape the dough into a ball and wound up with an amorphous blob instead, even after covering the entire work surface in flour and adding a generous amount to try and shape it. It just falls into a puddle. Lost about half of the dough in the transferring process as well. I’m not sure what happened, but I know I followed the recipe to the letter. Gonna try to throw it into the oven regardless.
Keith —
I too found the dough to be extremely wet, and I had to add a large (and I mean LARGE) amount of flour to make it usable. Even then, it didn’t really hold its shape.
I measured the flour by weight. As an engineer, I am used to following instructions carefully and precisely, so I doubt that the extreme wetness was caused by user error. I am also not a novice baker.
I think of this as “stealth-knead” rather than “no-knead” bread. Given the amount of folding required to incorporate the added flour, you might as well be kneading it.
Keith —
I should add that I judged the wetness and the ability to hold shape against what I saw in the video.
I’m curious. For those of you who were able to match the video without adding large amounts of flour, did you measure your flour by weight or by volume? I go by weight.
Heather —
This is my favorite bread recipe. I am an experienced bread maker, I’ve done all sorts of recipes and this is my go to. I saw a comment someone’s dough was too wet? Mine is normally a tad bit dry. Please note that while bread making is a science that science is dependent on all sorts of things! Your environment may change the recipe. Making bread is very much about feel. Once ya get it down you can replicate it over and over again. One accidental change I have made is I use pizza yeast…it makes us more airy on the inside. I used it by mistake one time and now it’s all I use!
Christine —
This comes out on the dry side compared to all the other no knead recipes I have tried. I measured by volume not weight. Spooned flour in cup, butter knife slide to level. It really shouldn’t be that wet. Make sure you measure flour in dry ingredients cup and water in wet.
First time baking bread. I used my cast iron (no enamel) dutch oven and stone ground hard red spring wheat flour from Michigan. It turned out great! A wonderful dense bread for doing into soup, stew or to mop up the juices on the plate.
@Richard, did you use bread flour or all purpose (plain for us Brits!)? I tried it before with bread flour, I think a 50:50 white/wholemeal mix, and found the same. However, I’ve just made it with plain flour and if anything it’s a bit dry. I’m more confident about this time, last time it was edible but not great.
Awesome bread! I’ve made it a couple times. I use instant yeast and put it in the fridge overnight. Punch it down in the morning, re-cover, then let it sit on the counter for a couple hours. I don’t have a Dutch oven, just use my baking stones, preheated in the oven. I sprayed loaf liberally with warm water, and bake it for 40 minutes. I’ve also subbed up to 1/3 of the flour with whole wheat bread flour – delicious! I tried it once with about 70% whole wheat bread flour, but it didn’t have the same *wow* factor. I recommend 1/3 whole wheat and 2/3 regular bread flour. Amazing and easy! Thank you for the recipe!!
This is such a great recipe! I have made both versions several times. As a novice bread baker, I was very hesitant, but it really couldn’t be more simple. Practice makes perfect!
(I now use the flour/water/salt/yeast ratio to make raisin bread, too. I just substitute plant-based oat milk for the water and add the raisins, cinnamon, and sugar amounts that are recommended in another recipe. Works!)
I made one loaf according to directions turned out wonderful. I decided for my second attempt I would add a spoonful of roasted garlic as I thought I saw in the comments you or someone had recommended it. The lof rose overnight but fell before I could get it ready for baking. Not knowing it was the garlic which I found out by Google I started a second loaf with garlic in it. As it is rising I’m going to treat it like a short rise loaf. Hopefully I can bake it before it falls completely. I won’t do that again. I’ll let you know how it turns out.
This is AMAZING bread!I can’t believe I spent all those years kneading dough! The only thing I did differently from the recipe was to turn the oven down from 450 to 425 when I put the bread in. I did this mainly because my parchment paper says top temp is 425. I did heat it to 450 originally that way it gets the higher temp initially. I only bake it about 8 minutes once I take the lid from but that time has varied a bit with each loaf. I love the shape and that it cracks on top. Reminds me of sour dough but the taste is of course more like Italian bread. Delicious! So easy too! Thanks for a great recipe! I think if your dough is too wet as one poster said you may need to add a bit more flour or slightly less water next time!
Perfect every time. I always double the recipie, use half rye flour the other half a mix of white and whole wheat, add herbs and caraway seeds. This is now the only bread I make and I’ve been making my own bread for 40 yrs.!
Absolutely amazing bread!! My first time making a true artisan loaf, and this recipe turned out so well. The first time I tried, I spooned and leveled the flour like a baking recipe, and after the first rise, the dough was extremely wet. I just kept adding more flour and folding the dough until it held a shape, and it was one of the best loaves I have ever had. The second try, I scooped the flour out of the bin, and added a tiny bit less water. That helped the dough be a little stiffer from the start!
Just tried the 2-hour version, and it’s noticeably denser, the top doesn’t split open in the same beautiful way as the overnight, and the flavor is a little bit lacking. With some butter/jam, though, it’s still delicious.
I could hardly wait for the half hour after I took it out of the oven. It’s absolutely fabulous! Not just fabulous but so dang easy! My hubby went crazy over the flavor and texture. Everyone needs to give this a go. Thank you so much! ❤️❤️❤️❤️❤️
I made this. Let it set for 18 hr. Put Dutch oven in cold oven and set at 450. I baked for time specified. First of all it didn’t rise much.It didn’t rise much in the oven. Turned out gummy on the inside. Won’t try this again.Will stick to conventional recipe.
Excellent and so easy! Came here looking for a faster no knead recipe (I wanted bread asap), and this was perfect. Used 1/3 bread flour per many comments. Ended up with about a 3 hour rise (I took a nap). I’ll definitely do overnight when I plan ahead, to get a bit more tangy flavor and open texture.
Your yeast may be dead- if your yeast is older than 2 years, purchase more yeast and try again. Or water too hot. I prefer instant yeast- I use cool water for this recipe. (check out the New York Times version of this recipe by Mark Bittman- he adapted Jim Lahey’s (owner of Sullivan Street Bakery in NYC) for home bakers. As a professional baker myself, I think his instructions make more sense.
Haven’t ever tried an overnight bread and was worried that 1/2 teaspoon of yeast wasn’t enough, but WOW! The dough was very slack before folding, but after flouring the surface and folding over, it formed up nicely. The texture & flavor is DELICIOUS. Will be making often! Thank you! *compared to other dutch oven loaves I’ve tried, this one was not as fussy*
To knock this recipe into the stratosphere, mix in 1 -2 tbsp white vinegar and 3 to 4 tablespoons hoppy beer with the water. Make the same. I let mine sit 36 to 48 hours to get that true sourdough taste with big holes and a crunchy crust. I have two Dutch Ovens, one a green Le Cruset and the other a basic seasoned black cast iron. The cast iron makes a much better loaf by far. I heat to 450 for an hour before transferring parchment with dough on it to the pan. I bake it with the parchment. I also do two good cuts in the top with a razor blade.
I have tried potato water and it makes a nice bread, more sandwich versus artisan.
I’m a novice bread maker who started this year. Hands down the best I’ve made. My loaf was on the smallish side (8-9 inches) due to the temp. drop overnight (I think) and me fussing with the shrink wrap which caused it to fall (note to self leave it alone). I did bake it with the parchment paper at 450 w/out any problem.
Made this for dinner with my 80 and 79 year old parents. Mom bookmarked recipe after dad said it was better than his mother’s bread. Grandma is a tough act to follow in the kitchen
Between the 4 of us just 2 pieces left. Thank you gimmesomeoven! This was a game changer!
First time making loaf bread and I was a little intimidated, but this bread is delicious!! I love the texture and flavor. I added a little flour as suggested in the comments which helped tremendously with shaping it.
I’ve made this loaf probably 10 times now, trying different variations of add ins every once in a while. Its a great staple bread and so easy to make! I sub the AP flour with Bread Flour (i’ve never used it with AP flour) and it turns out great.
This is a delicious, crusty loaf, but it is very small!! I should have realized when it only had a little over 3 cups of flour. This is perfect for a family of two, with no leftovers. The bread lovers in our family consider this more of a single serving size loaf :D
i really do love this recipe. I did find my perfect looking loaf to be to moist or wet inside and wonder how to fix this. I will try again. How much do i extend the bake time or is it the bake time with the lid off that matters?
I love this recipe! I used white Italian flour and added garlic and oregano. I wound up having to let it rise for about 21 hours because of scheduling, and it still turned out delicious. I plan on adding fresh parmesan next time!
Nelly —
I made this recipe a few times with variations of half/half white and WW flours- turns great every time. I’d like to know though can you make it with Gluten free flour and with what proportion to the water and yeast?
I made the overnight version of this recipe and I was so impressed with the rise of this bread and also the crumb. Just 2 questions…why does the bread have a slightly brownish tint to it and the texture was just a tiny bit gummy. I let it cool for an hour before cutting into it. Again I was very impressed. I think my Sourdough days are over!
I have tried several versions of three ingredient bread in my Dutch oven. This one came out best yes it’s a little sticky and will need a little extra flower when you’re forming it into a ball BUT it was by far the lightest and best tasting and it’s the one I’m sticking with!
I added everything but bagel seasoning in step one and sprinkled the top as well before I put it in the oven. The house smelled amazing and the bread was amazing.
Wow, this recipe is so easy. Mines about to depart the oven for snacking!!!
If you’re struggling to make the dough, it’s probably your elevation that’s causing the issues. I know many recipes don’t work for me because of the elevation of where I live.
Greetings! Thank you for sharing this recipe. If I were to make a half loaf in a 2.5 quart dutch oven, are there any suggestions in altering the bake time? Many thanks for your culinary creativity and wisdom.
I can’t remember if I’ve rated this recipe before but it is WONDERFUL. I’ve made it for years now. I add 100 grams or so of whole wheat flour when I make it for my family but I do all white flour (yay to Costco for carrying organic flour!) for company or church gatherings. I never leave with leftovers – because there are none. I always give credit to this recipe and have sent the link to more people than I can count. Thank you!!!
A great no-kneadish recipe. I did add a little more sea salt, 1tsp yeast (instead of 1/2tsp) and, added approx. 2Tbps of molasses to the water. I use distilled water as, I have read, the minerals, even in filtered water, can affect yeast functionality. Let it “stew” for 24hrs. Did multiple foldings with resting in between. The dough shaped up nicely. Snipped a slit across the top and into the pre-heated Dutch oven it went. After lid removal I let it go until it reached 198deg internal temp. The bread came out awesome. Nice and crusty/soft interior.
I usually make “exercise” bread…requiring kneading. I do like the therapeutic benefit of manually kneading bread dough although, the occasional bread making with less work is a nice break.
Thanks for your posting of this recipe
The bread was too salty for my taste, but it was easy to make and the texture turned out well. Next time, I’ll reduce the salt by half and add some rosemary or other herbs for flavor.
This recipe is absolutely amazing! The overnight is definitely more airy than the fast, but the fast version still is tasty (just a little dense). One thing that I do after the 30 minute bake with the lid on is after I remove the lid, I brush with vegetable oil and sprinkle the top with Parmesan cheese. The cheese gets a nice color to it and adds some extra flavor to the crust.
I’ve tried so many Dutch oven yeast bread recipes, and this one is my fave! It’s great as is, but for my most recent loaf I made a few modifications that took it to the next level (got me a much better rise). 1) Let the dough rest for 40 min in a covered bowl lined with the flour + cornmeal dusted parchment paper after shaping, instead of 20-30 min on a flat surface . 2) Score the top of the loaf just before baking. 3) Pre-heat oven to 475 with Dutch oven inside, then lower to 450 once I put the bread in. Result = the best loaf of bread I’ve ever made!
I never leave reviews for recipes, but this bread is SO excellent. A couple of months ago, I made a loaf for my mom, subbed in 1 cup of whole wheat flour because she prefers whole wheat, and she loved it so much she demanded (seriously, DEMANDED, on penalty of disowning me) I make bread for our holiday celebration this year. I am currently baking the first of three loaves to bring to her house tomorrow. I have had a lot of fun folding in different ingredients, but the most popular variations are the garlic bread, where I add about 6 cloves of finely minced garlic and the other is the southwest spices and cheddar, with cumin, chipotle powder, paprika, onion powder, Mexican oregano, chili powder, grated sharp cheddar cheese, and about 4 cloves of minced garlic. I always add whatever I am putting in before the water so anything wet gets coated in flour and will be evenly distributed throughout the loaf. The next variation I want to try is diced kalamata olives, feta, and Calabrian chili hot honey.
I have three notes; first, if using whole wheat, it definitely needs more time to rise, 24 hours seems to work, and I doubled the yeast in the one whole wheat loaf I made this time around. 1 cup of whole wheat with 2.25 cups of bread flour seems to be the best ratio. Second, I started making these with bread flour and the result gives me a beautiful crust and a very chewy texture. Finally, I found that if the top of the dough starts drying out and getting hard during the proving time, sprinkle it with about a tablespoon of hot water and put the plastic or beeswrap back on.
As I said, I never leave reviews for recipes, but this deserves one. If I could give it 10 stars, I would. Brilliant.
 method or a faster (2-hour) method. Both yield the most delicious crusty homemade bread loaves that are easy to make with minimal hands-on prep time. | gimmesomeoven.com #bread #noknead #easy #side #vegan #vegetarian #homemade")
 method or a faster (2-hour) method. Both yield the most delicious crusty homemade bread loaves that are easy to make with minimal hands-on prep time. | gimmesomeoven.com #bread #noknead #easy #side #vegan #vegetarian #homemade")
 method or a faster (2-hour) method. Both yield the most delicious crusty homemade bread loaves that are easy to make with minimal hands-on prep time. | gimmesomeoven.com #bread #noknead #easy #side #vegan #vegetarian #homemade")
 method or a faster (2-hour) method. Both yield the most delicious crusty homemade bread loaves that are easy to make with minimal hands-on prep time. | gimmesomeoven.com #bread #noknead #easy #side #vegan #vegetarian #homemade")
 method or a faster (2-hour) method. Both yield the most delicious crusty homemade bread loaves that are easy to make with minimal hands-on prep time. | gimmesomeoven.com #bread #noknead #easy #side #vegan #vegetarian #homemade")
 method or a faster (2-hour) method. Both yield the most delicious crusty homemade bread loaves that are easy to make with minimal hands-on prep time. | gimmesomeoven.com #bread #noknead #easy #side #vegan #vegetarian #homemade")


This is the best bread ever!! Aleady passed recipe to family members they loved it so much !!!
This is my go-to recipe! Love it! It works really well if you do half whole wheat as well. Super reliable recipe and so tasty!
Hello. I am new to bread making and thought this looked like an easy recipe to start with. I left my dough for a little over 24 hours (just the time I could get back to it) and it’s so wet I can’t even fold it over on itself it just sort of splodges out. Any insight as to what I did wrong?
Just sprinkle a little flour on your hands and on the bread itself. I don’t think you did anything wrong.
If you have to leave it more than 12ish hours I’d suggest letting it proof in the fridge – after 24 hours you might have overproofed dough which can smell a little like alcohol and won’t rise as well. It rises great in the fridge over 24 hours!
Just what I was looking for, low maintenance, wonderful homemade bread. Turned out great on the first try. Thank you!
Looking forward to how this turns out, based on comments – I’m excited!
Did use a 1:3 combo of WW: AP instead of bread flour. Was tempted to use bread flour but
wanted to honor the recipe before tweaking.
Question:
Given that this dough is @83% hydration, could I knead in some flour to make it suitable to form into baguettes? This may be cheating?
Thank you!
How can I use fresh yeast in this recipe
Hi Ali, thank you for this great recipe! My bread was delicious! The only problem I had was slicing it. The bottom was very hard and my knife would not go through it! My knife was very sharp too! Did I do something wrong that the bottom came out so hard? Thank you!
Possibly your Dutch oven was to close to the bottom element in your oven, I had the same problem with my first attempts because it’s one of those table top ovens and the Dutch oven was to close to the bottom.
If you can’t adjust the rack in the oven I suggest a lower baking tempreture, worked for me at about 180-200C(356-392F)
Extremely wet dough. What i made vs what i saw in the picture was totally different. I was unable to shape the dough into a ball and wound up with an amorphous blob instead, even after covering the entire work surface in flour and adding a generous amount to try and shape it. It just falls into a puddle. Lost about half of the dough in the transferring process as well. I’m not sure what happened, but I know I followed the recipe to the letter. Gonna try to throw it into the oven regardless.
I too found the dough to be extremely wet, and I had to add a large (and I mean LARGE) amount of flour to make it usable. Even then, it didn’t really hold its shape.
I measured the flour by weight. As an engineer, I am used to following instructions carefully and precisely, so I doubt that the extreme wetness was caused by user error. I am also not a novice baker.
I think of this as “stealth-knead” rather than “no-knead” bread. Given the amount of folding required to incorporate the added flour, you might as well be kneading it.
I should add that I judged the wetness and the ability to hold shape against what I saw in the video.
I’m curious. For those of you who were able to match the video without adding large amounts of flour, did you measure your flour by weight or by volume? I go by weight.
This is my favorite bread recipe. I am an experienced bread maker, I’ve done all sorts of recipes and this is my go to. I saw a comment someone’s dough was too wet? Mine is normally a tad bit dry. Please note that while bread making is a science that science is dependent on all sorts of things! Your environment may change the recipe. Making bread is very much about feel. Once ya get it down you can replicate it over and over again. One accidental change I have made is I use pizza yeast…it makes us more airy on the inside. I used it by mistake one time and now it’s all I use!
This comes out on the dry side compared to all the other no knead recipes I have tried. I measured by volume not weight. Spooned flour in cup, butter knife slide to level. It really shouldn’t be that wet. Make sure you measure flour in dry ingredients cup and water in wet.
First time baking bread. I used my cast iron (no enamel) dutch oven and stone ground hard red spring wheat flour from Michigan. It turned out great! A wonderful dense bread for doing into soup, stew or to mop up the juices on the plate.
@Richard, did you use bread flour or all purpose (plain for us Brits!)? I tried it before with bread flour, I think a 50:50 white/wholemeal mix, and found the same. However, I’ve just made it with plain flour and if anything it’s a bit dry. I’m more confident about this time, last time it was edible but not great.
Awesome bread! I’ve made it a couple times. I use instant yeast and put it in the fridge overnight. Punch it down in the morning, re-cover, then let it sit on the counter for a couple hours. I don’t have a Dutch oven, just use my baking stones, preheated in the oven. I sprayed loaf liberally with warm water, and bake it for 40 minutes. I’ve also subbed up to 1/3 of the flour with whole wheat bread flour – delicious! I tried it once with about 70% whole wheat bread flour, but it didn’t have the same *wow* factor. I recommend 1/3 whole wheat and 2/3 regular bread flour. Amazing and easy! Thank you for the recipe!!
This is such a great recipe! I have made both versions several times. As a novice bread baker, I was very hesitant, but it really couldn’t be more simple. Practice makes perfect!
(I now use the flour/water/salt/yeast ratio to make raisin bread, too. I just substitute plant-based oat milk for the water and add the raisins, cinnamon, and sugar amounts that are recommended in another recipe. Works!)
I made one loaf according to directions turned out wonderful. I decided for my second attempt I would add a spoonful of roasted garlic as I thought I saw in the comments you or someone had recommended it. The lof rose overnight but fell before I could get it ready for baking. Not knowing it was the garlic which I found out by Google I started a second loaf with garlic in it. As it is rising I’m going to treat it like a short rise loaf. Hopefully I can bake it before it falls completely. I won’t do that again. I’ll let you know how it turns out.
This is AMAZING bread!I can’t believe I spent all those years kneading dough! The only thing I did differently from the recipe was to turn the oven down from 450 to 425 when I put the bread in. I did this mainly because my parchment paper says top temp is 425. I did heat it to 450 originally that way it gets the higher temp initially. I only bake it about 8 minutes once I take the lid from but that time has varied a bit with each loaf. I love the shape and that it cracks on top. Reminds me of sour dough but the taste is of course more like Italian bread. Delicious! So easy too! Thanks for a great recipe! I think if your dough is too wet as one poster said you may need to add a bit more flour or slightly less water next time!
Just like grandma’s searching forever for this Thks
Perfect every time. I always double the recipie, use half rye flour the other half a mix of white and whole wheat, add herbs and caraway seeds. This is now the only bread I make and I’ve been making my own bread for 40 yrs.!
Absolutely amazing bread!! My first time making a true artisan loaf, and this recipe turned out so well. The first time I tried, I spooned and leveled the flour like a baking recipe, and after the first rise, the dough was extremely wet. I just kept adding more flour and folding the dough until it held a shape, and it was one of the best loaves I have ever had. The second try, I scooped the flour out of the bin, and added a tiny bit less water. That helped the dough be a little stiffer from the start!
Just tried the 2-hour version, and it’s noticeably denser, the top doesn’t split open in the same beautiful way as the overnight, and the flavor is a little bit lacking. With some butter/jam, though, it’s still delicious.
Hi, can I half the recipe? Thanks!
Has any one baked this in a baking tin or on a baking tray?
I could hardly wait for the half hour after I took it out of the oven. It’s absolutely fabulous! Not just fabulous but so dang easy! My hubby went crazy over the flavor and texture. Everyone needs to give this a go. Thank you so much! ❤️❤️❤️❤️❤️
I made this. Let it set for 18 hr. Put Dutch oven in cold oven and set at 450. I baked for time specified. First of all it didn’t rise much.It didn’t rise much in the oven. Turned out gummy on the inside. Won’t try this again.Will stick to conventional recipe.
Excellent and so easy! Came here looking for a faster no knead recipe (I wanted bread asap), and this was perfect. Used 1/3 bread flour per many comments. Ended up with about a 3 hour rise (I took a nap). I’ll definitely do overnight when I plan ahead, to get a bit more tangy flavor and open texture.
My dough isn’t rising at all! Very odd!
Your yeast may be dead- if your yeast is older than 2 years, purchase more yeast and try again. Or water too hot. I prefer instant yeast- I use cool water for this recipe. (check out the New York Times version of this recipe by Mark Bittman- he adapted Jim Lahey’s (owner of Sullivan Street Bakery in NYC) for home bakers. As a professional baker myself, I think his instructions make more sense.
Haven’t ever tried an overnight bread and was worried that 1/2 teaspoon of yeast wasn’t enough, but WOW! The dough was very slack before folding, but after flouring the surface and folding over, it formed up nicely. The texture & flavor is DELICIOUS. Will be making often! Thank you! *compared to other dutch oven loaves I’ve tried, this one was not as fussy*
To knock this recipe into the stratosphere, mix in 1 -2 tbsp white vinegar and 3 to 4 tablespoons hoppy beer with the water. Make the same. I let mine sit 36 to 48 hours to get that true sourdough taste with big holes and a crunchy crust. I have two Dutch Ovens, one a green Le Cruset and the other a basic seasoned black cast iron. The cast iron makes a much better loaf by far. I heat to 450 for an hour before transferring parchment with dough on it to the pan. I bake it with the parchment. I also do two good cuts in the top with a razor blade.
I have tried potato water and it makes a nice bread, more sandwich versus artisan.
I’m a novice bread maker who started this year. Hands down the best I’ve made. My loaf was on the smallish side (8-9 inches) due to the temp. drop overnight (I think) and me fussing with the shrink wrap which caused it to fall (note to self leave it alone). I did bake it with the parchment paper at 450 w/out any problem.
Made this for dinner with my 80 and 79 year old parents. Mom bookmarked recipe after dad said it was better than his mother’s bread. Grandma is a tough act to follow in the kitchen
Between the 4 of us just 2 pieces left. Thank you gimmesomeoven! This was a game changer!
Have you doubled the recipe? (I have a large dutch oven.) Does that change the bake time? Thank you!
What size Dutch oven do you use for your no knead bread
absolutely perfect! I usually make a no knead rye bread so this is a welcome treat which we all loved. Thank you!
First time making loaf bread and I was a little intimidated, but this bread is delicious!! I love the texture and flavor. I added a little flour as suggested in the comments which helped tremendously with shaping it.
I’ve made this loaf probably 10 times now, trying different variations of add ins every once in a while. Its a great staple bread and so easy to make! I sub the AP flour with Bread Flour (i’ve never used it with AP flour) and it turns out great.
Wow, this came out beautifully! I wish I could post a photo. It’s just beautiful!
Can I use a cast iron pot with lid?
This is a delicious, crusty loaf, but it is very small!! I should have realized when it only had a little over 3 cups of flour. This is perfect for a family of two, with no leftovers. The bread lovers in our family consider this more of a single serving size loaf :D
i really do love this recipe. I did find my perfect looking loaf to be to moist or wet inside and wonder how to fix this. I will try again. How much do i extend the bake time or is it the bake time with the lid off that matters?
I love this recipe! I used white Italian flour and added garlic and oregano. I wound up having to let it rise for about 21 hours because of scheduling, and it still turned out delicious. I plan on adding fresh parmesan next time!
I made this recipe a few times with variations of half/half white and WW flours- turns great every time. I’d like to know though can you make it with Gluten free flour and with what proportion to the water and yeast?
What are the quantities of flour and water?
I made the overnight version of this recipe and I was so impressed with the rise of this bread and also the crumb. Just 2 questions…why does the bread have a slightly brownish tint to it and the texture was just a tiny bit gummy. I let it cool for an hour before cutting into it. Again I was very impressed. I think my Sourdough days are over!
I have tried several versions of three ingredient bread in my Dutch oven. This one came out best yes it’s a little sticky and will need a little extra flower when you’re forming it into a ball BUT it was by far the lightest and best tasting and it’s the one I’m sticking with!
I added everything but bagel seasoning in step one and sprinkled the top as well before I put it in the oven. The house smelled amazing and the bread was amazing.
I made quite a long comment and it never showed up so i never got any answers! Can you tell me why ?
This recipe is perfect. Weigh your flour. Measurement is important in good bread making. Thank you for this lovely recipe.
Wow, this recipe is so easy. Mines about to depart the oven for snacking!!!
If you’re struggling to make the dough, it’s probably your elevation that’s causing the issues. I know many recipes don’t work for me because of the elevation of where I live.
what if you don’t have a dutch oven
This is super easy. I have made it a few times and I just tried whole wheat and it’s delicious. Weighing the flour made all the difference
Greetings! Thank you for sharing this recipe. If I were to make a half loaf in a 2.5 quart dutch oven, are there any suggestions in altering the bake time? Many thanks for your culinary creativity and wisdom.
I can’t remember if I’ve rated this recipe before but it is WONDERFUL. I’ve made it for years now. I add 100 grams or so of whole wheat flour when I make it for my family but I do all white flour (yay to Costco for carrying organic flour!) for company or church gatherings. I never leave with leftovers – because there are none. I always give credit to this recipe and have sent the link to more people than I can count. Thank you!!!
A great no-kneadish recipe. I did add a little more sea salt, 1tsp yeast (instead of 1/2tsp) and, added approx. 2Tbps of molasses to the water. I use distilled water as, I have read, the minerals, even in filtered water, can affect yeast functionality. Let it “stew” for 24hrs. Did multiple foldings with resting in between. The dough shaped up nicely. Snipped a slit across the top and into the pre-heated Dutch oven it went. After lid removal I let it go until it reached 198deg internal temp. The bread came out awesome. Nice and crusty/soft interior.
I usually make “exercise” bread…requiring kneading. I do like the therapeutic benefit of manually kneading bread dough although, the occasional bread making with less work is a nice break.
Thanks for your posting of this recipe
The bread was too salty for my taste, but it was easy to make and the texture turned out well. Next time, I’ll reduce the salt by half and add some rosemary or other herbs for flavor.
This recipe is absolutely amazing! The overnight is definitely more airy than the fast, but the fast version still is tasty (just a little dense). One thing that I do after the 30 minute bake with the lid on is after I remove the lid, I brush with vegetable oil and sprinkle the top with Parmesan cheese. The cheese gets a nice color to it and adds some extra flavor to the crust.
I’ve tried so many Dutch oven yeast bread recipes, and this one is my fave! It’s great as is, but for my most recent loaf I made a few modifications that took it to the next level (got me a much better rise). 1) Let the dough rest for 40 min in a covered bowl lined with the flour + cornmeal dusted parchment paper after shaping, instead of 20-30 min on a flat surface . 2) Score the top of the loaf just before baking. 3) Pre-heat oven to 475 with Dutch oven inside, then lower to 450 once I put the bread in. Result = the best loaf of bread I’ve ever made!
I never leave reviews for recipes, but this bread is SO excellent. A couple of months ago, I made a loaf for my mom, subbed in 1 cup of whole wheat flour because she prefers whole wheat, and she loved it so much she demanded (seriously, DEMANDED, on penalty of disowning me) I make bread for our holiday celebration this year. I am currently baking the first of three loaves to bring to her house tomorrow. I have had a lot of fun folding in different ingredients, but the most popular variations are the garlic bread, where I add about 6 cloves of finely minced garlic and the other is the southwest spices and cheddar, with cumin, chipotle powder, paprika, onion powder, Mexican oregano, chili powder, grated sharp cheddar cheese, and about 4 cloves of minced garlic. I always add whatever I am putting in before the water so anything wet gets coated in flour and will be evenly distributed throughout the loaf. The next variation I want to try is diced kalamata olives, feta, and Calabrian chili hot honey.
I have three notes; first, if using whole wheat, it definitely needs more time to rise, 24 hours seems to work, and I doubled the yeast in the one whole wheat loaf I made this time around. 1 cup of whole wheat with 2.25 cups of bread flour seems to be the best ratio. Second, I started making these with bread flour and the result gives me a beautiful crust and a very chewy texture. Finally, I found that if the top of the dough starts drying out and getting hard during the proving time, sprinkle it with about a tablespoon of hot water and put the plastic or beeswrap back on.
As I said, I never leave reviews for recipes, but this deserves one. If I could give it 10 stars, I would. Brilliant.