This post may contain affiliate links. Please read my disclosure policy.
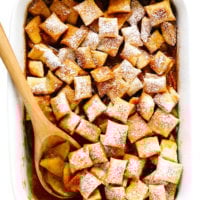
This Easy Apple Pandowdy recipe is made with the yummiest baked apple pie filling topped with toasted puff pastry bites and a light dusting of powdered sugar. All of the great flavors of apple pie…without all of the work required to make a pie!
To all of my fellow apple pie lovers out there…have you ever tried making apple pandowdy? ♡
I first heard about this old-fashioned dish, which is said to have originated in the Pennsylvania Dutch tradition, years ago from Martha Stewart. And I was immediately intrigued because it was basically everything I love about apple pie…without all of the work of having to assemble a pie!
Details about the exact heritage of this dish seem to be a little fuzzy. But traditionally, apple pandowdy is usually made a baking dish (or cast-iron skillet) with bite-sized pieces of pie dough sprinkled on top of a cozy cinnamon apple filling. Everything bakes up together in the oven to toasty, bubbly, sweet perfection. Then immediately after pulling the dish out of the oven, you take a spoon and press the topping down gently into the filling so that it can soak up some of those hot apple juices. And finally, serve the apple pandowdy nice and warm with a generous scoop of cold vanilla ice cream.
It’s all exactly as delicious as you would imagine. And so much quicker and easier to make than apple pie! So since I figure we could all use some easy shortcuts for our lower-key holiday season this year, this seemed like the perfect time to bring this old-fashioned dish back to the future.
I have loved making this dessert with homemade (or store-bought) pie crust over the years. But I actually recently saw a fun version from Bon Appetit that used fluffy puff pastry as an apple pandowdy topping, and after trying it out a few times, my husband and I have agreed that we like it even more than the original! Granted, I have made a few tweaks to BA’s recipe to make it a bit quicker and easier. And I’ve also been on a big vanilla chai kick this winter, so I’ve added a few extra chai-inspired spices to the apple filling to make it extra-special too.
So for anyone else who might be interested in an apple pie-ish recipe this holiday season that requires a bit less work, here’s the pandowdy version that we have been loving lately. I think you’re going to love it too!
Apple Pandowdy Ingredients:
Before we get to the full recipe below, here are a few notes about the ingredients you will need to make this apple pandowdy:
Store-bought puff pastry: One package of store-bought frozen puff pastry, which we will let thaw on the countertop while the apple filling is prepared so that it becomes a bit more soft and pliable. (That said, if you live in a country outside of the USA where puff pastry is sold refrigerated instead of frozen, no need to let the package thaw — you can just unfold and cut it immediately after removing it from the fridge.)
Apples: I used Granny Smith apples, whose tart flavor and firm texture I love in apple pie filling. But feel free to use any type of apples that you prefer — peeled or unpeeled, cut into either 1/2-inch-thick slices or chunks.
Lemon: We will toss both the zest and juice of 1 lemon with the apple, which will add a hint of tartness to the filling and help prevent the apples from browning.
Brown sugar: Or you are welcome to use any other type of sugar or sweetener that you prefer.
Melted butter: Half of which we will mix into the apple pie filling, and half of which we will brush over the puff pastry.
Flour: To thicken the apple filling a bit.
Warming spices: I used a chai-inspired blend of warming spices for the apple filling, including ground cinnamon, cardamom, ginger, cloves, nutmeg (plus some fine sea salt). But if you don’t have all of these spices on hand, you can keep things simple with just cinnamon and cardamom. Or you could also use pre-made apple pie spice (or pumpkin pie spice) for the apple filling instead, if you prefer.
Vanilla extract: To compliment all of those delicious warming spices in the apple pie filling.
Powdered sugar: To dust on top of the pandowdy before serving.
How To Make Apple Pandowdy:
Full recipe instructions are included below, but here is a brief overview of the process for how to make apple pandowdy:
Thaw the puff pastry. We want the puff pastry to be cool but not frozen for this recipe. So in order for it to thaw, I recommend setting the frozen puff pastry package on the countertop for about 20 minutes or so, while you prepare the apple filling, then you can unfold and cut it into bite-sized pieces using either a pizza cutter (easiest method!) or a knife.
Prepare the apples. It’s up to you whether or not you would like to peel the apples! I went the traditional apple pie route and peeled and cut mine into 1/2-inch slices. But you could leave yours peeled and/or cut them into smaller chunks instead, if you prefer. We’ll also toss them with the zest and juice of a lemon, to keep them from browning.
Combine the filling. Once your apples are ready to go, gently toss them with the brown sugar, half of the melted butter, flour, cinnamon, vanilla extract, cardamom, ginger, sea salt and cloves until combined. Then spread the mixture out in an even layer (you don’t want it to be too uneven, otherwise the topping may burn in spots) in a 9 x 13-inch baking dish.
Prepare the puff pastry topping. Next, we’ll sprinkle the puff pastry squares in an overlapping layer atop the apples, and brush them with the remaining melted butter so that they will toast up nice and golden. (Again, I recommend pressing down any puff pastry corners that happen to be poking up, otherwise they may burn.)
Bake. Bake uncovered for 20 to 25 minutes, until the puff pastry is lightly golden on top. (Keep an eye on it though, and if it starts to look too dark, you can gently lay a sheet of aluminum foil on top of the puff pastry to prevent it from toasting further.) Then lower the oven heat to 350°F and bake for 30 more minutes until the filling is bubbly.
Press down the topping. Finally, use a spoon to gently press the puff pastry topping down into the bubbly filling, so that it can soak up some of those delicious juices. (Don’t submerge the puff pastry completely — you just want to give it a brief soak.)
Serve warm. Then sprinkle with a dusting of powdered sugar, serve warm with a big scoop of vanilla ice cream, and enjoy!!
Possible Variations:
Here are a few more ways that you could potentially customize this apple pandowdy recipe…
Make it vegan: To make vegan apple pandowdy, use a vegan brand of puff pastry and plant-based butter.
Use different fruits: This recipe would also work deliciously with pears instead of apples. Or you are welcome to add in some fresh cranberries to go with the apples (or pears) too.
Use different spices: As mentioned above, I really love tossing the apple filling with a generous amount of chai-inspired warming spices. But feel free to keep things simple with just cinnamon and ginger, if you prefer, or add in any other warming spices that you love. Pumpkin pie spice would be another delicious option for the apple filling too.
Add nuts: Feel free to add in a handful of walnuts, pecans, or almonds to the apple filling if you would like too. (I don’t recommend sprinkling them on top with the puff pastry as they could burn under that high heat.)
Add a caramel drizzle: If you would really like to indulge, this apple pandowdy would be delicious drizzled with some warm caramel sauce. (I’m especially partial to mybourbon caramel sauce.)
More Favorite Apple Recipes:
Looking for more delicious apple recipes to try? Here are a few of my faves…
This easy Apple Pandowdy recipe is made with the yummiest baked apple pie filling topped with toasted puff pastry bites and a light dusting of powdered sugar. All of the great flavors of apple pie…without all of the work required to make a pie!
Thaw the puff pastry. Remove puff pastry from the freezer* and let it sit out while you prepare the rest of the ingredients so that it can thaw for about 20 to 30 minutes.
Heat the oven. Heat the oven to 425°F.
Prepare the apples. Core and peel the apples (if desired), cut them into 1/2-inch thick slices, and add the apples to a large mixing bowl. Add the lemon juice and zest to the apples and gently toss to combine.
Combine the filling. Add the brown sugar, 2 tablespoons of the melted butter, flour, cinnamon, vanilla extract, cardamom, ginger, sea salt and cloves to the apples. Gently toss the mixture until combined and the apples are evenly coated. Spread the mixture out in an even layer in a 9 x 13-inch baking dish.
Prepare the puff pastry topping. Gently unfold the puff pastry and transfer it to a lightly-floured cutting board. Use a pizza slicer or a knife to roughly cut the pastry into 1-inch squares (or whatever size/shape you desire). Layer the squares over the apples so that they are lightly overlapping, taking care to press down any corners that are sticking up noticeably (so that the corners do not burn). Use a pastry brush to brush the puff pastry with the remaining 2 tablespoons of melted butter.
Bake. Bake uncovered for 20 to 25 minutes, until the puff pastry is lightly golden on top. (Keep an eye on it though, and if it starts to look too dark, you can gently lay a sheet of aluminum foil on top of the puff pastry to prevent it from toasting further.) Lower the oven heat to 350°F and bake for 30 more minutes, until the filling is bubbly and the apples are soft. Transfer the baking dish to a wire cooling rack.
Press down the topping. Use a spoon to gently press the puff pastry topping down a bit into the bubbly filling. (You don’t want to completely submerge all of the puff pastry, but rather just give it a chance to briefly soak up more of those yummy juices). Use a fine mesh strainer to dust the puff pastry with a layer of powdered sugar.
Serve warm. Serve warm, topped with a scoop of cold vanilla ice cream, and enjoy!
Butter: Feel free to brown the butter on the stovetop, if you would like to give this dish some extra-delicious nutty flavor.
Spices: I loved loading the apples up with some warming chai spices. But if you don’t have all of these spices on hand (such as cardamom or cloves), feel free to just leave them out.
Puff pastry temperature: If you live in a country where store-bought puff pastry is sold refrigerated (instead of frozen), wait to pull it out of the refrigerator until just before you are ready to cut it. (No need to leave it out for the extra thaw time.)
I made this for Thanksgiving and purchased a huge cast iron dish to bake it in. This was an incredible recipe that I will be making again this year. I think the cast iron really adds to the carmelizing and makes it even more appealing to the eye. Granny Smith apples give a delicious tartness also! Really easy and something to be proud of out of the oven!


Yum Sounds good. I’m giving it 5 stars !
Have a Happy Thanksgiving from New Jersey!
I made this yesterday, and it is so delicious! Better than I could have imagined. Scrumptious :)
I made this for Thanksgiving and purchased a huge cast iron dish to bake it in. This was an incredible recipe that I will be making again this year. I think the cast iron really adds to the carmelizing and makes it even more appealing to the eye. Granny Smith apples give a delicious tartness also! Really easy and something to be proud of out of the oven!
I plan to make for Thanksgiving dessert. What is the best way to make a few hours before serving but serve warm?