The One Thing You Must Do To Every Image Uploaded To Your Blog

This one may seem like a no-brainer for those of you bloggers who use Pinterest every single day. But occasionally I still see new bloggers forgetting to take this crucial step with uploading photos that will literally make all the difference in optimizing your photos on Pinterest. Plus, as a bonus, it also helps with SEO.
The thing??
Titling your photos. Here’s how to do it:

1. Begin by opening up your post and finding the image you want to title.

2. Click on it, and then click on the “Edit Image” button (the little icon with the mountains) that pops up.

3. Whatever name you gave the image when saving it on your computer will now pop up.
(Another big tip — save your images with the names of the post! Not IMG_3928, or however your camera wants to name it. This will majorly help with SEO.)
Still, whatever image name you have here is what you want to change, because this is the text that will show up when people go to pin your image.

4. Ideally, the experts say that your title (and alt text) should have around 200 characters to be best optimized for Pinterest. I recommend including:
- The title of your image/post (even if you use Rich Pins, those titles usually don’t show up on all mobile devices)
- Some kind of description
- Your URL or Pinterest handle (I love the URLs because they are live links that people can click on within Pinterest)
- Hashtags (optional, and I recommend only using 1-3)
Then copy whatever text you included, and hit “update”. Then go and paste the text on all other photos that you have on that page. (Or change them each to include whatever text you want.)
You can also do this step when uploading photos to WordPress in the first place.

5. So now, whenever someone goes to pin your image on Pinterest…

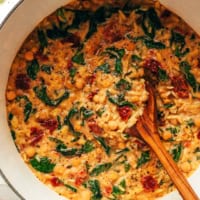
6. …your sweet new title text will show up in the description. So much better than “Chicken Parmesan Baked Ziti”, yes??

7. Of course, any pinner has the option of typing in whatever text they want to replace yours. But as someone who uses Pinterest day in and day out, I can confidently say that the vast majority of pinners never bother to take the time to rename your image.
So decide what you want to say, and title that text baby!
(And by the way, this Chicken Parmesan Baked Ziti will knock your socks off. Give it a try!)


Thank you so much for this tip. Very helpful.
You’re welcome Vickie — we’re glad you found this helpful! :)
Love this tip!!! Now off to do it to my photos.
Thanks Barbara—we’re glad you found it helpful! :)
Thank you for this great post! I’m trying to soak up all the knowledge I can to help me with my blog. This was helpful and easy to understand. -Janelle Jones
You’re very welcome Janelle — we’re glad to hear this was helpful to you! :)
Great post! Awesome idea. I am just getting started and I appreciate the newbie advice.
Thanks Lori — we’re glad you found this helpful! :)
I never realized that if you included the URL in the title, it would show up as a live link! Thanks for the great tip!
Thanks for the great advice! As a Pinterest newbie I have been a bit overwhelmed. This will definitely go on my to do list for new photos.
We’re glad you found this helpful Bill!
I am loving pinterest each day more when i get more and more information about it. Providing ALT and description in your image for pinterest is one important option that i will consider while pinning my own posts. Thanks for helping out newbies.
We’re glad you found this helpful Marjan! :)
Thank you so much! I am a new blogger, and while this may seem like a simple thing for most people, I did not realize how important this one step is. Love your blog!!
Thanks for your sweet words — we’re happy you found this helpful! And welcome to the world of blogging! :)
I am guilty of not paying much attention to the image title. I hust end up writing a 5-6 words titale for the image, and that’s what is shown as the description when it is pinned. I need to take care of that from now on.
Thank you for this tip.
You’re welcome — we’re glad you found it helpful! :)
Good tip. Should be done on websites also. If you don’t use content management, because it sucks, all can be done in HTML.
Thanks for these helpful tips. I am just beginning and this will help me out a lot.
You’re very welcome Jamie — we wish you luck on your blog! :)
Nice article….
This is a great post! Thanks so much for this step by step guide. I have a question – do you put anything in the “link URL” field, or did you just put your website in the alt text and title? Thank you! I’m a brand new blogger and still learning:)
Hmmm, I don’t seem to have that field?
I didn’t know this
Thanks for sharing..very helpful
We’re glad you found it helpful! :)
Oh. My. Word. I never even THOUGHT about this when adding images to posts!?!? Thank you so much for the knowledge and for sharing!!!
Sure! We’re so glad you found this helpful! :)
Hello! Thank you for a tip! I didn’t know it’s sooo important and helpful for SEO! Now I understand better how and why! It’s very helpful! Thanks! Have a good day!
We’re glad you found this helpful, Maria!
Thank you so much! This was so helpful. I’m a new blogger too so this definitely helped ?
We’re happy you found this helpful, Arlene — best of luck to you with your blog! :)
Thanks for the great tip! I am about to launch my first blog and it’s a bit intimidating!
We’re glad you found this helpful, Hannah!
Hello,
Thank you very much for this information.
My website is not yet ready for launch but i have been active on Pinterest a few weeks and am thankful to learn this now and not in a few more months.
Happy New Year,
Lora Smith
You’re very welcome, Lora — we’re glad this was helpful! Happy New Year to you as well, and good luck with your site! :)
I’ve always thought shorter was the way to go, but now I know the opposite to be true thanks to this! Thank you for the great example, now I can step up my photo game!
As a new blogger and fairly new to Pinterest, this tip is invaluable. Thank you for sharing!
We’re glad this was helpful to you, Susan, and we wish you luck with your new blog!
Great tip! I didn’t realize it would become a clickable link within the Pinterest description. Going to need to go back and add some URLs! Thank you.
We’re glad you found this helpful, Nikki!
I loved your article. Something I struggle with.
I like to copy articles that are relevant so I can read them later when I am actually working on that whatever. Your site doesn’t seem to allow the copy and paste option.
If this is related to site security and people stealing your work, I get it.
But since I can still do it with print screen or something, that isn’t 100%. My feedback. Your call. Just sharing.
s
Hi Susie — we’re not sure what you mean. You can highlight the recipe you’re trying to copy and copy and paste. We don’t have any features on the site that prohibit that.
I’m going to totally start doing that! Thanks for the helpful tip and the recipe I need to save as well!
You’re very welcome, Manda — we’re glad you found this helpful!
Thank you for this!! Exact information I have been looking for.
You’re very welcome, we’re glad you found it helpful!
Thanks so much for this helpful information. I am getting ready to start a blog and website so this is fantastic info!
You’re very welcome, Charlotte, we’re glad you found this helpful!
Great advice! Thanks for sharing
Thanks for the tips. As a new blogger my next goal is to grow my traffic through Pinterest. This was helpful.
We’re so glad you found this helpful, Katie!
Great tutorial!!! Thanks for sharing!!!
You’re very welcome, we’re glad you found this helpful!
This makes so much sense! It helps me fix the text from my images not pinning properly! I used to use this attribute when I was writing my code by hand but have forgotten about using it with building tools like WordPress. I’m going to fix all of my images now. Thank you!!!
Thanks for the tip!
Great advice and tutorial. Thanks for sharing!
When I upload photos on WordPress they are so blurry on my blog, why?
They aren’t blurry on the camera screen and they aren’t blurry when I edit them. They just look blurry when I put them on my blog. I don’t understand why and it is so frustrating. So, if anyone knows the solution please let me know.
I’ve been titling my pictures with a key-word file name but I never thought about adding the rest of the text to it! Amazing tip, thank you!
Thanks for sharing . I came across your blog via the podcast you did with Pinch of Yum. This is such helpful advice and I will be updating all of my photos now. Like you say it’s easy when you know how. Thank you for being so generous with your knowledge. We’re going to try this recipe for dinner tonight. Youve sold that to me as well.
Thank you for this tip! As a newbie to Pinterest I’m very grateful for all I learn x
Nice! I learned something new….thanks for sharing ?
Oh the little things! These minute details….a description, editing photos with your url….genius…lol ok powerful blogging!
Thank you!
Thanks so much for the tips. I’m new to this so I’m trying to learn as much as possible. I hope to launch my blog next week.
Thanks for this! I knew it was important to write something in the title and description of the image but was unaware of how I can harness the power of Pinterest by optimizing the text here. Still new to the blogging game and feel like I have so much to learn.
Wow thanks for sharing these tips and the recipe, it sounds delicious ?
Thank you for this clear explanation!
Question: are your title and alt texts identical per image?
Super helpful! Thanks for the info!
Thank you for this post. Sometimes I forget to do this but you’ve made me realise how important this is. Thank you