This post may contain affiliate links. Please read my disclosure policy.
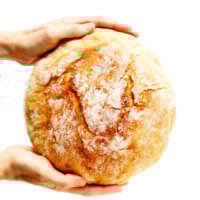
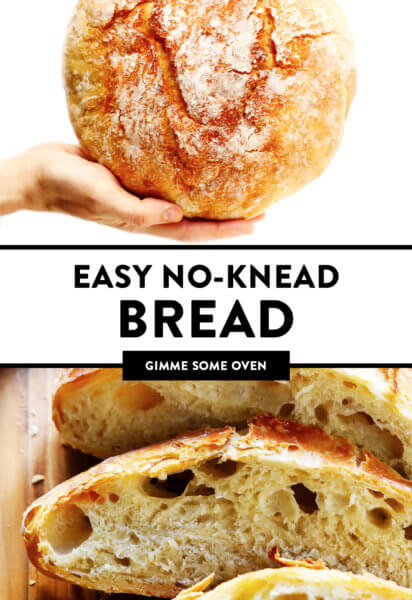
My favorite no knead bread recipe is incredibly easy to make, perfectly crusty and golden on the outside, and soft and flavorful on the inside. Two versions included — one with a traditional (overnight) rise, and one with a faster (1.5-hour) rise.
Interested in trying to make no knead bread? ♡
Well today, I thought I would share my two favorite no knead bread recipes with you — the traditional recipe that I like best (which requires the dough to rest 12-18 hours) or a faster method (which requires just a short 1.5-hour rise).
Both of these no knead bread recipes are incredibly forgiving and easy to make, with just 15 or so minutes of active hands-on prep time. They both bake up magically in the oven to yield artisan-style loaves with the most gorgeous golden crusts and soft, flavorful interiors. They call for just 4 basic ingredients, plus an extra teaspoon of honey or sugar for the faster version. They are guaranteed to make your entire home smell like the yummiest, coziest French bakery as they cook. And best of all, they both taste downright heavenly served warm and fresh outta of the oven. (And — my breakfast-loving husband would add — fabulous toasted up the next morning too!)
So whether you are brand new to bread-baking, or just looking for some tried-and-tested recipes to add to your repertoire, I highly recommend bookmarking these recipes if you would like to give no knead artisan bread a try! If you are planning ahead and have the time for an overnight rise, I would recommend going with the traditional version (my favorite) which gives the dough time to develop more of that yeasty, sourdough-like flavor and yields a more airy, porous crumb on the inside. But if you’re pressed for time and just want a hot loaf of crusty homemade bread in a hurry, this faster version is a great option to try too. Both versions can be made with any extra seasonings that you would like to add in, and baked up with however light or deeply golden of a crust you prefer.
Alright friends, let’s make some no knead bread together!
no-knead bread recipe | 1-minute video
Traditional overnight no knead bread (left) and faster 2-hour no knead bread (right).
No Knead Bread Ingredients:
The ingredients four base ingredients for these no knead bread recipes are the same — water, yeast, flour, salt — but be sure to note in the recipe below that the amounts differ slightly for each. The faster version will also include a hint of sugar.
To make traditional (overnight) no knead bread, you will need the following ingredients:
Warm water: I recommend using a cooking thermometer to measure the temperature of the water, if you have one. It should be between 105-110°F — which will feel quite warm but not hot to the touch.
Active dry yeast: You will need less than a packet (1/2 teaspoon) for the overnight version, and one full packet (2 1/4 teaspoons) for the faster version. If you only have instant yeast on hand, see notes below for how to modify.
All-purpose flour: I highly recommend using a kitchen scale to weigh your flour, if possible, so that the amount is accurate. But if you do not have a scale, just be sure to spoon the flour into your measuring cups (instead of scooping the cups into the flour) to make the measurements more accurate.
Fine sea salt: To bring out all of those delicious flavors.
To make faster (2.5-hour) no knead bread, you will need the following ingredients:
All of the ingredients listed above: Warm water, active dry yeast, AP flour, fine sea salt, plus…
Sugar or honey: We add extra sugar to this version to help the yeast do its work a bit more quickly.
How To Make No Knead Bread:
Here are the basic steps for how to make overnight no knead bread (full instructions in the recipe below):
Mix the dough. Whisk together the dry ingredients, add the warm water, then stir everything together until no flour streaks remain. The dough will look quite loose and shaggy and won’t hold its shape well — which is ok.
Let the dough rise. Cover the bowl with plastic wrap or beeswrap, and let it rest at room temperature for about 12 to 18 hours. The longer it rests, the more flavor and better texture it will have.
Shape the dough. Transfer the dough to a well-floured surface. Form the dough into a round ball by folding the dough on top of itself. (Just gently pull the outer edges up and press them into the center of the dough a few times until the dough feels a bit tighter and holds its shape.) If the dough is sticky or feels too loose at any point, just keep sprinkling on extra flour as needed. Lightly flour the top of the dough ball, and then carefully flip it upside-down onto a piece of parchment paper, so that the smooth side is on top. Use your hands to shape the ball into an even circle. Lightly flour the top of the dough ball, then loosely cover it with plastic wrap or beeswrap to rest while the oven heats.
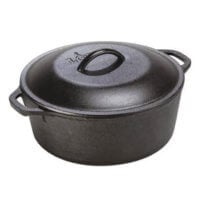
Heat the oven and Dutch oven. Place the Dutch oven inside of your oven, then set oven to 450°F. Wait for 20-30 minutes for the oven to heat, while the dough continues to rest. (If the dough rises and spreads out more than you would like during this time, just use your hands to shape it into a tighter ball once more just before baking.)
Bake. Very carefully, use oven mitts to remove the Dutch oven from the oven. (It will be extremely hot – be careful!) Lift the edges of the parchment to carefully transfer the dough ball (along with the parchment) to the Dutch oven. Cover with the Dutch oven lid and bake for 30 minutes. Then carefully remove the lid and bake for 10-20 more minutes, until the crust of the bread reaches your desired level of doneness (as light or as deeply golden brown and crispy as you prefer).
Serve. Remove from the oven, uncover, and then carefully lift up the edges of the parchment to transfer the bread to a wire cooling rack. Cool for at least 30 minutes, then slice, serve and enjoy!
Here are the basic steps for how to make no knead bread faster (the 2-hour version):
Mix the dough. Whisk together the dry ingredients, add the warm water, then stir everything together until no flour streaks remain.
Let the dough rise. Cover the bowl with plastic wrap or beeswrap, and let the dough rest at room temperature for 1 hour (not 12-18 hours).
Continue on with steps 3-6. As directed above.
Possible Variations:
Want to customize your no knead bread recipe? Feel free to…
Add in garlic: Mince 1-2 cloves of fresh garlic and stir them into the dough during Step 1.
Add in herbs: Chopped fresh herbs (such as rosemary, tarragon or sage) or dried herbs (or herb blends such as Italian seasoning or Herbs de Provence) would be lovely additions to this bread too. Just stir them into the dough during Step 1.
Add everything bagel seasoning: One of my personal faves — stir 1 tablespoon everything bagel seasoning into the dough during Step 1.
Add freshly-cracked black pepper: Sounds simple, but tastes so good. Just stir into the dough during Step 1.
Add in Parmesan: Stir 1/4 to 1/2 cup freshly-grated Parmesan cheese into the dough during Step 1.
Use less salt: If you are sensitive to salt, I recommend reducing the amount of fine sea salt in this recipe by half. And as always, just a reminder that fine sea salt is very different than table salt! (And to make things even more complicated, different brands of fine sea salt can taste more/less salty too.) I like my bread quite salty, but feel free to experiment and use less salt if you prefer.
Top with flaky sea salt: We also love to sprinkle a few pinches of flaky sea salt on top of the bread just before baking. (If you choose to do this, though, I recommend slightly lowering the amount of salt in the dough itself.)
No Knead Bread FAQ:
What if I only have instant yeast at home? No prob, just reduce the amount of yeast by half to use instant yeast. So for the traditional recipe, you would need 1/4 teaspoon instant yeast. Or for the fast recipe, you would need about 1 1/4 teaspoons instant yeast.
Do I need to proof the yeast for this recipe? Nope, just mix the yeast right in with the flour, salt and warm water.
Can I make this recipe with ______ flour? I’ve only tested this recipe with standard all-purpose flour, so I can’t speak to any other variations. But if you give the recipe a try with alternate flours, please report back in the comments!
Help, my dough feels too loose/wet/sticky! No prob, just add in a bit of extra flour. That said, when you very first mix the ingredients together in Step 1, know that the dough is supposed to look like a loose blob. :) But once you begin to shape it in Step 3, it should tighten up a bit and be able to hold a round shape. If not, just sprinkle on some extra flour until it does.
How do I create pretty patterns on top? If you would like to carve patterns into the top of your loaf, just use a knife to lightly score the top of the bread dough just before baking.
What if I don’t like a really crusty bread? No prob, you have 100% control over the doneness and color of your crust. Bake it for 5-10 minutes after removing the lid…or leave it in there for up to 20-25 minutes if you would like a super-crispy dark golden crust.
What if a piece of the crust pokes up really high and starts to burn? This can sometimes happen with crusty bread! If you notice that a piece of the crust is raised higher than the rest of the loaf, just carefully place balance a small piece of foil on top to cover that part of the crust, which will help it not to cook as quickly.
Is it safe to use parchment paper at such high heat? Most parchment brands have a heat limit of 425-450°F, so use parchment in this recipe at your own risk. But I have never had a problem using parchment in high-heat baking, and as Cooks Illustrated verified with leading parchment brands, “using parchment at higher-than-recommended temperatures does not release noxious chemicals, and the paper will not burn.”
Why do you need a Dutch oven for this recipe? Basically, the Dutch oven allows us to create an enclosed environment for the bread dough so that it will steam while baking.
Any recommendations for a cheaper Dutch oven? Definitely! If you don’t want to splurge on a Le Creuset or Staub Dutch oven, there are many cheaper options available on Amazon that work just as well. Since high heat baking can be hard on enameled cast iron, I would recommend this non-enameled Dutch oven from Lodge. But if you’re in the market for an enameled Dutch oven, I love this one by AmazonBasics (which is available in a variety of colors) or this one from Lodge. Just be sure to double-check that the knob on the lid can safely be heated up to 450°F.
Important tip for those with enameled Dutch ovens: If you own an enameled Dutch oven (as I do, pictured here), I highly recommend giving it a very good clean before baking. Any grease or residue that was on the pot can tend to stain when baked at this high of a temperature. If that happens, these are the tips that I follow for removing stains.
More Favorite Bread Recipes:
Looking for more easy bread recipes to try? Here are a few of my faves!
My favorite no knead bread recipe is incredibly easy to make, perfectly crusty and golden on the outside, and soft and flavorful on the inside. See notes below for an alternate faster (2-hour) version too.
Mix the dough. Stir together the flour, salt and yeast in a large mixing bowl until combined. Add in the warm water and stir with a wooden spoon or spatula until the dough is evenly mixed and no large flour streaks remain. (The dough will look quite loose and shaggy, which is ok.)
Let the dough rise. Cover the bowl with plastic wrap or beeswrap, and let the dough rest at room temperature for 12 to 18 hours.
Shape the dough. Transfer the dough to a well-floured surface. Fold the dough on top of itself — pulling the outer edges up and into the center a few times until the dough feels a bit tighter and holds its shape — to form a round dough ball. (If the dough is sticky or feels too loose at any point, just keep sprinkling on extra flour as needed.) Lightly flour the top of the dough ball, and then carefully flip it upside-down onto a piece of parchment paper, so that the smooth side is on top. Use your hands to shape the ball into an even circle. Lightly flour the top of the dough ball, then loosely cover it with plastic wrap or beeswrap to rest while the oven heats.
Heat the oven and Dutch oven. Place the Dutch oven inside of your oven*, then set oven to 450°F. Wait for 20-30 minutes for the oven to heat, while the dough continues to rest. (If the dough rises and spreads out more than you would like during this time, just use your hands to shape it into a tighter ball once more just before baking.)
Bake. Very carefully, use oven mitts to remove the Dutch oven from the oven. (It will be extremely hot!) Lift the edges of the parchment to carefully transfer the dough ball (along with the parchment) to the Dutch oven. Cover with the Dutch oven lid and bake for 30 minutes. Then carefully remove the lid and bake for 10-20 more minutes, until the crust of the bread reaches your desired level of doneness (as light or as deeply golden brown and crispy as you prefer).
Serve. Remove from the oven, uncover, and then carefully lift up the edges of the parchment to transfer the bread to a wire cooling rack. Cool for at least 30 minutes, then slice, serve and enjoy!
Faster (2-Hour) No Knead Bread Ingredients: 3 1/4 cups (430 grams) all-purpose flour
2 teaspoons fine sea salt
1 teaspoon honey or granulated sugar
1 (7-gram) packet active dry yeast (2 1/4 teaspoons) 1 1/3 cups warm water (about 110°F)
Faster (2-Hour) No Knead Bread Instructions: 1. Stir together the flour, salt, sugar and yeast in a large mixing bowl until combined. Add in the warm water and stir with a wooden spoon or spatula until the dough is evenly mixed and no large flour streaks remain. (The dough will look quite loose and shaggy, which is ok.) 2. Cover the bowl with plastic wrap or beeswrap, and let the dough rest at room temperature for 1 hour. (It should double in size during this time.) 3. Continue with steps 3-6 as directed above.
Dutch oven safety tips: If you own an enameled (vs non-enameled) Dutch oven, I recommend giving it a very thorough scrub-down before making this recipe, as any grease that happens to be on the pot can stain when baked at high heat. Also, in order to avoid cracking the enamel in your Dutch oven, it is essential that it preheats along with the oven. So add the Dutch oven to your oven before turning the oven on and let them heat up together.
Source: Big thanks to Jim Lahey who developed the famous no knead bread method that went viral years ago! These recipes are slight adaptions of his original recipe.
Can you make this with bread flour instead of all purpose flour?
Rick —
Yes, I typically only use bread flour. I’ve made 200+ loaves from about 30 different recipes using bread flour even when AP was called for. I use bread flour because it has a significantly higher protein content and well, it just makes better bread.
NancyLee —
Awesome! Comes out beautifully every time. This is my go to recipe for making a great boule.❤️🍞🥖♥️
Hi there, I have made this recipe twice and although the second one was a bit better it is still very dense. I didn’t see the modification for the yeast so I put in 2 and 1/4 teaspoons of the instant yeast versus reducing it but would that make it dense? Also, I don’t have a thermometer so if the water is too hot can that cause this problem? I made the quick recipe today as opposed to the overnight version the first time. Thoughts? Thanks
Pieter Vorster —
Water that is too hot kills yeast.
For instant yeast mixed directly into water it shouldn’t be hotter than 120 F, when mixing yeast into flour the best temperature is between 130F and 130F because room temperature flour will reduce water temp the instant it makes contact.
I have a non-enamalled Dutch oven and don’t use parchment paper. I seasoned mine by coating it in a thin layer of canola oil and then baking upside down on high in oven, this gives it a “non-stick” coating. Comes out perfect every time and never sticks to the pot, i also give it a thin oil coating every time a bake bread.
I’ve made the overnight version twice using two different Dutch ovens. Both times the bread turned out beautifully! I highly recommend this recipe. Mix it up the night before and bake it first thing in the morning for fresh bread for breakfast. Because there is no warm-up time, the dough comes together quickly.
Can this rise closer to 24 hours without ruining it? I miscalculated my timing.
Tim Carlson —
Teresa,
Yes! I have made well over a dozen of these loaves (making one a week now) and always let mine sit for 24 hours. I typically make the dough after work, and then the next day I bake it after 24 hours. I’ve had amazing results!
LOVE this recipe! It’s very forgiving. I’ve tried adding nuts, herbs, cheeses, etc. to the dough with great results. I’ve made a Rosemary, sun-dried tomato, & roasted garlic bread, cheddar and jalapeño, Italian herb, and Parmesan Asiago.
Probably the worst bread recipe I’ve ever tried ? Such a sticky, unworkable dough. Wasted so much flour to try and salvage a loaf.
Carla —
That is what it’s supposed to be like before you cook it. That is why you don’t knead it.
TerryF —
The dough is supposed to be sticky. And you do not need to work it at all. Read the full post.
John Spencer —
To get the kind of crumb (the part of the loaf that isn’t the crust) with large holes ( Artisan or French style) as many of us want, you need a very sticky dough. This is measured by hydration percentage, calculated as weight of water divided by weight of flour times 100. Most people can, maybe after a bit of practice, get up to 70 – 75% hydration. That is usually my limit for shaped loaves, but no knead recipes in a Dutch Oven can get up to over 100%, and I can handle that because one simply mixes the very wet dough, let is stand for about an hour, Fridge overnight (can skip that stage) scoop it into a lined (oil and cornmeal is good) Dutch Oven, let it rise for another hour or so and bake it. This recipe, at 324 grams / 425 x 100 gives a hydration of 83%, so that is indeed pretty wet and sticky. Just use your hand and scoop it into the Dutch Oven. You may discover you really like it.
Jen —
You don’t work the dough….. you didn’t read the directions. This is a very hands off recipe. I have been making this for years. Always great.
Catherine —
I really encourage you to try it exactly as the recipe says…you aren’t supposed to “work” it. It is amazing!
Jo —
That’s literally the point of breads like this. You’re not supposed to work it. How rude to leave reviews like this when it’s solely due to your ignorance.
jasmin —
I guess you didn’t understand the instructions?
Rick —
Patience. It’s a wet dough, but not as wet as some of them! I do several that are nearly 100% hydration.
As with all bread making, follow the recipe and trust the process. Coat your hands with water or olive oil when working with the dough (honestly, it’s not much work at all).
Tom —
No that’s on you. If you want nice bread you need high hydration.
This recipe has revolutionized my bread baking. So easy and so versatile! I find it needs a bit longer to bake, though, or it can be a bit tacky in the middle. I’m baking it covered for 35 minutes and uncovered for the full 20.
Clare —
I made the overnight version, and accidentally let the dough rise for closer to 24 hours. The crumb came out really nice, lots of holes which I love! But the taste is a little…bitter. Any advice? I can’t tell if it’s like a sourdough type flavor or if something is wrong?
Hi Ali,
I would love to try making this bread but I know it will only happen once or twice a year. So I don’t want to invest $100 in a Dutch oven. Is it possible to use a Corning ware casserole dish? The Corning website says it can be used at 450 degrees.
Thank you!
Amber —
I’ve used my $50 Target dutch oven to make bread for years and it always comes out great! This recipe needs to be baked in a fully covered pot in order to capture steam and get the proper rise, so a dutch oven really is necessary. But a fancy dutch oven is not!
LRA —
Hi, we usually use a Lodge Dutch oven, but when we want to do two at once, we also use the insert from an old crock pot and just put on a metal pot lid that fits (more or less). The crock pot loaves are shaped a little narrower and taller, but they come out just as good.
Jen —
Dutch ovens are great to have for many recipes! They often have them at Aldi super cheap. That being said, I have made this on a cookie sheet . I would think you could use anything.
Becky B. —
Kelly, you may have already done it by now but I used a Corning French white 2.5 qt. casserole the other day and my bread came out perfect!!
Holly —
I don’t use a Dutch oven most of the time. I don’t like the smell that my Dutch ovens put off when they get that hot.
I have a 25 yo Pampered Chef stoneware bowl and stoneware casserole dish that I use as its lid. I used to use a pizza stone as my lid until I pulled it out of the oven too soon once and it cracked in the cold room.
But any stoneware cookware the approx. size of a Dutch oven works great. No need worry about anything sticking, either! They should be cheaper than a nice Dutch oven, plus… well… pizza. :-)
Beata —
You can sometimes find used Dutch ovens at the local Good Will
I’ve done this in a metal stock pot and it turned out great. I used a cookie sheet as the lid. The parchment is key though, otherwise it will stick to the pot.
Hi, my dough was left 15 hours but it is such a wet dough, cannot form into a ball. Smells like acetone. Have just put it in the oven, lets see whap happens. Any ideas what went wrong?
Nancy Browne —
Thank you! This bread is delicious, beautiful & so easy. I made the 2 hour version & used instant yeast. This bread was so much better than any of the other no-knead bread.recipes I tried.
Nancy Browne —
Thank you! This bread is delicious, beautiful & so easy. I made the 2 hour version & used instant yeast. This bread was so much better than any of the other no-knead bread.recipes I tried.
Mille —
Sounds to me like maybe you put the 2.5 teaspoons of yeast that was called for in the quick dough recipe rather than the half teaspoon and your yeast ran out of stuff to eat. That or it just over-proofed really quickly. Maybe it was hot out and that sped up the process.
The bread turned out nicely but it is a bit salty and a smaller loaf than I expected. I would still make again but expect to double it and reduce the salt.
Wonderful recipe and tips. Would leave a picture but my family devoured it. I made mine into two smaller loaves using pots with tight fitting lids and all ovenproof handles. Came out wonderful!
Teresa Dowle —
Brilliant recipe. I bake this all the time now. Are there any ideas for making a sweet loaf version. Appreciate the recipes or ideas.
I don’t have a 5 qt Dutch oven. I have an 8 qt. Will it be too large to use—spread too much? I also have a 2 qt. Should I make the recipe and split the dough in half and make two smaller loaves? Any suggestions, or do I just need to buy a 5 qt.? Thank you!
Very first time making bread here… really great, easy to follow recipe. I substituted one cup of all purpose flour with whole wheat. It turned out good, but it was a little dense. I wanted more air in it… anyone know why this happened? Did I just need to cook it a bit longer? Thanks!
Jennifer —
Whole wheat flour has fiber (great, right!) that cuts the strands of gluten so they’re unable to make those nice, big pockets. I’d start with a plain white loaf to set your expectations, then sub 1/4 cup of the AP flour for whole wheat on your next attempt. There will be a percentage that works!
Mine came out so beautiful! Thank you for the thorough post!
Anna's Breads —
If you want to shape the dough or “contain” it if your pot is too big, use a parchement lined aluminum foil cake pan. You can bend the sides up if you want an oval loaf. I do this and then cook it in a lidded clay pot.
SWEET version – add about 2/3 cup EACH of walnuts and dried cranberries. I’ve also used raisins. The fruit makes it sweetish so I don’t add sugar but you could. The cranberries turn the loaf a darker colour…it is SO GOOD. I cook it about 10 min longer or cut it in half and put back in oven if the center is too soft.
We enjoyed the bread. I followed the recipe, except I didn’t have a dutch oven. Instead, I used a lidded deep casserole dish. It was soft inside and crusty outside. Will definitely keep making it. Thank you.
This is my second time making this recipe we LOVE it!
I don’t have a Dutch oven so I just bake it on my stone thing. I also double the recipe and do two loaves. I treat the stone as a Dutch oven and heat it before hand and add a small glass pan with water in it when heating my oven and while it cooks so that The crust gets crusty. I hear ice cubes work better but I don’t have a icemaker and I never make ice.
This recipe works really well without the Dutch oven!
I see a lot of people talking about how sticky dough is and I wouldn’t add to much extra Flour. the faster you move your hands the less it will stick to you so I just try to work as quickly as possible to form the balls and get it on the parchment so I don’t have to touch it too much. If you’re newer to bread baking (like me) I think it’s just a matter of technique and practice being able to handle a sticky dough and even in my short time of bread making (over the past six months) I’ve gotten a lot better. So there is hope for less sticky hands!
I found the recipe to work well.
I couldn’t find active yeast, so used instant (at a 1/4 tsp)
Also used unbleached organic flour…
It was very nice… the crust crunchy, but a little bit chewy…
the inside a little bit moist/doughy.
But this is being picky… A lot better than what I find even in the shops.
Should I use more flour?
Very happy with it and will make this often.
I also freeze it and it comes out very nice in the toaster!
I love cooking but when it comes to baking, I usually screw it up. That said, I have made the two-hour recipe many, many times and I am consistently thrilled with the results! Sometimes I add in extras: rosemary, roasted garlic, olives, parmesan cheese. Always a hit. Thank you for this lovely recipe!
Tried for the first time this weekend & love it! Crunchy on the outside & soft & yummy on the inside. Next time I’m going to try with garlic & try the dinner rolls!
I tried this recipe because I do not know how to bake. I tried both the overnight and the quick version. Both versions were so good and so easy that I have actual shame for not trying to make bread years ago. What was I thinking?
First loaf, overnight. I thought it was pretty great. Crusty delicious bread that made me think I could do this every day.
Second loaf, quick version. Pretty shape. Different texture inside the loaf. I also cooked it a little longer than I should have, but it was still quite good.
Third loaf, quick version. I went a little crazy here and ended up kneading the dough. Why you ask? Because I couldn’t seem to mix it all together sufficiently with a spoon. So I gradually added water and mixed it by hand…annnd ended up kneading it. Let me tell you something. Your recipe is foolproof. The bread turned out crusty, fluffy inside, flavorful and perfect.
Absolutely fabulous . I even use my cast iron frying pan and it comes out great. I use olive oil on the outside and use the everything seasoning and turn it it. Thank you!
This recipe is so forgiving. I had been avoiding any bread recipes that require kneading, and felt overwhelmed about the long proofing time for the original no-knead recipe. I’ve baked the quick version 3 times now, and usually with a 2-3 hour proof time ( I don’t keep precise time), and they have all been excellent. When I say it’s forgiving and almost foolproof, I mean it! The first time I made it, I accidentally used the lower yeast amount, and forgot to add the sugar until after the water, but it still came out so delicious and the crust was lovely. The last time I made it, I was actually able to score a heart on the top, so cute! The smell of fresh bread is intoxicating…
Absolutely the best bread that’s ever come out of my oven! So easy, I did the overnight version and I’m currently enjoying it for breakfast. Will be a repeat recipe for sure. Thanks!
First loaf looks and tastes great. Though realised later that I used 7g yeast instead of 1/2 teaspoon ( long method). Seems to work well but next will be as instructed! Also reduced temperatures for our fan oven and final lid off time.
Fantastic recipe. Be warned that the dough is extremely wet…after it’s overnight proof after I’ve dumped the dough into flour I give it 15 minutes – bench rest – before folding and shaping. I also use a lame to cut one slit down the middle before it goes into the Dutch oven to make the rise immediate. And to make it look good! The oven spring is amazing … and the flavour is too.
Delicious! And so easy! I got caught in a big transit delay and ended up leaving it to rise closer to 19 hours so I was worry that it would be over-proofed, but it was maybe a little softer but the texture was still very good and had almost a sourdough flavor. I don’t have a Dutch oven so I used a Le Creuset roasting pan with a lid and it worked perfectly. Excited to try some of the modifications next time.
Is there some special parchment paper you use for this? My Reynolds parchment paper says it’s safe to 425 degrees. Seems like 450 degrees might be pushing it.
My wife (our chef,) is away at her mothers. I tried this because I was bored and love good bread. Added a few grinds of very coarse black pepper. The bread with a little EVOO is simply fabulous.
I half the recipe so I make one pound loaves. I followed directions and the loaves are very crusty making it very hard to slice. Should I change the cooking time? Thank you!
This recipe helped me through covid lock down.
Never fails, and always forgiving.
I use mixed seeds, sunflower or pumpkin, but my favourite is caraway seeds. Tastes almost like a local rye bread a Ukrainian bakery used to make.
I bake in a pyrex dish with lid.
No need for parchment either, just flour bread and dish.
I made this recently when visiting Tuscany, the locals loved it.
I’ll keep on adjusting/creating new versions.
Many thanks
 method or a faster (2-hour) method. Both yield the most delicious crusty homemade bread loaves that are easy to make with minimal hands-on prep time. | gimmesomeoven.com #bread #noknead #easy #side #vegan #vegetarian #homemade")
 method or a faster (2-hour) method. Both yield the most delicious crusty homemade bread loaves that are easy to make with minimal hands-on prep time. | gimmesomeoven.com #bread #noknead #easy #side #vegan #vegetarian #homemade")
 method or a faster (2-hour) method. Both yield the most delicious crusty homemade bread loaves that are easy to make with minimal hands-on prep time. | gimmesomeoven.com #bread #noknead #easy #side #vegan #vegetarian #homemade")
 method or a faster (2-hour) method. Both yield the most delicious crusty homemade bread loaves that are easy to make with minimal hands-on prep time. | gimmesomeoven.com #bread #noknead #easy #side #vegan #vegetarian #homemade")
 method or a faster (2-hour) method. Both yield the most delicious crusty homemade bread loaves that are easy to make with minimal hands-on prep time. | gimmesomeoven.com #bread #noknead #easy #side #vegan #vegetarian #homemade")
 method or a faster (2-hour) method. Both yield the most delicious crusty homemade bread loaves that are easy to make with minimal hands-on prep time. | gimmesomeoven.com #bread #noknead #easy #side #vegan #vegetarian #homemade")


Can you make this with bread flour instead of all purpose flour?
Yes, I typically only use bread flour. I’ve made 200+ loaves from about 30 different recipes using bread flour even when AP was called for. I use bread flour because it has a significantly higher protein content and well, it just makes better bread.
Awesome! Comes out beautifully every time. This is my go to recipe for making a great boule.❤️🍞🥖♥️
Hi there, I have made this recipe twice and although the second one was a bit better it is still very dense. I didn’t see the modification for the yeast so I put in 2 and 1/4 teaspoons of the instant yeast versus reducing it but would that make it dense? Also, I don’t have a thermometer so if the water is too hot can that cause this problem? I made the quick recipe today as opposed to the overnight version the first time. Thoughts? Thanks
Water that is too hot kills yeast.
For instant yeast mixed directly into water it shouldn’t be hotter than 120 F, when mixing yeast into flour the best temperature is between 130F and 130F because room temperature flour will reduce water temp the instant it makes contact.
I have a non-enamalled Dutch oven and don’t use parchment paper. I seasoned mine by coating it in a thin layer of canola oil and then baking upside down on high in oven, this gives it a “non-stick” coating. Comes out perfect every time and never sticks to the pot, i also give it a thin oil coating every time a bake bread.
I’ve made the overnight version twice using two different Dutch ovens. Both times the bread turned out beautifully! I highly recommend this recipe. Mix it up the night before and bake it first thing in the morning for fresh bread for breakfast. Because there is no warm-up time, the dough comes together quickly.
Can this rise closer to 24 hours without ruining it? I miscalculated my timing.
Teresa,
Yes! I have made well over a dozen of these loaves (making one a week now) and always let mine sit for 24 hours. I typically make the dough after work, and then the next day I bake it after 24 hours. I’ve had amazing results!
LOVE this recipe! It’s very forgiving. I’ve tried adding nuts, herbs, cheeses, etc. to the dough with great results. I’ve made a Rosemary, sun-dried tomato, & roasted garlic bread, cheddar and jalapeño, Italian herb, and Parmesan Asiago.
Probably the worst bread recipe I’ve ever tried ? Such a sticky, unworkable dough. Wasted so much flour to try and salvage a loaf.
That is what it’s supposed to be like before you cook it. That is why you don’t knead it.
The dough is supposed to be sticky. And you do not need to work it at all. Read the full post.
To get the kind of crumb (the part of the loaf that isn’t the crust) with large holes ( Artisan or French style) as many of us want, you need a very sticky dough. This is measured by hydration percentage, calculated as weight of water divided by weight of flour times 100. Most people can, maybe after a bit of practice, get up to 70 – 75% hydration. That is usually my limit for shaped loaves, but no knead recipes in a Dutch Oven can get up to over 100%, and I can handle that because one simply mixes the very wet dough, let is stand for about an hour, Fridge overnight (can skip that stage) scoop it into a lined (oil and cornmeal is good) Dutch Oven, let it rise for another hour or so and bake it. This recipe, at 324 grams / 425 x 100 gives a hydration of 83%, so that is indeed pretty wet and sticky. Just use your hand and scoop it into the Dutch Oven. You may discover you really like it.
You don’t work the dough….. you didn’t read the directions. This is a very hands off recipe. I have been making this for years. Always great.
I really encourage you to try it exactly as the recipe says…you aren’t supposed to “work” it. It is amazing!
That’s literally the point of breads like this. You’re not supposed to work it. How rude to leave reviews like this when it’s solely due to your ignorance.
I guess you didn’t understand the instructions?
Patience. It’s a wet dough, but not as wet as some of them! I do several that are nearly 100% hydration.
As with all bread making, follow the recipe and trust the process. Coat your hands with water or olive oil when working with the dough (honestly, it’s not much work at all).
No that’s on you. If you want nice bread you need high hydration.
I made this with Bob Red Mill Bread flour and it came out wonderful. I could have passed it off as the local artisan bakery’s product.
Did you use the same amt of bread flouras AP?
This recipe has revolutionized my bread baking. So easy and so versatile! I find it needs a bit longer to bake, though, or it can be a bit tacky in the middle. I’m baking it covered for 35 minutes and uncovered for the full 20.
I made the overnight version, and accidentally let the dough rise for closer to 24 hours. The crumb came out really nice, lots of holes which I love! But the taste is a little…bitter. Any advice? I can’t tell if it’s like a sourdough type flavor or if something is wrong?
Hi Ali,
I would love to try making this bread but I know it will only happen once or twice a year. So I don’t want to invest $100 in a Dutch oven. Is it possible to use a Corning ware casserole dish? The Corning website says it can be used at 450 degrees.
Thank you!
I’ve used my $50 Target dutch oven to make bread for years and it always comes out great! This recipe needs to be baked in a fully covered pot in order to capture steam and get the proper rise, so a dutch oven really is necessary. But a fancy dutch oven is not!
Hi, we usually use a Lodge Dutch oven, but when we want to do two at once, we also use the insert from an old crock pot and just put on a metal pot lid that fits (more or less). The crock pot loaves are shaped a little narrower and taller, but they come out just as good.
Dutch ovens are great to have for many recipes! They often have them at Aldi super cheap. That being said, I have made this on a cookie sheet . I would think you could use anything.
Kelly, you may have already done it by now but I used a Corning French white 2.5 qt. casserole the other day and my bread came out perfect!!
I don’t use a Dutch oven most of the time. I don’t like the smell that my Dutch ovens put off when they get that hot.
I have a 25 yo Pampered Chef stoneware bowl and stoneware casserole dish that I use as its lid. I used to use a pizza stone as my lid until I pulled it out of the oven too soon once and it cracked in the cold room.
But any stoneware cookware the approx. size of a Dutch oven works great. No need worry about anything sticking, either! They should be cheaper than a nice Dutch oven, plus… well… pizza. :-)
You can sometimes find used Dutch ovens at the local Good Will
Best bread I’ve ever made! It was chewy, crusty, and flavorful. 10/10 will make it again 👍
I’ve done this in a metal stock pot and it turned out great. I used a cookie sheet as the lid. The parchment is key though, otherwise it will stick to the pot.
Hi, my dough was left 15 hours but it is such a wet dough, cannot form into a ball. Smells like acetone. Have just put it in the oven, lets see whap happens. Any ideas what went wrong?
Thank you! This bread is delicious, beautiful & so easy. I made the 2 hour version & used instant yeast. This bread was so much better than any of the other no-knead bread.recipes I tried.
Thank you! This bread is delicious, beautiful & so easy. I made the 2 hour version & used instant yeast. This bread was so much better than any of the other no-knead bread.recipes I tried.
Sounds to me like maybe you put the 2.5 teaspoons of yeast that was called for in the quick dough recipe rather than the half teaspoon and your yeast ran out of stuff to eat. That or it just over-proofed really quickly. Maybe it was hot out and that sped up the process.
The bread turned out nicely but it is a bit salty and a smaller loaf than I expected. I would still make again but expect to double it and reduce the salt.
Wonderful recipe and tips. Would leave a picture but my family devoured it. I made mine into two smaller loaves using pots with tight fitting lids and all ovenproof handles. Came out wonderful!
Brilliant recipe. I bake this all the time now. Are there any ideas for making a sweet loaf version. Appreciate the recipes or ideas.
The best method and recipe I have found 🤍
I have made this recipe several times. Each time a winner. I do the two hour version and it turns out great – wonderful recipe.
I don’t have a 5 qt Dutch oven. I have an 8 qt. Will it be too large to use—spread too much? I also have a 2 qt. Should I make the recipe and split the dough in half and make two smaller loaves? Any suggestions, or do I just need to buy a 5 qt.? Thank you!
where is the sugar to start the yeast?
Very first time making bread here… really great, easy to follow recipe. I substituted one cup of all purpose flour with whole wheat. It turned out good, but it was a little dense. I wanted more air in it… anyone know why this happened? Did I just need to cook it a bit longer? Thanks!
Whole wheat flour has fiber (great, right!) that cuts the strands of gluten so they’re unable to make those nice, big pockets. I’d start with a plain white loaf to set your expectations, then sub 1/4 cup of the AP flour for whole wheat on your next attempt. There will be a percentage that works!
Mine came out so beautiful! Thank you for the thorough post!
If you want to shape the dough or “contain” it if your pot is too big, use a parchement lined aluminum foil cake pan. You can bend the sides up if you want an oval loaf. I do this and then cook it in a lidded clay pot.
SWEET version – add about 2/3 cup EACH of walnuts and dried cranberries. I’ve also used raisins. The fruit makes it sweetish so I don’t add sugar but you could. The cranberries turn the loaf a darker colour…it is SO GOOD. I cook it about 10 min longer or cut it in half and put back in oven if the center is too soft.
Can I add cinnamon and raisins?
Has anyone used sourdough starter in this recipe?
We enjoyed the bread. I followed the recipe, except I didn’t have a dutch oven. Instead, I used a lidded deep casserole dish. It was soft inside and crusty outside. Will definitely keep making it. Thank you.
Can I divide the dough into two smaller loaves and bake in a 2.5 liter Dutch oven? If so, should I adjust the baking time?
Fantastic recipe! Have made the bread at least once a week, my friends ask for it!
I use wheat flour for a 1/3 of the flour and it adds such a wonderful depth and flavor to the bread, I will never go back to all white.
Is there a particular size Dutch oven needed for this recipe? Can this be made in BC a 6 qt stainless steel pot (Dutch oven) ?
This is my second time making this recipe we LOVE it!
I don’t have a Dutch oven so I just bake it on my stone thing. I also double the recipe and do two loaves. I treat the stone as a Dutch oven and heat it before hand and add a small glass pan with water in it when heating my oven and while it cooks so that The crust gets crusty. I hear ice cubes work better but I don’t have a icemaker and I never make ice.
This recipe works really well without the Dutch oven!
I see a lot of people talking about how sticky dough is and I wouldn’t add to much extra Flour. the faster you move your hands the less it will stick to you so I just try to work as quickly as possible to form the balls and get it on the parchment so I don’t have to touch it too much. If you’re newer to bread baking (like me) I think it’s just a matter of technique and practice being able to handle a sticky dough and even in my short time of bread making (over the past six months) I’ve gotten a lot better. So there is hope for less sticky hands!
can you half the reciope for a smaller loaf
Suppose your Dutch Oven can only go as high as 425. Will you still be ok with this recipe?
Hi there,
I found the recipe to work well.
I couldn’t find active yeast, so used instant (at a 1/4 tsp)
Also used unbleached organic flour…
It was very nice… the crust crunchy, but a little bit chewy…
the inside a little bit moist/doughy.
But this is being picky… A lot better than what I find even in the shops.
Should I use more flour?
Very happy with it and will make this often.
I also freeze it and it comes out very nice in the toaster!
I love cooking but when it comes to baking, I usually screw it up. That said, I have made the two-hour recipe many, many times and I am consistently thrilled with the results! Sometimes I add in extras: rosemary, roasted garlic, olives, parmesan cheese. Always a hit. Thank you for this lovely recipe!
Incredibly easy bread to make. I used the fast method and it worked out perfectly.
Added bagel seasoning.
My first time making bread and it turned out perfect. Great recipe, so easy and really tasty. Will be making this on a regular basis. Love it.
Tried for the first time this weekend & love it! Crunchy on the outside & soft & yummy on the inside. Next time I’m going to try with garlic & try the dinner rolls!
I tried this recipe because I do not know how to bake. I tried both the overnight and the quick version. Both versions were so good and so easy that I have actual shame for not trying to make bread years ago. What was I thinking?
First loaf, overnight. I thought it was pretty great. Crusty delicious bread that made me think I could do this every day.
Second loaf, quick version. Pretty shape. Different texture inside the loaf. I also cooked it a little longer than I should have, but it was still quite good.
Third loaf, quick version. I went a little crazy here and ended up kneading the dough. Why you ask? Because I couldn’t seem to mix it all together sufficiently with a spoon. So I gradually added water and mixed it by hand…annnd ended up kneading it. Let me tell you something. Your recipe is foolproof. The bread turned out crusty, fluffy inside, flavorful and perfect.
Thank you so much for this recipe. I salute you.
Wow. Turned out amazing. Best bread that I’ve made at home. Followed the recipe as written.
Absolutely fabulous . I even use my cast iron frying pan and it comes out great. I use olive oil on the outside and use the everything seasoning and turn it it. Thank you!
This recipe is so forgiving. I had been avoiding any bread recipes that require kneading, and felt overwhelmed about the long proofing time for the original no-knead recipe. I’ve baked the quick version 3 times now, and usually with a 2-3 hour proof time ( I don’t keep precise time), and they have all been excellent. When I say it’s forgiving and almost foolproof, I mean it! The first time I made it, I accidentally used the lower yeast amount, and forgot to add the sugar until after the water, but it still came out so delicious and the crust was lovely. The last time I made it, I was actually able to score a heart on the top, so cute! The smell of fresh bread is intoxicating…
Absolutely the best bread that’s ever come out of my oven! So easy, I did the overnight version and I’m currently enjoying it for breakfast. Will be a repeat recipe for sure. Thanks!
Question??? It is wrong to let this dough rise at room temp more than the recommended time? Maybe place in frig overnight?
First loaf looks and tastes great. Though realised later that I used 7g yeast instead of 1/2 teaspoon ( long method). Seems to work well but next will be as instructed! Also reduced temperatures for our fan oven and final lid off time.
I am a 79 year old male and made my first loaf 3 weeks ago. I’m hooked! I make about 3-4 loaves a week and we no longer buy store bought bread!
Fantastic recipe. Be warned that the dough is extremely wet…after it’s overnight proof after I’ve dumped the dough into flour I give it 15 minutes – bench rest – before folding and shaping. I also use a lame to cut one slit down the middle before it goes into the Dutch oven to make the rise immediate. And to make it look good! The oven spring is amazing … and the flavour is too.
Delicious! And so easy! I got caught in a big transit delay and ended up leaving it to rise closer to 19 hours so I was worry that it would be over-proofed, but it was maybe a little softer but the texture was still very good and had almost a sourdough flavor. I don’t have a Dutch oven so I used a Le Creuset roasting pan with a lid and it worked perfectly. Excited to try some of the modifications next time.
Is there some special parchment paper you use for this? My Reynolds parchment paper says it’s safe to 425 degrees. Seems like 450 degrees might be pushing it.
My wife (our chef,) is away at her mothers. I tried this because I was bored and love good bread. Added a few grinds of very coarse black pepper. The bread with a little EVOO is simply fabulous.
I dont have parchment paper is that a must?
I half the recipe so I make one pound loaves. I followed directions and the loaves are very crusty making it very hard to slice. Should I change the cooking time? Thank you!
This recipe helped me through covid lock down.
Never fails, and always forgiving.
I use mixed seeds, sunflower or pumpkin, but my favourite is caraway seeds. Tastes almost like a local rye bread a Ukrainian bakery used to make.
I bake in a pyrex dish with lid.
No need for parchment either, just flour bread and dish.
I made this recently when visiting Tuscany, the locals loved it.
I’ll keep on adjusting/creating new versions.
Many thanks