This post may contain affiliate links. Please read my disclosure policy.
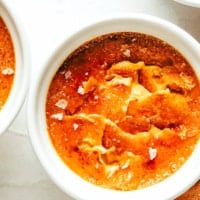
This salted caramel crème brûlée recipe is easy to make with a few basic ingredients and features a delicious salted caramel custard with a crispy, crackly sugar topping. Easy to prep up to 3 days in advance if you’d like!
I’ve been dusting off my trusty little kitchen torch to do lots of brûléeing this holiday season. And I have to say, it’s been so much fun. ♡
Custards have long been some of my favorite make-ahead desserts for easy entertaining. But when you add in the extra 5 minutes to sprinkle some sugar on top and torch it to crispy, crackly, caramelized perfection just before serving, it instantly kicks everything up a fun and fancy notch. And of course, tastes heavenly!
Well lately, I’ve been experimenting with taking the caramel-love one step further by also caramelizing the sugar traditionally used in the custard base of classic French crème brûlée, which adds an extra layer of nutty, sweet, irresistible richness to the custard. And when combined with a hint of vanilla, sea salt and cream, and then topped with warm brûléed sugar, this dessert is a caramel lover’s dream come true.
It’s so lovely and flavorful and decadent. And it’s also surprisingly easy to make with just 6 simple ingredients! Definitely a great dessert for easy entertaining, since the custards need to be made and chilled at least a few hours in advance. So you can enjoy your meal, then slip out for a quick 5 minutes to use your kitchen torch (or the broiler on your oven) to brûlée the topping, and then delight in cracking into each delicious bite. Even the custard-wary friends of ours have absolutely raved about this dessert, so I hope yours will enjoy it too!
Let’s make some crème brûlée.
Crème Brûlée Ingredients
Before we get to the full recipe below, here are a few notes about the salted caramel crème brûlée ingredients that you will need:
Heavy whipping cream: This will serve as the base for our custard. It’s important to use full-fat heavy cream in this recipe in order to achieve the classic rich and creamy texture.
Sugar: We will use white granulated sugar (with water) to create the caramel for this recipe, as well as to sprinkle on top of the baked custards to create the brûléed topping.
Egg yolks: The yolks add rich flavor and help to thicken the custard.
Vanilla extract: A hint of pure vanilla extract enhances the flavor of the caramel.
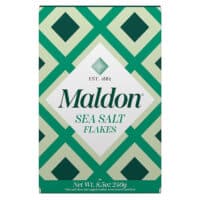
Salt: Finally, we will use a hint of fine sea salt in the custard itself, but then I also highly recommend adding an extra sprinkle of flaky sea salt atop each custard to finish.
Crème Brûlée Equipment
In addition to basic mixing bowls, here are three important pieces of equipment you will need to make creme brûlée:
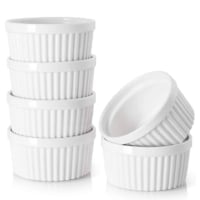
Ramekins: I wrote this recipe using four 6-ounce ramekins. If your ramekins happen to be larger, they can still work, but please note that you will need to reduce the baking time and add more sugar for the topping.
Baking dish: You will also need some sort of baking dish large enough for all four of the ramekins to comfortably fit in an even layer. I used a basic 9 x 9-inch baking dish.
Kitchen torch: I find it’s easiest (and so fun!) to brûlée the sugar using a small kitchen torch like this. (Don’t forget you may also need to buy butane to fuel the torch.) However, see the note below if you don’t own a kitchen torch and prefer to brûlée the sugar in the oven.
Crème Brûlée Tips
Full instructions for how to make crème brûlée are included in the recipe card below, but here are a few additional tips to keep in mind:
Don’t stir the caramel while it is cooking. If you’re new to making homemade caramel sauce, it’s very important not to stir the sugar as it is caramelizing in order to prevent it from crystalizing and turning grainy.
Keep a close eye on the caramel. Once the sugar begins to caramelize, it can darken quite quickly! Always keep a very close eye on the sugar so that you can remove the pan from the heat once the caramel reaches a rich amber color. If you own a cooking thermometer, you can measure the temperature and remove the pan from the heat once the caramel reaches 355°F (180°C).
Add the water bath after the pan is in the oven. I find it’s easiest to place the baking dish with the ramekins in the oven and then use a kettle to carefully pour the hot water into the baking dish. But you are welcome to add the water beforehand if you can very carefully transfer the dish to the oven.
Don’t over-bake the custards. The custards should be just barely set in the center and no longer liquid, but they should still be a bit wobbly when you jiggle them from side to side. The internal temperature should measure 170°F (76°C) if you would like to double check.
Brûlée the topping just before serving. Unfortunately, the crispy, crackly, magical texture of a brûléed sugar topping doesn’t last all that long before it gets soggy. So I recommend caramelizing the sugar just before serving (or if need be, up to 30 minutes in advance, max).
Crème Brûlée FAQ
What does crème brûlée mean? Crème brûlée directly translates to mean “burnt cream” in French.
Can I make crème brûlée without a kitchen torch? Yes, you can use the broiler on your oven to brûlée the sugar topping, but it’s not the most reliable method since oven broilers can vary dramatically and most broilers will cook the sugar more unevenly. Still, you’re welcome to give it a try! Place the ramekins on a baking sheet and then transfer them to the top shelf of the oven. Then turn on the broiler to preheat (once the ramekins are already in the oven), and wait for the sugar to caramelize, using long tongs to rotate the ramekins as needed while they cook. The process usually takes between 5-10 minutes depending on your oven.
Why use a water bath for crème brûlée? This helps the the custards to cook evenly and prevent them from cracking.
Can I prep crème brûlée in advance? Sure! Just prepare, bake and cool the custards as directed (steps 1-8). Cover the ramekins and refrigerate for up to 3 days, then remove and add the brûlée topping just before serving.
More Ramekin Dessert Recipes
Looking for more fun dessert recipes to make in small ramekins? Here are a few of my favorites:
1/2 cup granulated white sugar, plus extra for topping
1/4 cup water
4 egg yolks
1 teaspoon pure vanilla extract
1/2 teaspoon fine sea salt
flaky sea salt, for topping
Instructions
Prep oven and ramekins. Heat oven to 325°F. Place 4 (6-ounce) ramekins side by side in a large baking dish. Place a kettle of water on the heat to boil.
Heat the cream and hot water. In a small saucepan over medium-low heat (or in the microwave), heat the cream until it is hot but not simmering, then set it aside. Place a kettle of water on the heat to boil.
Caramelize the sugar.Add the sugar and water to a (separate) saucepan and stir to combine. Heat the mixture over medium-low heat, without stirring, until it caramelizes and reaches a deep amber color. Be patient with this process – the sugar will bubble for a while, then it will begin to progressively darken until it reaches a deep amber color or 355°F (180°C). At this point, remove the pan from the heat.
Add the cream.Immediately pour the hot cream into the caramelized sugar with one hand, very slowly and carefully, while whisking the mixture with the other hand. The cream will bubble up quite dramatically, so please be careful.
Temper the eggs.Add the egg yolks to a large heat-safe mixing bowl. While whisking the eggs with one hand, use your other hand to slowly add about 1/2 cup of the cream mixture to the eggs. Slowly add an additional 1/2 cup, then pour the remaining cream mixture into the eggs and whisk until combined. Add the vanilla and sea salt and whisk once more until combined.
Strain.Strain the entire mixture through a fine mesh strainer into a clean bowl to catch and discard any clumps that might have accidentally scrambled.
Fill the ramekins.Pour the mixture evenly into the ramekins so that they are nearly full. Pour the hot water from the kettle carefully into the baking dish surrounding the ramekins (avoid pouring water into the ramekins) until the water reaches halfway up the sides of the ramekins. (I actually find it’s easiest to add the dish to the oven and then carefully pour in the water, but either option will work.)
Bake.Very carefully transfer the baking dish to the oven. Bake for 30 to 40 minutes, or until the custard is still slightly jiggly but the centers are barely set. (If you’d like to double-check doneness using a cooking thermometer, the centers of the custard should measure 170°F.)
Cool.Very carefully remove the baking dish from the oven (remember that the water is very hot), then carefully remove the ramekins and transfer them to a wire rack. Let the ramekins cool to room temperature, then transfer them to the refrigerator and cool until completely chilled.
Brûlée. Once the custard is chilled, remove the ramekins from the refrigerator. If you notice any condensation on the surface of the custards, blot it away gently with a paper towel. Add a thin layer of sugar on top of each custard, swirling it around so that the sugar is distributed evenly. (I used about 1 teaspoon per custard.) Use a kitchen torch to caramelize the top of each custard, holding the torch 2-3 inches from the top of the custard and very slowly moving the flame across the surface until it is a deep amber color and bubbly. Let the custard rest for at least one minute.
Serve.Serve immediately, topped with a sprinkle of flaky sea salt, and enjoy!
Very clear instructions!
I’m not a gadget person So I’m glad you stated the broiler option as an alternative to the kitchen torch.
And I appreciate the pronunciation guide!
Thanks!
I’ve tried this twice and my caramel seems to be burning before 355. Just go by color and give up on the temp? I had it in low but maybe not low enough? Suggestions
Britt —
Yes you should just go by color & smell. As soon as it starts turning from light caramel to dark amber swirl it to evenly distribute the color and add the cream. You can smell it once caramel has gone too far and begun to burn. The nice thing about the recipe here is that depending on how dark you take your caramel will determine what flavor profile your custards will be. If you add the cream, while the caramel is still a lighter caramel color you’ll have a caramel crème brûlée but if you take it darker you’ll have a butter scotch like flavor crème brûlée. I’ve even used sugar that was just a touch over what I would like it to be in terms of color and it still worked out because when you add all that cream it dilutes that burnt flavor so it resulted in a very deep butterscotch flavor. It was delicious. Try calibrating your thermometer but another thing to keep in mind is that the caramel process is so quick by the time you measured and looked, you could take it past the point of usable to burnt. Always better to go with your eyes & your gut with caramel in my opinion.
Rachelle —
I know ur comments a year old but that burning look is the Amber color ur supposed to be watching for. Once it gets to 355 turn the heat off


I bet you can guess the first question…can I make this without a kitchen torch?
Yes! :) I included instructions in the FAQ section above for how to make this recipe using an oven broiler instead. Enjoy!
Can’t wait to make this! What temperature should the oven be set to?
Oh my gosh, thank you for catching that. Somehow the first line of the recipe got deleted! :) The instructions are there now.
Very clear instructions!
I’m not a gadget person So I’m glad you stated the broiler option as an alternative to the kitchen torch.
And I appreciate the pronunciation guide!
Thanks!
I’ve tried this twice and my caramel seems to be burning before 355. Just go by color and give up on the temp? I had it in low but maybe not low enough? Suggestions
Yes you should just go by color & smell. As soon as it starts turning from light caramel to dark amber swirl it to evenly distribute the color and add the cream. You can smell it once caramel has gone too far and begun to burn. The nice thing about the recipe here is that depending on how dark you take your caramel will determine what flavor profile your custards will be. If you add the cream, while the caramel is still a lighter caramel color you’ll have a caramel crème brûlée but if you take it darker you’ll have a butter scotch like flavor crème brûlée. I’ve even used sugar that was just a touch over what I would like it to be in terms of color and it still worked out because when you add all that cream it dilutes that burnt flavor so it resulted in a very deep butterscotch flavor. It was delicious. Try calibrating your thermometer but another thing to keep in mind is that the caramel process is so quick by the time you measured and looked, you could take it past the point of usable to burnt. Always better to go with your eyes & your gut with caramel in my opinion.
I know ur comments a year old but that burning look is the Amber color ur supposed to be watching for. Once it gets to 355 turn the heat off
Just made these for my dad’s birthday! They were luxurious and delicious!! Such a great recipe!! We all licked our ramekins lol! Saving this one.