This post may contain affiliate links. Please read my disclosure policy.
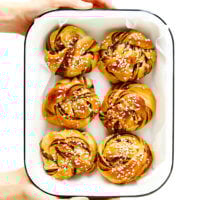
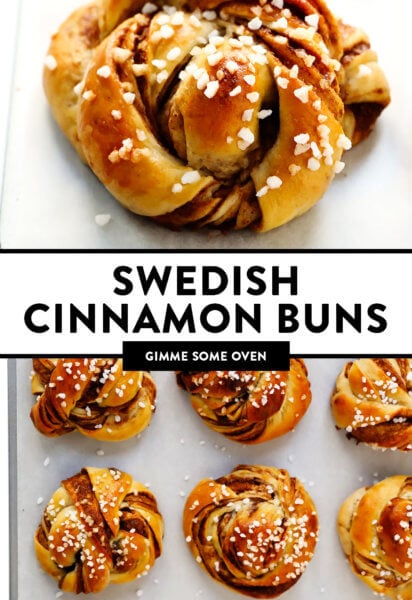
This traditional Swedish kanelbullar (cinnamon buns) recipe is made with a perfectly soft and chewy cardamom dough, a buttery cinnamon-sugar filling, and twisted into cute little knots.
A few years ago when Barclay and I visited Stockholm together for the very first time, we were introduced to one of Sweden’s most delicious national treasures that I have been craving ever since…
…Sweden’s famous cinnamon buns. ♡♡♡
Somehow, Barclay and I had lived our entire lives up until that trip without ever having tried kanelbullar (Swedish cinnamon buns) or kardemummabullar (Swedish cardamom buns). But our friend in Stockholm said that these sweet treats were an absolute must. So the very first morning that we arrived, we ordered one of each to go with our coffee. And oh my word, you guys, it was head-over-heels cinnamon bun love at first bite.
I can’t even tell you how much I love these cinnamon buns! By contrast to their American cinnamon roll cousins, Swedish cinnamon buns are typically twisted and tied into these cute little knots, as you can see above. And instead of spreading a thick layer of icing on top, these buns are sprinkled with crunchy pearl sugar. The dough in Swedish cinnamon buns is also kneaded with a hint of cardamom, which adds an irresistibly warm depth of flavor to the cinnamon in the filling. And best of all, these rolls are baked just long enough so that they stay perfectly soft and chewy, which I strongly believe is the optimum texture for any type of cinnamon roll or bun.
Anyway, Barclay and I literally could not get enough of these sweet treats during our time in Stockholm and have been craving them ever since. So when one of my good friends offered to teach us how to make them a few weeks ago (via Zoom, of course, while we’re all still staying home), we wholeheartedly said YES. Turns out — they’re easier to make than I was expecting! The twisting technique definitely takes a bit of practice at first, but it’s quick and easy once you get the hang of it. And otherwise, the process for making the dough and filling are pretty standard. They do require a few hours of prep time overall, thanks to a few long rise times, so set aside a good long morning to make a batch. But trust me, it will be one million times worth it.
Alright, I’ve been looking forward to sharing this kanelbullar recipe with you for weeks now. So let’s get to it!
To make this Swedish cinnamon buns recipe (kanelbullar), you will need the following ingredients:
Milk: I used cow’s milk for this recipe, but plain non-dairy milk (such as almond milk or oat milk) would work too.
Butter: Part of which we will add to the rolls, and part of which we will use for the filling. Please note that it’s essential that the butter be room temperature for this recipe.
Flour: I just used standard all-purpose flour.
Yeast: I used instant yeast, because it can easily be mixed in with the dry ingredients. See variation notes below if you would like to sub in active dry yeast instead.
Granulated and brown sugar: We will use granulated (white) sugar in the dough and the brown sugar in the filling.
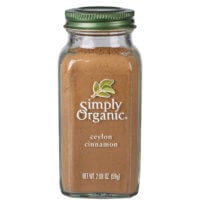
Ground cinnamon and cardamom: The cardamom here is one of the essential flavors that differentiates the taste of Swedish cinnamon buns from traditional American cinnamon rolls. And trust me — it is delicious. I just used store-bought ground cardamom this recipe. But if you would like to go the extra mile, you can make your own cardamom by emptying out the green pods and finely-grinding the seeds. (The flavor will be more potent and you will also have the classic black flecks of seeds in your buns.)
Vanilla extract: To add a bit of cozy vanilla flavor to the filling.
Fine sea salt: To bring out all of these delicious flavors.
Egg wash: An egg plus a tablespoon of water whisked together, which will help the pearled sugar to stick to the tops of the rolls.
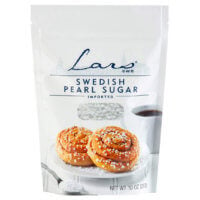
Pearl sugar: I topped my cinnamon buns with traditional Swedish pearl sugar, which is chunky and crunchy and adds some fun decor to these buns. But feel free to sprinkle on some turbinado sugar or, really, any type of sugar that you have on hand.
How To Make Cinnamon Buns:
As I mentioned above, these rolls require a few long rises before they are baked. So be sure to plan ahead, and I promise they will be worth the extra time and effort! Full instructions are included in the recipe below, but here is a brief overview of what’s ahead:
Heat the milk and butter. Heat the milk and butter together (either in the microwave or in a saucepan) until they reach 110°F, which is the optimum temperature to help your yeast activate.
Mix the dough. In a separate large mixing bowl, briefly whisk together the dry ingredients (flour, sugar, yeast, ground cardamom and salt), add the mixture, stir until combined, then turn the dough out onto a floured surface and knead for 7-10 minutes.
First dough rise. Form the dough into a ball, place it in a greased bowl, cover, and let it rise in a warm place for 1 hour (or until doubled in size).
Mix the filling. Meanwhile, stir together the filling ingredients in a separate mixing bowl until evenly combined.
Roll out the dough. Next, the fun part! Turn the dough out onto a large floured work surface and roll it into a 22 x 15-inch (55 x 38-cm) rectangle. Spread the filling mixture evenly across the dough. (I find it’s easier to dot little spoonfuls evenly across the dough, as pictured above, then spread it out evenly.) Fold the left third of the dough in towards the center, and fold the right third of the dough over that towards the center, like you’re folding a business letter. Then gently run the rolling pin over the dough to press out any big bubbles, and roll the dough out a bit more so that it forms a 15 x 8-inch (38 x 20-cm) rectangle.
Form the buns. Using a pizza cutter, pastry cutter or a knife, slice the dough into even 2 x 20-cm long strips. Take one strip and twist it several times, gently stretching it as you do so until it nearly doubles in length. Grab one end of the twisted strip and loosely wrap the dough around two fingers twice, like a bandage. Then loop the rest of the dough perpendicularly around the dough so that it forms a knot, and tuck the loose end in at the bottom. Transfer the dough to a large parchment-covered baking sheet, and repeat with the remaining dough strips. (Here is a great visual for twisting the dough, or you can watch my step-by-step tutorial on Instagram stories.)
Second dough rise. Loosely cover the dough buns with a clean kitchen towel and let them rise for 45-60 minutes.
Brush and sprinkle. Heat the oven to 375°F. Brush each bun with the egg wash, then sprinkle with a pinch of pearled sugar.
Bake. Bake for 15-18 minutes, or until the rolls reach your desired level of golden brown. Transfer to a wire baking sheet and let cool for 5 minutes. Then serve warm and enjoy!! These rolls are best enjoyed the day that they are baked, but see tips below for storage instructions if you have leftovers.
Possible Variations:
Here are a few recipe variations that you are welcome to try too:
Make them vegan: Use a plain plant-based milk (such as almond milk or oat milk) or water, in place of the cow’s milk. Then use vegan butter in the dough and filling, and brush the rolls with melted vegan butter instead of an egg wash.
Make them ahead of time: If you would like to prep the rolls the night before, just follow the recipe until the dough is twisted into knots. Place the knots in a baking sheet or in a baking dish, cover and refrigerate overnight. Then let them rest on the counter until they reach room temperature (about 60-90 minutes), then bake as directed.
Roll the buns like round cinnamon rolls: If you would like to skip the twisting, you are welcome to roll out and slice the rolls like I do in this recipe.
Use active dry yeast: If you do not have instant yeast on hand, you will just need to take some extra time to activate the yeast. Heat the milk (on its own!) to 110°F, sprinkle the yeast on top, and give it a quick whisk. Let the mixture rest for 5 minutes. Then add in your remaining dough ingredients, including either room temperature or melted butter. You will also need to increase each rise time by about 15-20 minutes, if using active dry yeast. But you can use the exact same amount of active dry yeast as instant yeast — 7 grams.
More Cinnamon Roll Recipes:
Looking for more yummy cinnamon roll recipes? Here are a few of my faves:
This traditional Swedish kanelbullar (cinnamon buns) recipe is made with a perfectly soft and chewy cardamom dough, a buttery cinnamon-sugar filling, and twisted into cute little knots.
Heat the milk and butter. Combine the milk and 1/4 cup butter in a small saucepan*. Heat over medium-low heat, stirring frequently to melt the butter, until the mixture reaches 110°F. (I recommend measuring the temperature with a cooking thermometer, but if you don’t have one, the mixture should be warm but not hot to the touch. If the mixture gets too hot, just wait a few minutes for it to cool.)
Mix the dough. (See optional stand mixer instructions below.) In a separate large mixing bowl, briefly whisk together the flour, sugar, yeast, ground cardamom and salt until combined. Add the warm milk mixture and stir until the dough begins to form. Turn the dough out onto a floured surface and knead for 7-10 minutes, or until the dough is smooth and soft.
First dough rise. Form the dough into a ball, place it in a greased bowl and cover with a damp towel or plastic wrap. Let the dough rise in a warm space for 1 hour, or until it has doubled in size.
Mix the filling. Meanwhile, stir together the filling ingredients in a separate mixing bowl until evenly combined.
Roll out the dough. Once the dough is ready to go, turn it out onto a large floured work surface. Use a rolling pin to roll the dough into a 22 x 15-inch (55 x 38-cm) rectangle. Carefully and evenly spread the filling mixture across the entire surface of the dough. Then (as pictured above) fold the left third of the dough in towards the center, and fold the right third of the dough over that towards the center, like you’re folding a business letter. Gently run the rolling pin over the dough to press out any big bubbles. Then roll the dough out a bit more so that it forms a 15 x 8-inch (38 x 20-cm) rectangle.
Form the buns. Using a pizza cutter, pastry cutter or a knife, slice the dough into even 2 x 20-cm long strips. Take one strip and twist it several times, gently stretching it as you do so until it nearly doubles in length. Grab one end of the twisted strip and loosely wrap the dough around two fingers twice, like a bandage. Then loop the rest of the dough perpendicularly around the dough so that it forms a knot, and tuck the loose end in at the bottom. Transfer the dough to a large parchment-covered baking sheet, and repeat with the remaining dough strips. (Here is a great visual for twisting the dough, or you can watch my step-by-step Instagram tutorial here.)
Second dough rise. Loosely cover the dough buns with a clean kitchen towel and let them rise for 45-60 minutes.
Brush and sprinkle. Heat the oven to 375°F. Brush each bun with the egg wash, then sprinkle with a pinch of pearled sugar.
Bake. Bake for 15-18 minutes, or until the rolls reach your desired level of golden brown. (I like mine just very lightly golden, so that they stay super soft.) Transfer to a wire baking sheet and let cool for 5 minutes. Then serve warm and enjoy!! These rolls are best enjoyed the day that they are baked, but see tips below for storage instructions if you have leftovers.
Microwave option: Alternately, you can combine the milk and butter in a microwave-safe bowl or measuring cup. Then microwave the mixture for 1 minute, pausing to give it a good stir to help melt the butter, and then continue heating in 15-second intervals, until the mixture reaches 110°F.
Stand mixer option: If you own a stand mixer, you can mix the dough using the dough attachment on low speed for 8 minutes, or until the dough is smooth and soft. If you find that the dough is sticking to the sides of the bowl, just sprinkle in a bit of extra flour.
Make-ahead option: If you would like to prep the rolls the night before, just follow the recipe until the dough is twisted into knots. Place the knots in a baking sheet or in a baking dish, cover and refrigerate overnight. Then let them rest on the counter for until they reach room temperature (about 60-90 minutes), then bake as directed.
Storage instructions: These rolls are best enjoyed the same day that they are baked. But any leftovers can be stored in a sealed container for up to 3 days, or frozen for up to 3 months.
Loved this recipe! Easy to make and all the instructions were spot on. Would it be possible to add the weight measurement for salt though? I have a courser grind so it’d be helpful to weigh it out instead of measuring by volume
I have now made these kanelbullarna three times. They are incredibly delicious–truly five star, but I am having trouble with the filling leaking out and making a wonderful lacy sugar puddle surrounding the outside of each kanelbulle. Do you have any suggestions to keep the filling in the bun?
 recipe is made with a perfectly soft and chewy cardamom dough, a buttery cinnamon-sugar filling, and twisted into cute little knots. Top these rolls with crunchy sweet pearl sugar or any type of sugar that you have on hand! | gimmesomeoven.com #swedish #cinnamon #buns #rolls #breakfast #brunch #sweet #vegetarian #vegan")
 recipe is made with a perfectly soft and chewy cardamom dough, a buttery cinnamon-sugar filling, and twisted into cute little knots. Top these rolls with crunchy sweet pearl sugar or any type of sugar that you have on hand! | gimmesomeoven.com #swedish #cinnamon #buns #rolls #breakfast #brunch #sweet #vegetarian #vegan")
 recipe is made with a perfectly soft and chewy cardamom dough, a buttery cinnamon-sugar filling, and twisted into cute little knots. Top these rolls with crunchy sweet pearl sugar or any type of sugar that you have on hand! | gimmesomeoven.com #swedish #cinnamon #buns #rolls #breakfast #brunch #sweet #vegetarian #vegan")
 recipe is made with a perfectly soft and chewy cardamom dough, a buttery cinnamon-sugar filling, and twisted into cute little knots. Top these rolls with crunchy sweet pearl sugar or any type of sugar that you have on hand! | gimmesomeoven.com #swedish #cinnamon #buns #rolls #breakfast #brunch #sweet #vegetarian #vegan")
 recipe is made with a perfectly soft and chewy cardamom dough, a buttery cinnamon-sugar filling, and twisted into cute little knots. Top these rolls with crunchy sweet pearl sugar or any type of sugar that you have on hand! | gimmesomeoven.com #swedish #cinnamon #buns #rolls #breakfast #brunch #sweet #vegetarian #vegan")
 recipe is made with a perfectly soft and chewy cardamom dough, a buttery cinnamon-sugar filling, and twisted into cute little knots. Top these rolls with crunchy sweet pearl sugar or any type of sugar that you have on hand! | gimmesomeoven.com #swedish #cinnamon #buns #rolls #breakfast #brunch #sweet #vegetarian #vegan")
 recipe is made with a perfectly soft and chewy cardamom dough, a buttery cinnamon-sugar filling, and twisted into cute little knots. Top these rolls with crunchy sweet pearl sugar or any type of sugar that you have on hand! | gimmesomeoven.com #swedish #cinnamon #buns #rolls #breakfast #brunch #sweet #vegetarian #vegan")
 recipe is made with a perfectly soft and chewy cardamom dough, a buttery cinnamon-sugar filling, and twisted into cute little knots. Top these rolls with crunchy sweet pearl sugar or any type of sugar that you have on hand! | gimmesomeoven.com #swedish #cinnamon #buns #rolls #breakfast #brunch #sweet #vegetarian #vegan")
 recipe is made with a perfectly soft and chewy cardamom dough, a buttery cinnamon-sugar filling, and twisted into cute little knots. Top these rolls with crunchy sweet pearl sugar or any type of sugar that you have on hand! | gimmesomeoven.com #swedish #cinnamon #buns #rolls #breakfast #brunch #sweet #vegetarian #vegan")
 recipe is made with a perfectly soft and chewy cardamom dough, a buttery cinnamon-sugar filling, and twisted into cute little knots. Top these rolls with crunchy sweet pearl sugar or any type of sugar that you have on hand! | gimmesomeoven.com #swedish #cinnamon #buns #rolls #breakfast #brunch #sweet #vegetarian #vegan")


Loved this recipe! Easy to make and all the instructions were spot on. Would it be possible to add the weight measurement for salt though? I have a courser grind so it’d be helpful to weigh it out instead of measuring by volume
I have now made these kanelbullarna three times. They are incredibly delicious–truly five star, but I am having trouble with the filling leaking out and making a wonderful lacy sugar puddle surrounding the outside of each kanelbulle. Do you have any suggestions to keep the filling in the bun?