This post may contain affiliate links. Please read my disclosure policy.
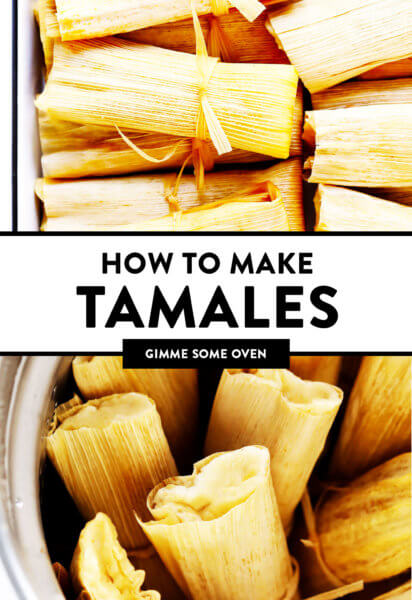
Learn how to make tamales with this easy recipe and step-by-step tutorial! They’re easy to customize (chicken, beef, pork and vegetarian filling recipes provided), they’re made without lard or shortening, they’re easy to freeze, and taste as delicious as ever!
Guys, I finally learned how to make tamales! ♡
Turns out, they are actually quite simple to make at home and next-level delicious when served fresh outta the steamer. They do take a considerable investment of time, about two hours to assemble and steam. But in that time, you can make literally three dozen servings, you can customize them with just about any meat or vegetarian filling and sauce that you prefer (either 100% homemade, or I have some speedy store-bought shortcuts below), you can steam them either on the stovetop or in the Instant Pot, and — in the end — you get to enjoy the most delicious homemade tamales made from scratch.
Seriously, we can’t get enough of these homemade tamales…which is good news, since we now have a freezer full of ’em.
Over the past few weeks, I have been experimenting with various recipes for tamales and have finally landed on a base masa recipe that is light and moist (without being greasy) and super-flavorful. This particular tamales recipe also happens to be made with zero lard or shortening, and can be filled with your choice of protein (chicken, pork, steak, etc), cheese, beans, veggies, or whatever sounds good to you. And it also freezes beautifully, making these tamales a great meal prep option for easy-to-grab lunches and dinners in the weeks ahead.
So pick up some corn husks and masa and your favorite fillings, set aside a few hours, turn up the music in the kitchen and make some margaritas, maybe invite a friend over to help out, and let’s have a tamales-making date!
How To Make Tamales | 1-Minute Video
What Is A Tamal?
First off, just a quick note for English speakers that the singular for tamales in Spanish is actually tamal (not tamale). Tamales are actually a traditional dish in dozens of countries around Central and South America. But today, we are specifically talking about Mexican tamales, which feature a corn-based masa (dough) wrapped around a filling and steamed in a corn husk. They are traditionally filled with either chicken, pork, beef, cheese and/or beans, but you’re welcome to customize the filling in this recipe however you would like.
Tamales Ingredients:
To make this recipe, you will need the following tamales ingredients:
Dried corn husks: These may be available in the Latino or produce section of your grocery store, or if not, you can order them on Amazon. In general, you want to look for husks that are wide enough to wrap around the entire tamal filling. But if you happen to get a bag of husks that are fairly narrow, hakuna matata, you can just overlap two on top of each other. We will also shred a few husks into lots of long skinny pieces to tie the tamales together.
Masa (dough) ingredients: For the masa dough itself, you will need:
Masa harina: Finely-ground nixtamalized corn flour. (“Maseca” is the most popular brand.)
Corn oil or avocado oil: I prefer these two, but any mild-flavored oil will do.
Stock: Chicken, beef or vegetable stock will work — yoou pick!
Baking powder, salt and ground cumin: To season the masa.
Filling: As I said, you can literally fill these tamales with just about anything! They are a fantastic way to use up leftover taco fillings, meat, veggies, cheese, you name it. Or, you can totally cook up a new batch of filling from scratch to go in these. You will need about 2-3 cups of filling this recipe, so feel free to mix and match whatever sounds good. Ideas could include:
Chicken: Any kind of cooked, shredded chicken will do. Shredding a large rotisserie chicken would be the quick and easiest route here. Or, you could make (and shred) my recipe for Baked Chicken Breasts, or make this delicious 3-Ingredient Mexican Shredded Chicken in the slow cooker or Instant Pot.
Beef: Any kind of cooked and shredded (or ground) beef will do. You could brown some ground beef, or use some leftover steak or roast beef. Or I would highly recommend making a batch of this Barbacoa Beef in the Instant Pot or slow cooker.
Pork: Any kind of cooked and shredded/pulled pork will do. I’m a big fan of using this Carnitas recipe, either made in the Instant Pot or slow cooker.
Refried beans: Refried pinto or black beans are a delicious (and super-easy!) vegetarian option, which you can either use on their own, or mix with cheese and/or roasted veggies.
Cheese: Cheese is another delicious vegetarian option that you can use on its own, or pair with any other fillings. I would highly recommend Oaxaca cheese (sort of a Mexican mozzarella), but any cheese will do.
Veggies: And of course, you can always use any kind of veggies, either on their own as a vegetarian option or paired with any other fillings. The veggies will need to be cooked ahead of time however you prefer (<– I highly recommend roasting them up), and finely-chopped. Some tasty options could include peppers (poblano, bell, or jalapeño peppers), potatoes (Yukon gold or sweet), cauliflower, mushrooms, squash, onions, carrots…you name it.
Sauce: If your filling recipe includes quite a bit of sauce (such as if you make the barbacoa or carnitas recipes), you may not need to add any extra. But in general, I highly recommend adding some extra sauce to your meat or vegetarian fillings. Store-bought salsa will definitely save you a big step, but feel free to go the extra mile and make homemade salsa if you’d like! You will need about 1-ish cups of sauce for this recipe — enough to add a light coating to the filling, without making it too juicy/watery. And then I would also recommend having lots of extra salsa on hand for serving once the tamales have cooked. You can choose just about any kind you love. I would recommend either:
Red salsa: Either homemade or store-bought, and as mild or spicy as you prefer.
Green salsa (salsa verde): Either homemade or store-bought, and as mild or spicy as you prefer
Mole: I still don’t have a recipe for mole here on the blog, but mole tamales would be incredible.
Toppings: Once the tamales are cooked, I’m a big fan of loading them up with lots of toppings. They are totally optional, but I would recommend any combination of:
Sour cream (or Mexican crema) or crumbled cotija cheese: Delicious!
How To Assemble Tamales:
It’s much easier than you might think! Simply:
Soak your corn husks. Find a large stockpot or pan big enough to fit the corn husks, then fill it with very warm water and a lid. The corn husks will float to the top, so you may need to add something to weigh them down a bit so that they are submerged. They will need to soak for about 30 minutes, or until softened.
Mix up your masa (dough). Meanwhile, mix up your masa. You can either do this in a stand mixer (the easiest) or with a hand mixer (a bit more messy) or by hand (lots of work). Mix it up according to the recipe below, and then cover with a damp towel and refrigerate until ready to use.
Prepare your fillings and salsa. See options above for ideas! Whatever sounds good to you, prepare both your fillings and salsa, them toss them together in a bowl until combined.
Then…assemble the tamales! As I said, this is the part that will take a little while. But I find it totally relaxing and repetitive. So prepare an assembly line of your ingredients, and get in your groove. Simple:
Lay the soaked corn husk on a flat surface. A simple plate or cutting board will do.
Spread your masa on the corn husk. About 1/4 cup (or a little more) will do. I highly recommend using a large cookie scoop to measure out the masa. Use a spoon or your fingers to spread it out into a rectangle large enough to enclose your filling. (I keep a little bowl of water nearby to dip my fingers regularly, which helps the masa from sticking to them.)
Add your filling/sauce to the center of the masa. Tamales use surprisingly little filling — just a tablespoon or two will do. Add it to the center of your masa.
Fold the corn husk in half vertically. Then very carefully, fold the corn husk in half so that the masa wraps completely around the filling, maybe using your fingers to pinch it together just a little bit.
Wrap the corn husk into a little burrito. Continue folding the corn husk completely over to one side so that it is a burrito/cylinder shape.
Fold the top (skinny) end down to enclose one end of the tamal. The image above explains this best. One end of the tamal will be exposed, and the other will be folded over. (I like to fold my tamales to cover the side with the seam.
Tie the tamal together. I like to shred a few corn husks into long skinny strips to tie the tamales together (this is a perfect use for the husks that are too skinny!). But you can also use baking string.
To make the tamales on the stovetop, you will need a large stockpot with a strainer. I used a strainer pot that came with my stockpot. But you can also purchase various kinds of strainer baskets separately.
To make tamales on the stovetop, simply add the tamales to the strainer, add 2 cups of water to the base of the pot, cover and steam on medium heat for about 30-40 minutes, or until the masa separates easily from the husks.
How To Make Tamales In The Instant Pot:
Yep — turns out that tamales are also easy to make in the Instant Pot (or your brand of pressure cooker) too! Simply add 1 cup of water to the bottom of your Instant Pot, insert the strainer basket, add the tamales, cover and cook on high pressure for 20 minutes (using quick release afterwards) until the masa separates easily from the husks.
How To Serve Tamales:
Once your tamales are all cooked and ready to go, please — please — stop right there and serve a batch fresh outta the steamer. There is nothing like the warmth, texture, and flavor of freshly-cooked tamales. They’re amazing!!!
Just carefully unwrap your tamal (you will not eat the corn husk), top the tamal with your favorite toppings (see ideas above), and dig in! :)
If you would like some ideas for side dishes to go with your homemade tamales, I would recommend:
That said, half of the fun of making tamales is that this recipe makes a BIG batch for leftovers! So unless you are having a big tamales party the day you are baking, you will likely have plenty to store for later. Which is lucky for you. ;)
In general, tamales will keep in the fridge for up to 3 days, or in the freezer for up to 3 months.
To store them, you want to try to have as little air in your storage container as possible. So adding a handful to a ziplock bag (pressing out any extra air) works well. Or if you really want them to be as fresh as possible, you can wrap them individually in plastic wrap.
How To Reheat Tamales:
My three favorite methods use either a:
Steamer: Simply re-steam your tamales for 15 minutes or so (or a bit longer if they were frozen).
Oven: Wrap your tamales in foil and bake at 350 for about 15-20 minutes until warmed through.
Microwave: Admittedly my favorite, and the easiest. Just place 1-3 tamales on a plate, cover with a damp paper towel, and microwave for a minute so until warmed through.
Learn how to make tamales with this easy recipe and step-by-step tutorial! They’re easy to customize (chicken, beef, pork and vegetarian filling recipes provided), they’re made without lard or shortening, they’re easy to freeze, and taste as delicious as ever. See blog post above for filling ideas and recipes.
3/4 cup corn oil (or avocado oil, olive oil, or any mild-flavored oil)
2-3 cups filling (see ideas below)
1 cup salsa (see ideas below)
Instructions
Soak the corn husks. Place the corn husks in a large stockpot or pan and cover completely with warm water. Soak for 30 minutes or so until softened.
Mix the masa (dough). Meanwhile, in the bowl of a large stand mixer, add masa marina, salt, cumin, baking powder, and whisk to combine. Add the oil, then beat on low speed until combined. Then gradually add the stock, and beat on low speed until combined. Once the stock is incorporated, increase speed to medium, and beat for 10 minutes until fluffy, stopping occasionally to scrape down the sides of the bowl if needed. Cover the mixing bowl with a damp paper towel and refrigerate until ready to use.
Prepare your filling: Toss together your desired filling(s) and sauce until combined. In general, you want enough sauce to coat and flavor the filling, but not so much that the filling is really juicy/watery.
Assemble the tamales: To assemble the tamales, follow these simple steps (visual included in the blog post above):
Lay the soaked corn husk on a flat surface. A simple plate or cutting board will do.
Spread your masa on the corn husk. About 1/4 cup (or a little more) will do. I highly recommend using a large cookie scoop to measure out the masa. Use a spoon or your fingers to spread it out into a rectangle large enough to enclose your filling. (I keep a little bowl of water nearby to dip my fingers regularly, which helps the masa from sticking to them.)
Add your filling/sauce to the center of the masa. Tamales use surprisingly little filling — just a tablespoon or two will do. Add it to the center of your masa.
Fold the corn husk in half vertically. Then very carefully, fold the corn husk in half so that the masa wraps completely around the filling, maybe using your fingers to pinch it together just a little bit.
Wrap the corn husk into a little burrito. Continue folding the corn husk completely over to one side so that it is a burrito/cylinder shape.
Fold the top (skinny) end down to enclose one end of the tamale. The image above explains this best. One end of the tamale will be exposed, and the other will be folded over. (I like to fold my tamales to cover the side with the seam.
Tie the tamale together. I like to shred a few corn husks into long skinny strips to tie the tamales together (this is a perfect use for the husks that are too skinny!). But you can also use baking string.
Steam the tamales: Add water to the bottom of a stockpot or Instant Pot. Then add a steamer basket, fill it with your tamales, and steam until the tamales are hot and cooked through and the masa separates easily from the corn husks, about 30 minutes on the stovetop or 20 minutes (high pressure, natural release) in the Instant Pot.
Serve tamales: Remove from the steamer and serve immediately. Or refrigerate in a tightly-sealed ziplock bag for up to 3 days, or freeze for up to 3 months.
Filling Ideas: See blog post above for detailed filling ideas and recipes. In general, some faves include: chicken, beef, pork, cheese, beans, and/or vegetables.
Sauce Ideas: Your filling recipe may already include some kind of sauce. But if you would like to add extra, I recommend: red salsa (either homemade or store-bought), green Salsa (either homemade or store-bought), enchilada sauce (this enchilada sauce recipe is my all-time fave), or mole.
This looks so yummy!! Love reading about your adventures in Barcelona. I`m a Norwegian reader, and hope you stop by Scandinavia during your European stay! We have beautiful nature, excellent coffee, and our seafood is the best … Also, we really love tacos!
Thank you for sharing this recipe! I too have always been afraid to try to make homemade tamales! But your recipe and details make it seem doable! I’ll be giving them a try for sure!
Two questions if you don’t mind: 1) I have seen ready-made masa in grocery stores – can that be used instead of making from scratch – maybe doctoring it up with spices? and 2) should they be standing up on end or stacked when steaming -or does it matter?
Thank you so much for answering these questions! I’m really anxious now to give them a try ?
Here in Arizona we can get the meatless corn, cheese and green chile tamales just about everywhere they have the red, which contains pork or beef. However…..my all time favorite are the sweet tamales especially pineapple. They have a few raisins, cinnamin, maybe nutmeg…..yum!
Thank you for sharing this tutorial & recipe. It is, indeed, quite simple to make tamales. I learned many years ago from a 1st generation Mexican American chef, but lost my written notes in a move. Your recipe mirrors his & it’s a blessing to have it as Tamales are one of my all time favorite, traditional meals. Again, thank you for sharing. I look forward to your emails each week.
These look amazing! I’ve been wanting to make my own tamales lately, and your post made them seem not so intimidating. I definitely will make some vegetarian tamales in my Instant Pot soon. Thanks for sharing.
I’ve been wanting to make tamales for a looooooong while now but so many recipes are just one variation. Thank you for including so many different options! I’ll be making some up as soon as I can get to the Latin grocery store!
I tried these tonight, but so much liquid added to the masa produced a very sticky, soupy dough. Maybe I did something wrong? The rest of the recipe worked well and they had a good taste, but I had to add a substantial amount of masa to the mix to get it to stop sticking like glue to my fingers. (I also added a little more oil). Even so, they ended up very dense.
If anyone has any suggestions, please let me know! My daughter loved the vegan versions I made her but they were a bit heavy for my taste. I think adding more powdered masa at the end compacted them, or else they still had too much moisture and didn’t end up puffing up at all. I will give them another go if anyone has a remedy for this issue…. it was fun to make tamales from scratch!
I made these and they turned out wonderful. I love that they arent made with lard. They did take longer to steam. About an hour. The recipe made 3 and a half dozen tamales. I used the stock from cooking a pork roast which did add some fat. Overall, they were perfect. Id give this recipe 5 stars.
I made these for my brothers last weekend; filled them with your Instant Pot carnitas and served with salsa verde and sour cream. We demolished them. SO delicious, I think I’ll be on a tamales kick for a while now. Thank you so much for sharing your wonderful recipes with us!
I just tried pretty much ALL of the recipes above! It was a LONG cooking day, but well worth it! I work in an elementary school with a large Mexican population. The moms love to treat us with their amazing cooking. Therefore, I have been spoiled by authentic Mexican cooking versus the Americanized version most Americans are used to. Until now, I would only eat the tamales that our moms would make. I am now able to make my own! Loved the Barbacoa and Carnitas recipes and the Green Enchilada sauce! I used the Power Pressure Cooker for cooking the Barbacoa, Carnitas, and the tamales. The tamales ended up needing to go for 30 minutes instead of 20. For the first batch, I set it for 20 minutes. They weren’t quite done, so I had to put it back in for 5. For the next batch, I went ahead and set it for 30 and they came out fine. I also made refried beans in the pressure cooker and made a few tamales with those and the Oaxaca cheese you suggested. Yummy! For my next batch, I am going to add Mixed Roasted Veggies with cilantro to the order.
Question: How tightly can I pack the tamales in the pot to steam? I used the pressure cooker and used the steamer basket. I didn’t know if I had them packed too tightly and that is why they took longer to cook.
Thank u for the ingredients and measurements will be goin to local lil Mexican store and gettin them and making tamales for the first time next weekend. Iv been lookin for a good recipe and this no lard recipe sounds delicious.
My husband and I made these last night! Unbelievable!!! We went with a simple refried black bean and cheese filling and chose kitchen twine to tie with. Also made your homemade enchilada sauce that I use on my enchiladas all the time! They were fantastic (as is everything we’ve tried from your blog!) I’ve already passed your recipe along to friends that saw our pics of them! Thank you for such a yummy recipe!!!
Use all the liquid. For a second (more like a few minutes) I considered whether there was an error because it seemed like way too much liquid. But I was wrong, it is the correct amount as listed.
Love the masa recipe, I added some other seasonings to give the masa more flavor.
These tamales are absolutely delicious! We filled ours with three different options: 1) shredded chicken seasoned with taco seasoning, 2) black beans seasoned with Penzey’s Adobo seasoning, and 3) refried beans with pepper jack cheese.
The only thing I suggest is making sure the dough seals around the ones filled with cheese, so cheese doesn’t ooze out during steaming.
The hardest part about making these is waiting for them to finish steaming so you can ENJOY!
To top the tamales, I used this amazingly simple and flavorful sauce recipe, then I finished the tamales with a sprinkle of crumbled queso fresco. Yum!
For the sauce:
1 -15 oz can tomato sauce
1/4 cup water
1 1/2 tablespoons chili powder
1 teaspoon cumin
1 teaspoon dried oregano
1/2 teaspoon garlic powder
1/4 teaspoon salt (smoked)
1/8 teaspoon cayenne pepper
This is just what I was looking for. Thank you, you have done a terrific job explaining everything and recipes to boot! Now I think I can handle making tamales…Yes,I too have been intimidated by the thought..but now I’m ready.
These were great! I have made several tamales recipes from other people and they have always just seemed bland or greasy but these were spot on and delicious. I followed the ingredients list and instructions exactly. I used avocado oil. We had made pulled pork on Sunday and I used the left overs for the tamales. I also made black bean and fresh corn tamales. Yum! Thanks!
This recipe has saved my Thanksgiving! I have been experimenting with different masa recipes all week and my tamales have either come out too dry or too greasy to the point that they have been practically inedible. With this recipe, they turned out great! They are the proper consistency, great-tasting, and not at all greasy! I did not make any changes to the recipe, but I did opt to use avocado oil rather than corn oil. Thanks again!
These were so good! Home made tamales are so much better than the ones you can buy. My twelve year old and I had a great time making them as a Christmas advent project and shared with our family. Thanks so much for making a delicious, straight forward recipe! Merry Christmas!
Just made these. It was my first time making them and the dough came out a bit wet which I didn’t realize until I was rolling the tamales. They still turned out incredible. They’re so moist and flavorful! I filled with cheese and roasted jalapeños. Thank you for sharing the recipe. I can’t wait to make them again!
Thank you so much for posting this tamale recipe. I also have been intimidated, even though I grew up in a Hispanic household. I had never tried making them on my own. Let me tell you, the masa was perfect following your ingredients and directions. Probably the best masa I have ever tasted. I followed your advice on using Avocado Oil. I only made 38, but they were gone in about a week, especially after my son came home from college on break…LOL So thank you and I will be making more in a few days.
My 12-year-old son ate seven of these (filled with masa, citrus pork tenderloin and the salsa recipe on this site) and asked me to make them for dinner the next night as well. Enough said!
The ingredients list calls for cumin however nowhere in the instructions does it say when or where to add the cumin. Also, everywhere I have looked online about how long to steam tamales everybody is telling me 60-90 minutes and your recipe says only 20 minutes. I’m just not sure about that. Today is the third batch of tamales I have made using your recipe and they turn out delicious every time. I add onion powder garlic powder and cumin powder and chili powder to the dry ingredients and it gives the end result so much more flavor.
I freeze the mole I make in ice cube trays, then transfer to zip bags and when I want one tamal with a fried egg for breakfast, I can microwave a cube or two of mole to pour over.
So happy with how these turned out! I cooked them in the instant pot. I overstuffed mine a bit and they overflowed. A couple recommendations: (1) Add cumin to masa dough dry ingredients (2) it’s the correct amount of broth, follow the recipe (3) if you’re only doing one fold, don’t fill to brim (4) plop masa onto center of husk and spread with dampened fingers (4) you only need half of a 1 lb package of husks (5) mine were a bit tall in the instant pot, either make them shorter or lean them all diagonally in the instant pot (6) add extra water to instant pot. Mine ran out and couldn’t creat pressure, add enough to touch the bottom of the steamer rack (7) make sure when you close the lid, there aren’t tamales blocking the seal or the pressure switch. Thanks for the recipe!!
Found this recipe last week, and I decided to go for it. My husband loves tamales and I’ve always been scared to make them. This recipe really broke it down and gave me the confidence to move forward. I made a batch yesterday- it yielded 36 tamales. The leftovers were eaten for breakfast this morning. :) I still had quite a few corn husks, so I decided to make another batch today. I thought it would be great to have some to freeze…I’m not sure they’ll make it to the freezer.
Here are some things I noticed as a first-timer:
1) My masa did not spread easily with a spoon as shown in the video. I plopped about 1/4 cup masa on the husk, dipped my finger tips in water, then patted out shape. It looks like you’re going to have really small tamales, but they get bigger when they cook. Also, remember to leave some space at the top so they don’t spill out. I thought the cumin gave the masa such good flavor. It took me a little bit to get the wrap down. What worked easiest for me was bringing one side up and allowing (or forcing) the masa to drop off the husk onto the top of the filling, then I brought the other side of the husk over and wrapped it pretty snug.
2) Filling- we don’t care for saucy tamales. We had three types of meats. 1-butter beef (stew meat in the slow cooker on low for at least 8 hours- 1/2 stick butter for every pound of meat, 1/2 packet brown gravy seasoning for every pound of meat, and cover with water. Used the juice from the butter beef for my tamale stock. 2- Pork carnitas- one of our favorite recipes (https://www.myforkinglife.com/ninja-foodi-recipe-crispy-pork-carnitas/). Again, added any juice to my stock for tamales. I think I ended up using 1-2 cups of chicken broth to get to 6 cups. 3- shredded chicken seasoned with chicken taco seasoning. Beef and pork were my favorite. The batch I made today, I just browned hamburger with red onions. So simple, but so good.
3)Pressure cooking time- I have a 8qt ninja foodi. I was able to fit 23 tamales in the basket. My first batch I had about 15 and pressure cooked it for 30 minutes and let it natural release for 10. I had to pressure cook for an additional 8 minutes. The next batch had 20ish and I pressure cooked for 45 minutes.
This is a great recipe. It is pretty time consuming, but worth it.
, they're easy to steam on the stovetop or Instant Pot, they're easy to make ahead and freeze for meal prep, and they're SO delicious! | Gimme Some Oven #tamales #mexican #mealprep #glutenfree #cincodemayo")
, they're easy to steam on the stovetop or Instant Pot, they're easy to make ahead and freeze for meal prep, and they're SO delicious! | Gimme Some Oven #tamales #mexican #mealprep #glutenfree #cincodemayo")
, they're easy to steam on the stovetop or Instant Pot, they're easy to make ahead and freeze for meal prep, and they're SO delicious! | Gimme Some Oven #tamales #mexican #mealprep #glutenfree #cincodemayo")
, they're easy to steam on the stovetop or Instant Pot, they're easy to make ahead and freeze for meal prep, and they're SO delicious! | Gimme Some Oven #tamales #mexican #mealprep #glutenfree #cincodemayo")
, they're easy to steam on the stovetop or Instant Pot, they're easy to make ahead and freeze for meal prep, and they're SO delicious! | Gimme Some Oven #tamales #mexican #mealprep #glutenfree #cincodemayo")
, they're easy to steam on the stovetop or Instant Pot, they're easy to make ahead and freeze for meal prep, and they're SO delicious! | Gimme Some Oven #tamales #mexican #mealprep #glutenfree #cincodemayo")
, they're easy to steam on the stovetop or Instant Pot, they're easy to make ahead and freeze for meal prep, and they're SO delicious! | Gimme Some Oven #tamales #mexican #mealprep #glutenfree #cincodemayo")


, they're easy to steam on the stovetop or Instant Pot, they're easy to make ahead and freeze for meal prep, and they're SO delicious! | Gimme Some Oven #tamales #mexican #mealprep #glutenfree #cincodemayo")


This looks so yummy!! Love reading about your adventures in Barcelona. I`m a Norwegian reader, and hope you stop by Scandinavia during your European stay! We have beautiful nature, excellent coffee, and our seafood is the best … Also, we really love tacos!
Those look amazing!!! Shout out to dear old Dad for shipping the corn husks to Barcelona – ole!
We have organic pastured lard could we use that in place of the oil? Would we need to melt it first?
Yes, you can use lard. It will be better. No, it does not need to be melted.
Thank you for sharing this recipe! I too have always been afraid to try to make homemade tamales! But your recipe and details make it seem doable! I’ll be giving them a try for sure!
Two questions if you don’t mind: 1) I have seen ready-made masa in grocery stores – can that be used instead of making from scratch – maybe doctoring it up with spices? and 2) should they be standing up on end or stacked when steaming -or does it matter?
Thank you so much for answering these questions! I’m really anxious now to give them a try ?
I was wondering about the ready made masa myself.
What a great tutorial! My husband love tamales. I’m going to try these!
These sound wonderful! And I have been wanting to learn how so this came at the perfect time! Thank you so much!
A tamale making party is called a ”tamalada.
Beat the masa dough until a dollop floats in water. Now you’ll have the fluffiest tamales anywhere.
Here in Arizona we can get the meatless corn, cheese and green chile tamales just about everywhere they have the red, which contains pork or beef. However…..my all time favorite are the sweet tamales especially pineapple. They have a few raisins, cinnamin, maybe nutmeg…..yum!
Thank you for sharing this tutorial & recipe. It is, indeed, quite simple to make tamales. I learned many years ago from a 1st generation Mexican American chef, but lost my written notes in a move. Your recipe mirrors his & it’s a blessing to have it as Tamales are one of my all time favorite, traditional meals. Again, thank you for sharing. I look forward to your emails each week.
when you stream them do they need to stand up? I don’t have a basket but I have a pan that you can stream things with holes on top. thanks
These look amazing! I’ve been wanting to make my own tamales lately, and your post made them seem not so intimidating. I definitely will make some vegetarian tamales in my Instant Pot soon. Thanks for sharing.
Tamales do seem intimidating for some reason, even ordering them at a restaurant. BUT, they are sooo good! And these look delicious.
Looks wonderful! A clarification point, do you fully cook the tamales prior to freezing? Thanks!
These turned out amazing!!! Thank you for all of the great tips. I used a rotisserie chicken and salsa verde and they are delicious!
I’ve been wanting to make tamales for a looooooong while now but so many recipes are just one variation. Thank you for including so many different options! I’ll be making some up as soon as I can get to the Latin grocery store!
This recipe sounds real good. Ive made them before but I wanted to try a new recipe. Making this tomorrow
Many tamales. One tamal. ?
I tried these tonight, but so much liquid added to the masa produced a very sticky, soupy dough. Maybe I did something wrong? The rest of the recipe worked well and they had a good taste, but I had to add a substantial amount of masa to the mix to get it to stop sticking like glue to my fingers. (I also added a little more oil). Even so, they ended up very dense.
If anyone has any suggestions, please let me know! My daughter loved the vegan versions I made her but they were a bit heavy for my taste. I think adding more powdered masa at the end compacted them, or else they still had too much moisture and didn’t end up puffing up at all. I will give them another go if anyone has a remedy for this issue…. it was fun to make tamales from scratch!
I made these and they turned out wonderful. I love that they arent made with lard. They did take longer to steam. About an hour. The recipe made 3 and a half dozen tamales. I used the stock from cooking a pork roast which did add some fat. Overall, they were perfect. Id give this recipe 5 stars.
Yes! This recipe is perfect. Wish i could post a picture.
I made these for my brothers last weekend; filled them with your Instant Pot carnitas and served with salsa verde and sour cream. We demolished them. SO delicious, I think I’ll be on a tamales kick for a while now. Thank you so much for sharing your wonderful recipes with us!
I’m sooooooooo going to try to make these ASAP!!!! Thank you for the recipes, love your blog for years!!!
I’ve never made tamales before. These are terrific! I made them with vegan cheese for my boyfriend and he was in love. They’re great for lunches!
How many tamales will this make?
I just tried pretty much ALL of the recipes above! It was a LONG cooking day, but well worth it! I work in an elementary school with a large Mexican population. The moms love to treat us with their amazing cooking. Therefore, I have been spoiled by authentic Mexican cooking versus the Americanized version most Americans are used to. Until now, I would only eat the tamales that our moms would make. I am now able to make my own! Loved the Barbacoa and Carnitas recipes and the Green Enchilada sauce! I used the Power Pressure Cooker for cooking the Barbacoa, Carnitas, and the tamales. The tamales ended up needing to go for 30 minutes instead of 20. For the first batch, I set it for 20 minutes. They weren’t quite done, so I had to put it back in for 5. For the next batch, I went ahead and set it for 30 and they came out fine. I also made refried beans in the pressure cooker and made a few tamales with those and the Oaxaca cheese you suggested. Yummy! For my next batch, I am going to add Mixed Roasted Veggies with cilantro to the order.
Question: How tightly can I pack the tamales in the pot to steam? I used the pressure cooker and used the steamer basket. I didn’t know if I had them packed too tightly and that is why they took longer to cook.
Gosh! I wish the filling recipes were with this!!
Doris, I think the filling recipes are included as links under the “ingredients” portion of the recipe. ?
My only comment, in the recipe, you forgot to post that you mix in cumin with the dry ingredients…. The dough tasted great with the filling I used.
Forgot to added I cooked my tamles 30 to 40 mins
Thank u for the ingredients and measurements will be goin to local lil Mexican store and gettin them and making tamales for the first time next weekend. Iv been lookin for a good recipe and this no lard recipe sounds delicious.
My husband and I made these last night! Unbelievable!!! We went with a simple refried black bean and cheese filling and chose kitchen twine to tie with. Also made your homemade enchilada sauce that I use on my enchiladas all the time! They were fantastic (as is everything we’ve tried from your blog!) I’ve already passed your recipe along to friends that saw our pics of them! Thank you for such a yummy recipe!!!
These were amazing, and so much easier than we anticipated!
Thanks for this how-to. I followed it using beef. The tamales got rave reviews! The wrapping video was very helpful.
Use all the liquid. For a second (more like a few minutes) I considered whether there was an error because it seemed like way too much liquid. But I was wrong, it is the correct amount as listed.
Love the masa recipe, I added some other seasonings to give the masa more flavor.
Very good recipe. Mine took longer to cook but worth the wait.
These tamales are absolutely delicious! We filled ours with three different options: 1) shredded chicken seasoned with taco seasoning, 2) black beans seasoned with Penzey’s Adobo seasoning, and 3) refried beans with pepper jack cheese.
The only thing I suggest is making sure the dough seals around the ones filled with cheese, so cheese doesn’t ooze out during steaming.
The hardest part about making these is waiting for them to finish steaming so you can ENJOY!
To top the tamales, I used this amazingly simple and flavorful sauce recipe, then I finished the tamales with a sprinkle of crumbled queso fresco. Yum!
For the sauce:
1 -15 oz can tomato sauce
1/4 cup water
1 1/2 tablespoons chili powder
1 teaspoon cumin
1 teaspoon dried oregano
1/2 teaspoon garlic powder
1/4 teaspoon salt (smoked)
1/8 teaspoon cayenne pepper
Simply mix and heat to serve!
This is just what I was looking for. Thank you, you have done a terrific job explaining everything and recipes to boot! Now I think I can handle making tamales…Yes,I too have been intimidated by the thought..but now I’m ready.
These were great! I have made several tamales recipes from other people and they have always just seemed bland or greasy but these were spot on and delicious. I followed the ingredients list and instructions exactly. I used avocado oil. We had made pulled pork on Sunday and I used the left overs for the tamales. I also made black bean and fresh corn tamales. Yum! Thanks!
I love to make tamales is very good and I will make it soon
This recipe has saved my Thanksgiving! I have been experimenting with different masa recipes all week and my tamales have either come out too dry or too greasy to the point that they have been practically inedible. With this recipe, they turned out great! They are the proper consistency, great-tasting, and not at all greasy! I did not make any changes to the recipe, but I did opt to use avocado oil rather than corn oil. Thanks again!
These were so good! Home made tamales are so much better than the ones you can buy. My twelve year old and I had a great time making them as a Christmas advent project and shared with our family. Thanks so much for making a delicious, straight forward recipe! Merry Christmas!
Just made these. It was my first time making them and the dough came out a bit wet which I didn’t realize until I was rolling the tamales. They still turned out incredible. They’re so moist and flavorful! I filled with cheese and roasted jalapeños. Thank you for sharing the recipe. I can’t wait to make them again!
Thank you so much for posting this tamale recipe. I also have been intimidated, even though I grew up in a Hispanic household. I had never tried making them on my own. Let me tell you, the masa was perfect following your ingredients and directions. Probably the best masa I have ever tasted. I followed your advice on using Avocado Oil. I only made 38, but they were gone in about a week, especially after my son came home from college on break…LOL So thank you and I will be making more in a few days.
My 12-year-old son ate seven of these (filled with masa, citrus pork tenderloin and the salsa recipe on this site) and asked me to make them for dinner the next night as well. Enough said!
Good and easy recipe for beginners.
The ingredients list calls for cumin however nowhere in the instructions does it say when or where to add the cumin. Also, everywhere I have looked online about how long to steam tamales everybody is telling me 60-90 minutes and your recipe says only 20 minutes. I’m just not sure about that. Today is the third batch of tamales I have made using your recipe and they turn out delicious every time. I add onion powder garlic powder and cumin powder and chili powder to the dry ingredients and it gives the end result so much more flavor.
Yup, worked great!
I freeze the mole I make in ice cube trays, then transfer to zip bags and when I want one tamal with a fried egg for breakfast, I can microwave a cube or two of mole to pour over.
So happy with how these turned out! I cooked them in the instant pot. I overstuffed mine a bit and they overflowed. A couple recommendations: (1) Add cumin to masa dough dry ingredients (2) it’s the correct amount of broth, follow the recipe (3) if you’re only doing one fold, don’t fill to brim (4) plop masa onto center of husk and spread with dampened fingers (4) you only need half of a 1 lb package of husks (5) mine were a bit tall in the instant pot, either make them shorter or lean them all diagonally in the instant pot (6) add extra water to instant pot. Mine ran out and couldn’t creat pressure, add enough to touch the bottom of the steamer rack (7) make sure when you close the lid, there aren’t tamales blocking the seal or the pressure switch. Thanks for the recipe!!
SHOULD HAVE BEEN 5 STARS! If you can fix before posting- please do!!!
Found this recipe last week, and I decided to go for it. My husband loves tamales and I’ve always been scared to make them. This recipe really broke it down and gave me the confidence to move forward. I made a batch yesterday- it yielded 36 tamales. The leftovers were eaten for breakfast this morning. :) I still had quite a few corn husks, so I decided to make another batch today. I thought it would be great to have some to freeze…I’m not sure they’ll make it to the freezer.
Here are some things I noticed as a first-timer:
1) My masa did not spread easily with a spoon as shown in the video. I plopped about 1/4 cup masa on the husk, dipped my finger tips in water, then patted out shape. It looks like you’re going to have really small tamales, but they get bigger when they cook. Also, remember to leave some space at the top so they don’t spill out. I thought the cumin gave the masa such good flavor. It took me a little bit to get the wrap down. What worked easiest for me was bringing one side up and allowing (or forcing) the masa to drop off the husk onto the top of the filling, then I brought the other side of the husk over and wrapped it pretty snug.
2) Filling- we don’t care for saucy tamales. We had three types of meats. 1-butter beef (stew meat in the slow cooker on low for at least 8 hours- 1/2 stick butter for every pound of meat, 1/2 packet brown gravy seasoning for every pound of meat, and cover with water. Used the juice from the butter beef for my tamale stock. 2- Pork carnitas- one of our favorite recipes (https://www.myforkinglife.com/ninja-foodi-recipe-crispy-pork-carnitas/). Again, added any juice to my stock for tamales. I think I ended up using 1-2 cups of chicken broth to get to 6 cups. 3- shredded chicken seasoned with chicken taco seasoning. Beef and pork were my favorite. The batch I made today, I just browned hamburger with red onions. So simple, but so good.
3)Pressure cooking time- I have a 8qt ninja foodi. I was able to fit 23 tamales in the basket. My first batch I had about 15 and pressure cooked it for 30 minutes and let it natural release for 10. I had to pressure cook for an additional 8 minutes. The next batch had 20ish and I pressure cooked for 45 minutes.
This is a great recipe. It is pretty time consuming, but worth it.